
Before repairing the repair in the old bathroom, the question of replacing or restoration of plumbing and communications arises. What is better to do: renovate the old bathroom, or get rid of it and buy a new one? Our instruction will help to answer this question, which fully describes all the tips and steps necessary to dismantle and install the bathroom with their own hands. Compliance with the correct sequence of actions will help perform all the work quickly and efficiently, besides, will not require additional costs.
Content
Methods of dismantling old bath
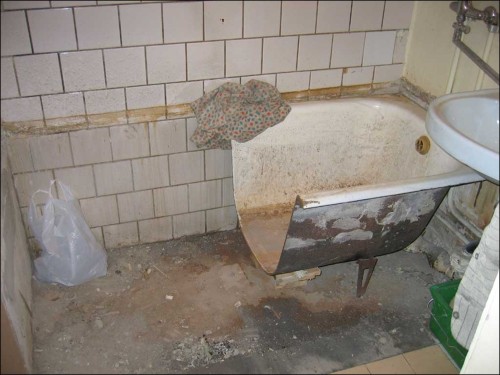
If the life of the bathroom came out, the siphons were rusted and came into disrepair, and the legs hold on the "honest word", it is better to replace the old bowl of the new. At first glance, it may seem that it is quite easy, but note that dismantling is a fairly responsible work related in most cases with increased trauma. Always use protective facilities, while observing the safety rules.

Dismantling bath with preservation
This method implies the removal of the bath, while maintaining the integrity of the bowl. The bath has a fairly large size and weight, so by dismantling the old bath, it is better to resort to the help of another person. Over time, the bowl can be fixed to the wall and the floor so firmly that all work will not be possible to produce it possible.
To remove the old bath, while maintaining it in the whole, go as follows, acting in stages:
- Starting work, make sure your own security. To do this: put on special protection (gloves, shoes, glasses, respirator).
- Make sure the legs are securely fixed to the bath. In the process of dismantling, the bath can fall on the leg or pinch your finger. It happens if one of the legs rotten or broken. Please note that often the legs are fixed using special wedges. Check that everything is fixed properly. Correct wedges if necessary.
- Disconnect the siphon and plums from the bath. Split the screws and disassemble the drain design. A variant is possible when the siphon, as well as the bath, is made of cast iron. In this case, during operation, they can close to each other. Then it is better to take a brandy with a disc on metal and just cut off the siphon in a place where it is attached to the bowl.
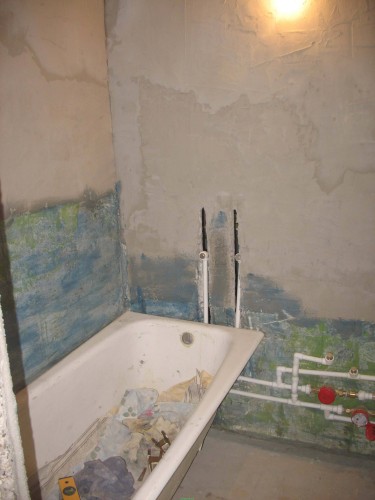
- On the perimeter, the bath is fixed with a cement-sandy solution. To remove the connecting layer, use the hammer with a chisel or a perforator with a shovel's nozzle. Gently take off the frozen solution if you want to save the tile. If not, then boldly knock all the elements that lock the bath.
- Now the bath does not hold anything, and you can proceed to the next stage. Armed with a nail or mount, shake the tool in the gap between the bathroom and the wall. Using the mount as a lever, move the bath from the wall to the distance needed to fit the person there.
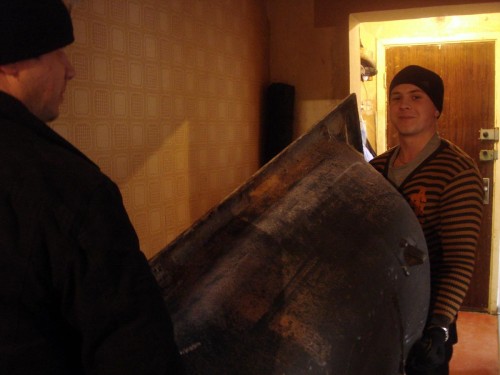
- Together with a partner, pick up the edges of the bath and lift the bath so that it is in standing position. Note that the cast iron bowl is very heavy. Its weight sometimes reaches 180 kg, so make sure in advance in the physical abilities of the assistant. If necessary, ask the neighbor to progress you at this stage.
- Holding the legs and side of the bowl, take a bath from the room. Expand the bathroom at an angle of 45 °. Put the first two legs in the doorway first, moving around the door jamb. Also enclose with the second pair of legs to completely endure the bowl of the bathroom.
- Remove the cast-iron bath from the apartment through the front door. Do not rush to dispose of it right away, it is better to take to the cottage. The used bath can be used as an artificial reservoir, the mangala, or even make an armchair from it.
Cast iron baths have a very long service life, due to which they are in fairly large demand. Therefore, starting to dismantle the old bowl, pre-make sure the restoration of the protective coating is possible. To date, there are various many ways to extend the service life of the bath. This way of dismantling the same for any kind of baths, be it acrylic or steel. The difficulty of performing such works depends on the weight of the bowl, as well as from the space required to dismantle the old bath with the subsequent removal.
Disassembly bath without saving
If you decide to completely repair the bathroom, you are going to replace the tile and all Sanfayans, you can make disassembly without saving a bath bowl. This method will become easier and faster thanks to a simple algorithm of action. But, as in the first case, special attention is paid to the safety technique, since the dismantling method without saving is even more studyable.

In order to remove the old bathroom enter as follows:
- At the preparatory stage, as in the first case, it is necessary to cut off the cup from drain systems. Make it can be using a grinder.
- To disconnect the bath from the wall, use the perforator. Using the nail or any other lever, move the bowl of the wall at a distance of 10-15 cm.
- Armed with a grinder, ride the bath in places where it bends, clearly in the middle. Any bath has the ribbon ribs necessary to impart the strength of the structure during the deformation process. The role of Röbeber in all three cases is played by its wings, which also need to be completely cut out, which will significantly weaken the entire design.
- Now take a sledgehammer, and carefully hit the bottom of the bath. Usually, one strike is enough. If necessary, repeat the blows until the bath is "folded" in half. When you dismantle a metal bath, it is enough just to cut it with the help of a grinder into two equal parts. The incision can also be made using the gas cutting method.
If you work alone, then take half of the cast-iron bath for you will be problematic. In this case, the bowl is broken into small pieces. For this, it is enough to hit the casing of the sledge hammer several times. Then the bowl breaks into several parts, which can also be divided into several small pieces, fold into the garbage bags, and make it yourself.

Getting Started for dismantling work, always pay attention to the features of the material from which the bath is made. This will help determine the dismantling method. Removing, for example, a shower cabin in the bathroom, it is better to save it. And the old steel or cast-iron bath can be invented further use.
Ways to install a new bath
The cast iron bowl weighs much more if you compare it, for example, with a steel or acrylic bath. Since the faience is most often installing stationary for a long time, it is worth highlighting several installation methods intended for a particular type of bath.

On bricks
In this way, usually use, mounting the cast-iron bath. The basis for the bowl, in this case, are two parallel walls laid out of the brick. The base is installed on the basis, after which all joints are sealed using cement-sandy solution or tile glue.

On metal corner
The prerequisite necessary to use this method is the presence of three walls to which the bath will be adjusted. Metal corners are strengthened to the surface of the wall around the perimeter of the bath, fixing with anchors. The base is also enhanced using a welded construction from a metal corner. But note that this is not the final way of fastening the bath. Most often, it is performed in a pair with brick, and serves to provide additional support for the bowl.

On factory frame
Used when installing acrylic and metal baths. The role of the base required for reliable fastening of the bowl is played by the factory metal frame. It consists of parallel guides that are attached to the bottom of the bath. Usually the frame is included with the bath. It is attached to the bottom of the bowl in advance places with screws. The legs are then screwed to the guides. The collected design is placed in the place where it will be installed in the future. Turning the bowl along the horizontal level, fix the bath. For this, the legs are unscrewed until they are unscrewed into the floor surface.

On legs
To enhance the base, four legs are used. They are usually sold already complete with a bath. Optionally, you can replace them with any like. First, they are attached to the bowl with bolts, through wedges. Then the bath is installed in the required location. If you install the bath on the wooden floor, then put the metal plate 50x50 mm under the legs, 5 mm thick. Thus, the design will become more stable.

General principles of mounting
Before starting the installation of the bath, carefully consider all the features that will allow you to identify the desired installation method. Different types of bathtubs are mounted using various ways. However, note that there are several important rules applicable to any kind of bath.

To qualitatively and correctly install the bath, pay attention to the following rules:
- the surface of the floor must be treated with waterproofing. In case of flooding, it will help moisture not penetrate further towards the neighbors through concrete overlap;
- all drain communications must be summarized and ready for operation;
- the bath must be installed clearly by horizontal level;
- for additional sealing, the place of adjoining the bath to the wall surface must be filled. To do this, use a special sanitary silicone, which has a resistance to fungal formations;
- the minimum height of the bath layout (from the floor to the floor) 70 cm;
- call the size of the revision screen. The accuracy of the further installation will depend on the correct measurements.

The fulfillment of all the above rules is the guarantee of the high-quality installation of the bath.
Installation of steel bath
After you dismantled the old bath, it's time to start installing a new one. This process is quite simple, but it should be considered with all responsibility and understanding.

The following actions will help to high qualityly mount the metal bath:
- Prepare the floor base: Make a screed and waterproofing. Free yourself work space from unnecessary items.
- To prepare a bowl for further assembly, proof places to contact the legs with a bathroom rolled rubber. For waterproofing and noise suppression can be glue "invisible" part of the whole structure, using the same material. Besides, these actions are more reliable lock the bowl shape, which tends to expand under the action of hot water
- On the wall around the perimeter, we mount a metal corner of 25x25 mm using a drill with a metal drill and anchor. Consider the height of the bath and legs. Do not forget that the corners must be located clearly in the level to serve as a quality support of the design.
- Place the label bath so that the plum place is from the side of the sewage pipe.
- To the bowl, with a raised side, fasten two legs, which come with the bathroom. Do not pin the nuts too much, it can lead to a breakdown of the thread.
- "Roll off the bath on the other side to set the second pair of legs.
- On the sides of the bath, which will join the wall surface, apply a thin layer of tiled glue. This will make it possible to achieve better stability of the design.
- Place the bath on a metal frame under a slight inclination to the drain hole. This is necessary in order for the water completely leaving at the time of the drain.
- Install the siphon and overflow system. Do not forget to use all available pads needed for better sealing of compounds.
- Fill the bath with water to half of the volume. Wipe dry all connections and floor under the bath. Under the bowl, spread several newspapers.
- Drain completely all the water. If the newspapers remain dry, then you have done everything right.

Removing the bath, take into account weak points of construction. Use the correct tool, if necessary, use the services of an assistant, and do not forget about safety regulations and protective equipment. We hope this article helped you understand the intricacies of the work related to the dismantling of the bath.
To dismantle the old bath, you will help to deal with the following video:


