Walking around the cold floor is unpleasant, and in addition, the thermal energy in the house with a poorly insulated floor is lost in the house. To save it, you need to take a number of measures. About, with the help of which technology and how to insulate the floor in a private house or apartment with your own hands, will be discussed in this article.
Content
Requirements for floor insulation
In order for the insulation of the floor to be effective, safe to health and served for many years, it is necessary to choose the insulation in the following criteria.
- Density of material. This indicator characterizes the ability of the insulation to hold heat. In the event that the floor level cannot be enhanced significantly, it is necessary to choose the heater with the greatest density and less thickness.
- Compressive strength. For insulation stistings, this parameter is particularly important: the material should not be deformed due to the high load on the floor surface.
- Resistance to moisture. The insulation should not lose its qualities at moisture. Mold and fungus should not develop and destroy the material.
- Waterproof: the insulation does not have to absorb moisture. Otherwise, its thermal insulation qualities will decrease.
- Life time.
- Environmental Safety. The insulation should not be distinguished by harmful substances, cause allergic reactions.
Types of heat insulation

Heat insulation
We list the varieties of insulation, the advantages and shortcomings of the insulation of the floor with their own hands for each of them.
- Polyfoam (polystyrene foam). The cheapest material with sufficient moisture resistance is not destroyed during wetting. It should be taken into account its weak mechanical strength. In addition, the foam can allocate phenol, harmful to health, and not recommended in residential premises.
- Basalt (mineral) wool. It is characterized by low density and high heat and sound insulation qualities. This insulation is hygroscopic. For insulation, it is placed in a raised floor between bars.
- Polyurethane foam: material, distinguished by high strength indicators, service life expectancy. Well tolerate moisture and is not afraid of temperature drops. Environmentally unsafe: Hazardous substances.
- Extruded polystyrene foam: produced in the form of plates of various density and thickness. It has greater mechanical strength than foam. It also surpasses it in terms of water absorption, thermal conductivity and service life.
- Cork: Natural insulation with a high degree of thermal insulation. Used as a substrate for finishing coating (for parquet board, laminate).
- Foamed glass. Does not absorb moisture, is an environmentally friendly material with high thermal insulation properties. The duration of the service can only be limited to the fragility of a material that is not able to withstand high loads.
- Ceramzite: It is a granules of 5 to 50 mm. Environmentally friendly material. It is added to concrete as a binder component (replaces crushed stone) to improve its thermal insulation qualities. Disadvantages: absorbs moisture, has a significant weight, which limits the scope of its use.
- Perlite: Material similar to clamzit in a method of use, but characterized by higher thermal insulation qualities.
Important: For each material there are certain restrictions on the application, which is associated with such characteristics as mechanical strength and environmental safety. Compensate the difference in thermal insulation characteristics can be increased by the insulation thickness.
Concrete Insulation Technology
You can warm the concrete floor in two ways: the first assumes the pouring of the screed over the laid insulation, the second is the installation of the raised floor with the insulation (in the form of a multilayer "cake"). For the agility, only the technology of raised floor is applied. Consider examples of how to insulate the floor under the screed with your own hands.
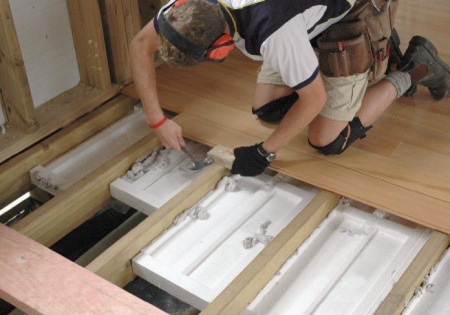
Concrete floor insulation with clamping using clay
How to insulate the concrete floor with your own hands using a concrete screed using clay (or perlite): Step-by-step instructions. Consider examples of how to insulate the floor under the screed with your own hands.

Screed leveled on beaches
- Preparatory stage. The base surface is cleared of garbage and dust, processed by primer. This is necessary to bind small particles and improve adhesion.
- Waterproofing is stacked. You can use a thick (at least 50 μm) polyethylene film. This is necessary in order to prevent water flow to the lower level. The film should be solid: the adjacent sheets are stacked by the mustache, and the jokes are sampled with a wide scotch.
- The bottom of the floor is determined and the beams are exhibited by level. A steel pipes or profile can be used as beacons. They are "fit" with the help of a cement-sandy solution, which should be bought during the day.
- The concrete mixture is mixed in the proportion of 1: 1: 3: 2, where, respectively, part of the cement, part of the water, three pieces of sand and two - ceramisitis.
- A concrete surface with a mixture with a mixture is poured and lines the screed with the rules on the installed beacons. The latter dismantle after drying the screed.
- Fill the cement-sandy mixture of seams resulting after dismantling beacons.
IMPORTANT: Plotted flooring after complete drying of the cement screed. Otherwise, decorating material may be deformed.
The features of the insulation of the floor of the floor by clamzite are such that after the fill and drying the surface becomes small irregularities due to protruding faces of the insulation. To eliminate this defect, the screed is poured by a self-leveling mixture. This method is applied if the thickness of the leveling layer will not exceed 5 mm. Otherwise, you will need an additional screed with a mixture prepared without clay.

Pouring self-leveling mixture
To note: this method of floor insulation allows the installation of water or electric heating under the tie. In this case, at first top of the base floor, a rolled foamed polyethylene with a foil outer layer is stacked, reflecting heat into the room.
Concrete floor insulation with tie over polystyrene

Structure of insulated polystyrene floor
Features of the insulation of the floor by Polyopolmineol suggest its fill with cement-sand tie in the next sequence of actions.
- The base floor is prepared: purified from garbage and dust, it is ground, covered with a waterproofing film.
- The plates of extruded polystyrene foam or fasteners are stacked. The characteristics of the insulation of the floor insulation are used: the lack of temperature expansion allows not to leave the gaps between adjacent plates and along the wall. Small gaps are filled with mounting foam.
- Installed beacons for a screed.
- The leveling screed with a thickness of at least 50 mm is applied over the insulation and leveled on beacons. The reinforcing mesh with a cell size of 50 × 50 mm, cooked from rods with a thickness of 6 mm, is placed in the middle layer of the screed.
- If this requires the technology of laying a fixed coating - the surface of the screed is powered by a self-leveling mixture.
- After drying, the screed is placed ceramic tiles, laminate, parquet or parquet board.
It is also possible to apply polystyrene foam on the base by spraying: in this case, the monolithic layer of insulation is formed.

Application of polystyrene foam deposition
Floor insulation according to Falsefol technology
In the event that the height of the room allows you to insulate the floor in the following way.
- The base surface is cleared of dust.
- Mount the lags from the bar with a cross section of 100 × 50 mm. The laying is performed at mandatory near the walls, and then every 600 mm. It is impossible to place lags close to the walls: there must be a compensation clearance of at least 5 mm.
- Lags are exhibited by level with lining from plywood liners or dense cardboard.
- Between the lags, clamzite fall asleep or stove insulation plates. Features of the insulation of the floor of the Minvata prescribe the protection of the material from moisture. For this, the base floor is covered with waterproofing film.
- On top of the plates of mineral wool, steamed vaporizolation and fasten it to lags using a construction stapler.
- Place boards with a thickness of at least 40 mm, on top of which the purple floor is mounted.

Laying Plates of Minvati Between Lag
Features of the insulation of the floor by foam: it is placed between Vosport lags. Clauses are filled with mounting foam. The use of foam plastic as a heater under the tie is not recommended: the fragile material will not stand the load.

Installation of blackboard boards
Not loaded floors can be insulated with clay or perlite according to the following technology.
- On the prepared base base over the waterproofing film, a layer of insulation is embanked and is leveled by the rule.
- Parosolation is laid.
- Two layers of plywood with dimensions of 1 × 1 m or a little more, with a thickness of at least 16 mm "floating" way: sheets are shifted relative to each other half of the width. The joints of the sheets of the second layer should also be shifted and relative to the joints of the first (lower) layer.
- The upper and lower layers of plywood are connected by self-drawing so that the hats are hidden "wise".
- Mounted purple floor.

Plywood sheets laid with offset
Instead of plywood, you can use OSB plates of the same thickness.
At the end of the article on how the insulation of the floor is performed with their own hands: video with detailed explanations of the specialist.


"Ceramzite: represents granules with a size of 5 to 50 mm. Environmentally friendly material. It is added to concrete as a binder component (replaces crushed stone) "
Ceramzit is a warming and facilitator. The binding component in concrete is cement.