Ensuring the indentation area with water is one of the most important tasks of any dac. Unfortunately, not always nearby is a reservoir, but can not be about the central water supply and speech. The best solution to the problem is a brick well: it can be built yourself. The same well can be coated for discharge of waste water.
Content
The advantage of the brick construction is that a special lifting equipment is needed to work with concrete rings, and the brick laying of the well does not even require assistants. But before proceeding with work, you should find out how to build a well. This will be further a story.
The first stage of construction of a brick well
The thickness of the wall of the well is directly proportional to its depth and is usually from 250 to 370 mm. For masonry, ceramic brick and sandy-cement mortar are used.
To work requires tools:
- bayonets and scaffolding shovels with short and long handles;
- rope or cable with hook;
- metal buckets;
- trenga for chain winch;
- water pumping pump;
- ladder.
This must be taken into account when building a well.
- Using the above-listed tools rotates the necessary depth.
- After the boobing for the well is dug, you should thoroughly align the bottom of the well.
- It is necessary to make a round frame from the metal: it will be located downstairs, the diameter of the frame is 1 m. Then two more frames are made of wood with a thickness of 8 cm, and each subsequent diameter should be greater than the previous one.
- The main frame must be 5 cm more extra, its width coincides with the size of the masonry.
- From the outside of the main frame, a metal knife is established, the form of which resembles the frame itself.
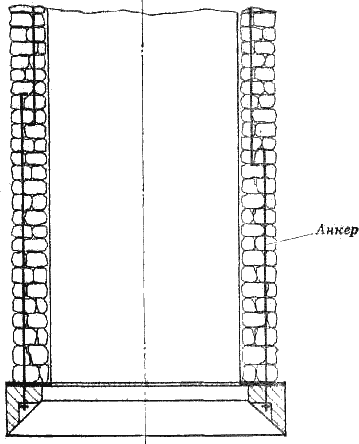
- To obtain a solid design, it is necessary to increase the frames using anchor bolts with a diameter of 15 mm. Anchors are inserted into the frame and tightened with nuts, laying the washers.
- The collected and proven frames are descended into the pit, after which they check their position: it should be strictly horizontal.
- On top of the main frame put the following, connecting them with anchors with washers and nuts. Anchors must be vertical.
- All three frames additionally fasten the logs, boards and acresses.
Features of brick masonry
To build a well with your own hands, you need to follow the rules of laying bricks. To get started, you need to stock task with such a tool:
- brackets with a transverse bar (sodes);
- picky or hammer;
- extender;
- kelma;
- level and plumb;
- as a carbon;
- shovel for mixing the solution;
- rule;
- cord-fiber;
- capacity for the preparation of the solution.
You can use only ceramic brick. For this purpose, it is recommended to choose a failed, but the silicate cannot be used (it does not retain its strength properties in the soil).
In the walls of the well for the septic, you can leave the "windows" through which water will go into the ground. From the outside of the wall around the well, it is necessary to make a sprinkle from the broken brick.
It should be known that the spoonful side of the brick is his long side, the shortest is the stumps. The bottom and upper plane is called bed.
To prepare a masonry solution, you need a portland cement grade 400 mixed in the ratio of 1: 3 with sainted sand. After that, add water in such a quantity to ultimately get a creamy mass by consistency. All components are thoroughly mixed.
Next, the order of work is as follows:
- To lay out and align the solution to create a pillow with a thickness of 1 cm.
- Bricks for the first row must be moistened with water and put on the solution.
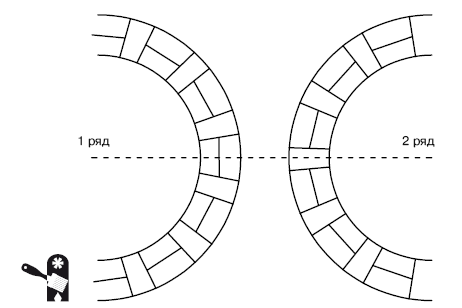
- The first two rows of brick masonry are placed by a tile method, and the gaps between them are filled with a solution.
- After tychkaries, there are several rows of spoonful, and then repeat the tiley again. Such a bandage makes the laying more durable.
- Sewage brick wells are built round. In order for their form to be correct, the template should be used: it is fixed with hooks to bricks. Such a template will help in the absence of masonry skills.
- The pattern is moved as the rows add, installing it opposite the subsequent row.
- In order for the anchor to prevent the brickwork, it is necessary to cut down the hole, and then fill the gaps with cement mortar, comprising it.
- In order for the ranks to be better connected with each other, every 5 rows should lay a wire mesh or wire. It should be at a distance of at least 30 mm from the external and indoor edge of the masonry.
- Crucifying bricks is needed with such a force so that you can easily remove the template.
- Masonry should not be restarted into the intermediate frame. To avoid this, you must first install anchors that fasten the adjacent frames, and then continue the masonry.
- During the work, it is possible to periodically check the position of the frames using a plumb. If necessary, adjust the tightening of the anchor bolts, after which the masonry can be continued.
- At a distance of 5 cm from the beginning of the intermediate frame, the masonry is stopped and filled with a solution between the frame and masonry. It is recommended to add a filler as a gravel. The solution is rambling with a board.
- The pillow formed in this way is necessary for pressing the frame. So that it fell tightly on the solution, in the brick knock out "nests" under the protruding ends of the anchor bolts.
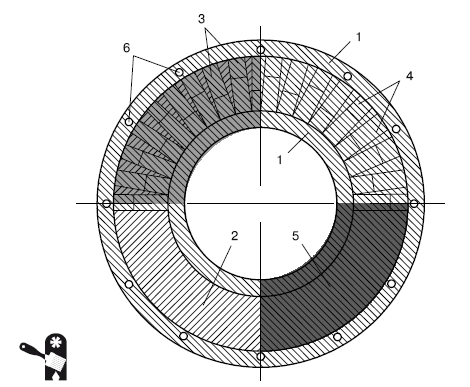
Masonry scheme in a half brick: 1 - concrete pillow; 2 - a litter from the cement mortar; 3 - the first row of brick masonry; 4 - second row; 5 - the third row; 6 - Frame from fittings.
Laying from spoons and chips.
Construction Strengthening Activities
So that the well served for many years, it is necessary to take into account some nuances and take the following actions.
- If the flow of water into the well will be the side wall is left in the filter mounting hole, which can be made of porous concrete.
- Little to build a well in the country or near the residential building - it is still necessary to serve it. In the walls of a deep well insert steel brackets capable of withstanding the weight of an adult. To protect metal from corrosion, a double coating of moisture resistant paint is used.
- It is recommended to shock the outside of the masonry. To make it convenient to do, the pit should be appropriate. For plastering, a thick cement-sandy solution is prepared in proportion 1: 1.
- The plaster is applied to one intake with freshly prepared solution and is aligned with culma or semi-surser. It is important to use a solution within an hour: later its binders worsen.
- It is possible to reduce the friction of the soil about the masonry using the sheaving board of the distance between the main frame and the nearest rings. Boards are installed vertically, but in such a way that they do not interfere with laying a brick.
- After performing the first tier or capture, you need to plaster the inner walls. The solution is applied in two layers: initially a thin layer (about 5 mm) - liquid so that it penetrates all microcracks, and then - a thicker and thick layer, which is thoroughly align. Smooth plaster can be made using lighters from metal profiles: relying on them with the rule, pull down, moving from top to bottom, align the solution. The ring from the board at the junction of the frame is not covered.
About the nuances arising from construction
- After plastering the distance between the first and second frame (first grip), you can begin the extraction of the soil. During the work, the vertical position of the design is controlled.
- The next stage is the laying of the brick between the second and the third frame (the second capture) and its shocking.
- If the water in the well comes from below, and not from the sides, the "sockets" is close to the filter and then covered with plaster.
- Entering in large quantities water (if it prevents the process) should be pumped up with pump: it will give the opportunity to "grab" the solution. Its further hardening is possible under water.
- In order to avoid further immersion of the well in the ground, a large cobblestone is stacked under the legs, but he should not act very outside.
- At the end of construction, on the bottom of the well, you need to pour a semi-meter layer of rubble: this will serve as a filter.
- It is necessary to disinfect the wall of the well with a solution of chlorine. Water can be used two weeks later, making sure its purity with the help of a specialized laboratory.
- To protect the water from dust and leaves, the well is required to cover with a lid.
In conclusion - a video with examples of design the aerial part of the well.


