Any construction is associated with difficulties, regardless of whether a large house is built or a regular cellar, because if you do not comply with the right technology, the built-up construction will not meet the necessary operational qualities. At the cellar, as well as on any other building, some functions are assigned. So, vegetables, fruits, homemade salts, etc. have to be kept here. We can say that the cellar replaces the refrigerator and does not consume a large amount of electricity. Therefore, it is important to create a correct microclimate in the cellar that will contribute to the fact that the entire harvest and conservation will be maintained for several years and does not lose their food properties. It is possible to achieve the desired microclimate in the room by compliance with all technological processes of construction of the construction, as well as the right ventilation arrangement. How to build a cellar in a private house with your own hands and ventilation in it - let's tell me further.
Content
Characteristics of the cellar
The cellar is classified for several signs:
- By type of equipment.
- By area.
- In terms of blend.
If the first and second parameter of the classification is still more or less clear, then the level of the swamping should be described in more detail. After all, if you wish to equip ventilation in the cellar of a private house with your hands, then you should know about it first. So, the cellar distinguish:
- Hooded.
- Small breeding.
- Ground.
Before building a cellar, it is important to conduct a survey of the site and determine the level of groundwater occurrence. After all, any of the right microclimate can also be speech if the premises of the cellar will constantly sleep. The level of water flow can be determined using special devices or simple folk methods.
- The ground cellar is built in the event that the groundwater takes place very close to the surface of the Earth. Otherwise, even with the arrangement of a good drainage system, it will be difficult to avoid flooding the construction. The ground cellar is being built on a mound from the ground. On the sides, it also falls asleep earth, which serves as a thermal insulation layer. From above, the grass is sometimes planted, which has both decorative and thermal insulation properties.
- The small-breeding cellar is being built if the groundwater takes place at a distance of more than 1 m from the surface of the Earth. According to the design, it is something average between the bellped and ground cellars, that is, its upper part is above the surface, and the bottom - built into the ground. If the cellar door is located below the ground level, then to avoid flooding with thawed waters, a good drainage system should be equipped nearby.
- The ruble cellar can only be built if the analysis of the site showed that groundwater lies very far from the surface. In addition, in any case, it will be necessary to equip the drainage system, as well as lay a layer of waterproofing. The cellar of this type can be topped with a lid. Sometimes it is built combined with the main building or hozpostroy. In this case, the country house or hozpostroy will serve thermal insulators for a cellage that is underground.
For construction use a variety of materials. Sometimes even the walls of the structure are not faced. This is permissible if the cellar is built into the thickness of solid clay soil.
Ventilation cellar with their own hands
The most popular embodiment of the cellar is considered a semi-breed design of slag block and concrete. The procedure for the work is as follows:
- Initially, the site is examined. The level of groundwater occurs is determined.
- Next, with the help of earthmoving equipment, they dig a pit in the place where the cellar will be built. If the construction is not too shrouded in the ground, you can dig a small pit for manually, without the use of special equipment.
- Then perform the markup of the site. According to the made markup, tester under the foundation.
- Usually under the camp of this type, the belt basis is installed. For this, the framework of the reinforcement is mounted and then it is concreted.
- The foundation is poured over a layer of sand and gravel, which will ensure the insulation of the room. Next lace a layer of solid clay.
- After the foundation is finally frozen, go to the installation of the walls of the cellar and the arrangement of the ventilation system.
- Walls build out bricks. If necessary, they are insulated with a layer of clay. The size of the walls are regulated depending on the initial calculations. The correct installation is checked using a construction level.
- If the state of groundwater on the site is unstable and it is possible to increase their level, then the drainage system is equipped. To improve the outflow of water, lay a layer of medium-sized stones. The flow of water is directed to the drain pipe.
- The roof of the structure is covered with rubberoid.
Ventilation in the cellar with your own hands
As noted above, it is due to the qualitatively equipped ventilation, it is possible to achieve the formation of the correct microclimate in the placement of the cellar in which many years can be maintained. If the ventilation of the cellar under the house of the hands is made incorrectly, the wet air will always be present in the room, which will contribute to rapidly sparkling vegetables stored there.
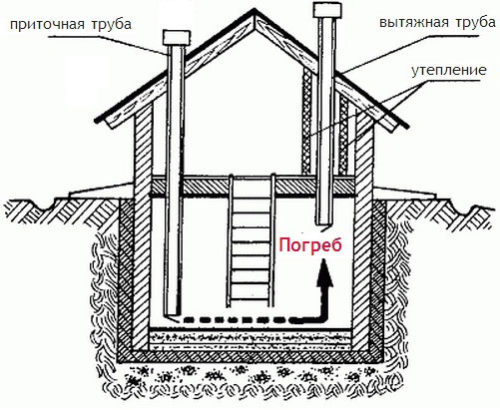
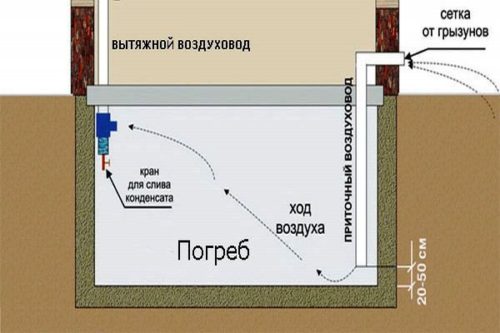
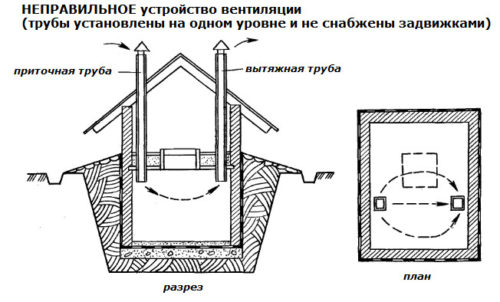
The highest quality air exchange can be created using natural ventilation. Such a system is organized using two pipes (air ducts), one of which will ensure the influx, and the other - air outflow. As a result, different air temperature over the floor and under the ceiling of the structure will be present. In any case, initially you need to make a ventilation scheme in the cellar with your own hands. It denotes the location of the pipes and holes for them.
Most often for the organization of the natural ventilation system, galvanized or asbestos pipes coming out. They are usually protected from garbage and precipitation with a visor. To exclude small rodents, a grid with small cells is installed on the pipes. The degree of thrust in the ventilation system is regulated by a special damper.
How to make ventilation in the cellar with your own hands
If you decide to equip ventilation in the garage cellar with your own hands or the ventilation system in the country house, you should familiarize yourself with the basic requirements that are presented to air ducts:
- Exhaust duct. Designed for the withdrawal of stagnant and raw air. It is mounted in the corner of the room. Its upper part goes through the roof hole. The distance from the roof of the cellar to the end of the exhaust air duct should be 40-45 cm. In the regions where strong frosts are present, it is necessary to equip the heat-insulating layer in the exhaust air duct system. This will require mineral wool. The thermal insulation layer prevents the condensate cluster inside the pipe.
- Patch duct. Through it, clean air enters the cellar. It is usually placed in terms of the room, located opposite the angle, in which the exhaust air duct is mounted. The bottom of the pipe is located at a distance of 70 cm from the floor.
The air exchange in the cellar is achieved due to the difference in the specific weight of warm air, available indoors, and cold, which is located outside. In the regions where strong frosts are available, and there is a big difference between the temperature inside and outdoors, it is possible to occur drafts that harm the right air exchange. In this case, the air flow can be adjusted using valves placed on ventilation pipes.
To organize the right air exchange, it is recommended to use large-diameter pipes made of steel, plastic treated with varnish to protect against the destructive effects of sunlight. The ends of pipe-ducts should be placed vertically or at an angle of no more than 45 degrees.
Forced ventilation in the cellar
Applying a piece of paper to the edge of the pipe, you can test the correctness of the air exchange system. Easy paper vibration should be felt, under the influence of air flow. If the air movement is weak, this means that the ventilation system is equipped incorrectly and needs to improve efficiency. Otherwise, the optimal microclimate will not be maintained - the air will be asleep and raw, which will entail a damage of food stored in the cellar.
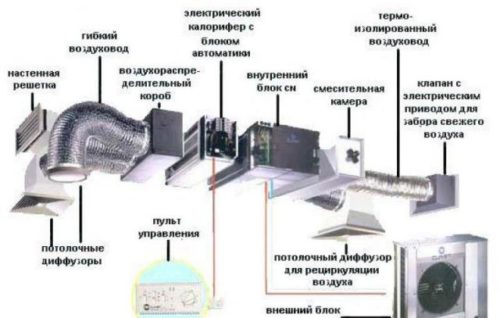
In some cases, in order to maintain the optimal coefficient of humidity, you need to equip forced ventilation in the cellar with your own hands. This is necessary when the placement of the cellar is too large and the natural ventilation system does not cope with the functions entrusted to it. Either the installation of forced ventilation is resorted to when it is necessary to create a special microclimate, for example, to store elite or perishable products.
In this case, it is possible to strengthen the air exchange with a fan built into the pipe. It will blow out the outflow of the air flow that is delayed indoors. Usually, the power of such a device does not exceed 100 W. Thanks to such a simple device, it is possible to keep even the most demanding products to the temperature regime. However, it is necessary to remember that when using forced ventilation, the need to carry out wiring to the cellar appears. Wire laying is needed even if it is planned to set the lighting. It should be remembered about the rules of safety, because raw land is characterized by high electrical conductivity. In any case, all the wires that go to the fan must be covered with insulating material.
Ventilation of the cellar with your own hands: photo
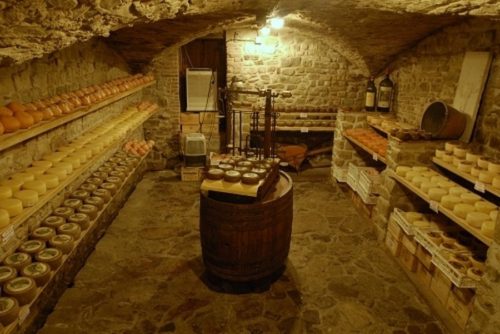
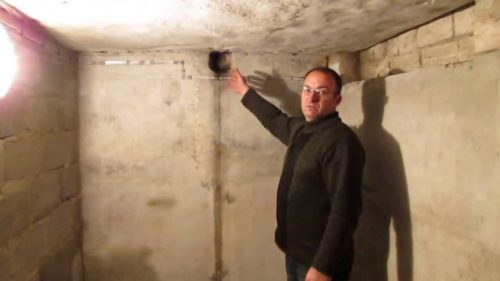
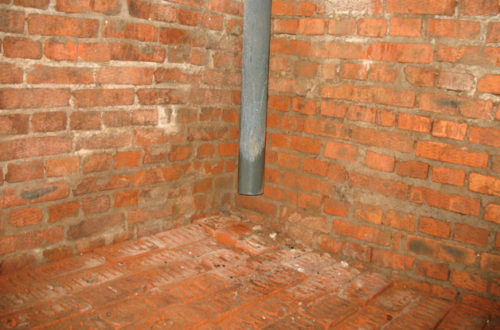
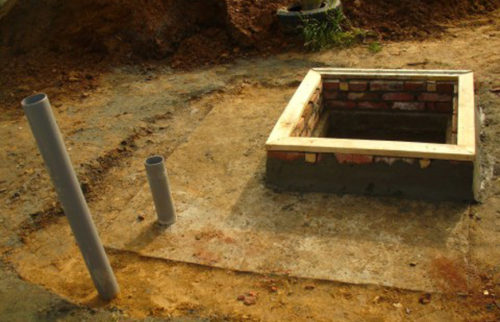
You can visually see how to equip ventilation in the cellar with your own hands and the scheme in the photo.





And if there is a ground floor in the house (the house stands on the hill), there is also ventilation, and heating?
the default ventilation should be, and heating - if you want to live there or constantly. If just a storage room, it is optional, with a normal heating system on the top floor and so it will be warm.