Modern housing is hard to imagine a man without a sanitary room. Bathroom and toilet in the houses and flats are already perceived as a reality and is not surprising. The main piece bathrooms, of course, is the toilet. The correct choice and installation of this device depends on the comfort of living in the house. For information on how to install the installation of a toilet bowl with your hands, describe below.
Content
- types of toilets
- Dismantling of the old toilet
- Step by step instructions for installing the toilet with their own hands
- Features bowl mounted on a wooden floor
- Installation Rules bowl on the tiles with their hands
- How to install corrugation to the toilet with your own hands
- How to install the toilet seat with your own hands
- Features of the installation of the hygienic shower for toilet
- Installing the toilet with your own hands: Video
Types of toilet bowls

The toilet was invented relatively recently. In the last century, the inventors thought to make a bowl with a hydrotherapist so that the unpleasant smell was not seeping from the sewer tube to the room, which significantly increased comfort in it. For its history, the toilet passed a lot of modifications. Currently, there are even high-tech toilets, "stuffed" by various electronics, which follows the health of their owner.
Despite the seeming versatility, there are many types and models of toilet bowls that differ in each other. Conditionally, all the toilets can be divided into several groups.
By the method of fastening the toilet, there are:
- Wall. These are modern models that are attached to the wall on special brackets. A feature of the installation of the suspended toilet with their own hands is that a powerful design that supports it is set to a false wall where the drain tank is hiding. The advantage of this model is that it does not take up much space, and looks pretty attractive. However, the cost of such devices is very high, and only professional plumbers can be performed, due to its complexity. That is why it is very rare to meet them. In addition, the repair of a wallile toilet is difficult.

- Wasted. They differ from the first the fact that the bowl of the toilet bowl itself is installed on the floor, and the drain tank hides behind the false wall. Although they stand a little cheaper, similarly, as the first model, do not differ in their practicality. For example, when the leaks occurs from the tank, and sooner or later it can happen, the neighbors know about it before the owner of the housing. And the repair of the tank in the wall is the pleasure "below average."

- Mounted. Such models are almost never used in residential premises due to extremely uncomfortable use. According to sanitary requirements, they can be installed in places of large cluster of people, where the use of conventional bowls is not suitable.
- Outdoor. These are the most popular types of toilet bowls. They differ simplicity, ease of installation, maintenance and repair. These qualities, together with a relatively low price of devices, determine their popularity.
On the installation of the tank, the toilets are:
- With a separate tank. These are old models that can be rarely found on sale. The drain tank in such models is attached separately on the wall and is connected to the bowl with a plastic pipe.
- With a tank ended. These are modern models. The drain tank is attached directly to the bowl. This makes the design more aesthetic and practical.

On the position of the drain nozzle:
- Direct nozzle. These toilets are used in the houses of a newer building, where the drain flange is built into the wall.
- With oblique nozzle. Apply where the hole is closer to the floor.
- With vertical nozzle. Such models are very rare. Previously, especially in Stalinki, the graduation flange was mounted vertically to the floor. It is for such cases that such models have made.
By connecting to the water supply:
- With side connections.
- With lower connections.
The last option is more aesthetically attractive, because with such a type of connection the hose is located below and immeasured. It is worth noting that these two options differ in the design of the float valve.
Dismantling of old toiletza

It would seem that in this operation there is nothing complicated, but there are several nuances that you should know:
- Disassemble the old toilet it is necessary only with a removed drain tank. First, it will be much more convenient, and secondly, the likelihood of damage to the bowl during dismantling significantly decreases.
- Disconnect the toilet from the exhaust cuff must be carefully. Especially in old houses. The fact is that they installed the sewage from cast-iron pipes, which are very "not like to love" sharp blows. Otherwise, they can just burst. And if the tee burst, which is hidden in the overlap, then with a huge probability you can "make yourself enemies" from the neighbors from below.

- Usually builders installed toilet bowls on a small podium (taffeta). He was a small segment of the board, which was screwed to the floor of a dowel. And the toilet itself was installed on the podium and was attached to self-drawing. If it is so that disassembly does not take much time. Particularly lazy builders (concerns more buildings 70s - 80s) put the toilets simply on mastic. Dismantling of such a device will not take time at all. It's easy enough to hit your hand on it and it will disappear by itself. If the leg of the bowl is filled into concrete, and there are also such "arts", then you will have to tinker, and without repairing the floor there is no longer anything.
The entire dismantling process is performed in the following sequence:
- Water supply is turned off.
- Water residues merge from the tank.
- Disconnect the water supply hose.
- The tank is removed.
- Remove the toilet bowls.
- The bowl is removed from the coupling and dismantled.
Step-by-step instructions for installing the toilet with your own hands

Step-by-step work:
- Before starting the installation, it is necessary to check the completeness of the entire system, as well as the presence of possible defects. The ceramic bowl of the toilet should not have chips and cracks. Otherwise, when loading, it can just burst.
- Be sure to check the performance of the shut-off valve. To do this, it is enough to close the valve and try to blow through its air. He should not pass. If the valve works, the toilet will constantly spend water.
- After the kit is checked, you can start the tank assembly. In addition to the ceramic bowl, it includes a descent system and an intake valve. The latter is attached to the bottom of the tank with the help of a caproic nut. Since there will be water inside, it is impossible to forget about the installation of rubber bushings and pads, otherwise it will simply flow.
- Then you can proceed to the installation of the bowl. This process largely depends on the quality and type of flooring, as well as the features of the location of the drain hole.

FEATURES OF MAINTAINING TOOTE TO WOODEN
The wooden floor in modern apartments is quite difficult to find, and especially in the bathrooms. The fact is that in such premises a very wet environment, which is destructive for wood. That is why almost always in the toilets, the wooden floor is changed to the concrete tie. Installation "On the Board" is often a feature of the installation of the toilet in a private house with their own hands.
- If, after all, "lucky" to install the toilet on the wooden floor, then in the place of its installation it is necessary to strengthen the design. The toilet must be attached directly to lags.
- A board with a thickness of at least 50 mm, installed around the perimeter, is stacked, to which the toilet is screwed onto the screws.
- All wood before installation should be carefully processed by antifungal agents, oil and then painted. The board must be easy to stop so that it is smooth.
- After graduating from the preparation of the exhaust discharge, the toilet bowl is inserted into the drain hole and is mounted on the seat. Before inserting, a slight silicone sealant can be applied on the nozzle.
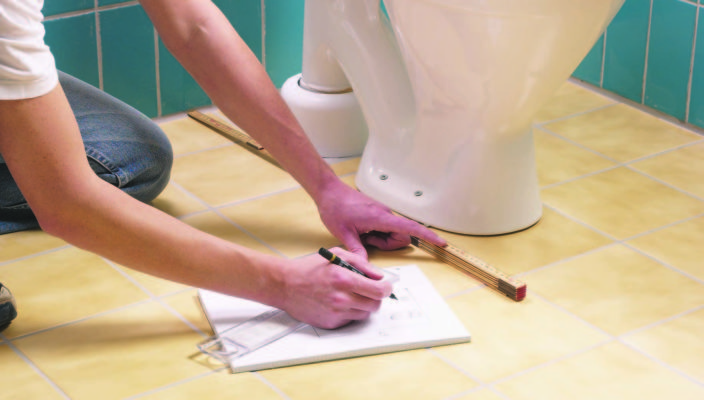
Rules for installing the toilet to the tile do it yourself

- When installing the toilet on the ceramic tile, a wooden substrate can not be installed. The only condition for this type of installation is an absolutely smooth surface. Otherwise, the bowl of the toilet will be fused and can burst.
- Fastening the bowl to the tile is carried out on the anchor bolts. To do this, the bowl is installed in place and with the help of the drain (marker, pencil), mounting holes are scheduled. Then, with a drill with a winning tip, holes are drilled. It is necessary to do it very carefully so as not to split the tile. First, the holes are noted using conventional screws, then a small hole Ø4-6 mm is drilled, which is then drilled under the diameter of the dowel (10-12 mm).
- After that, a dowel is inserted into the hole. Next, they mount the bowl of the toilet bowl into the workplace, while inserting the outlet into the drain hole. Then she is screwed with screws.
- When installing a bowl, you can not allow sharp blows, otherwise, it can simply split.
How to install corrugation to the toilet with your own hands

If you install the unit of the toilet pipe into the drain hole, you can use a corrugated pipe. At one of its ends there is a rubber sleeve, which is inserted into the drain hole, and on the other - the receiving opening in which the toilet pipe is inserted.
Installation of corrugations is carried out as follows:
- The throat of the drain hole is cleaned from the garbage and is rubbed with a rag of dry.
- It is then lubricated with silicone sealant, which is applied to the corrugation sleeve. Thanks to sealant, it will be possible to avoid the spread of unpleasant odors from the pipe.
- Next, the corrugation is inserted into the sewer hole.
- After that, the other end of the corrugation is smeared with soap or shampoo. Do it in order for the toilet to be easily entering it. Also, soap is applied to the door of the toilet.
- After that, the toilet is mounted in place.

How to install the toilet seat with your own hands
The seating is carried out at the very last moment after connecting the toilet to the water supply and checking its performance. In the back of the bowl there are two mounting holes. The studs are inserted into them and the plastic nuts are clamped from the bottom. This is the easiest stage in the montage toilet.
Features of the installation of the hygienic shower for toilet
After the toilet is installed, you might think over the installation of the hygiene shower. This is a fairly convenient solution that allows you to increase the comfort of using the toilet. The design of such a soul does not differ from the shower watering can be in the bathroom. It connects to the tee together with the water supply hose for the tank. On the height of the hygienic shower, a button that opens the flow of water should be provided so as not to be needed to be drawn to the valve.


