It is known that there are two types of wiring: outdoor and hidden. We decided to devote this article to the outer wiring, because it is her every year chooses an increasing number of people. Such popularity is due to the simplicity of installation and maintenance, but everything in order. So, we suggest learning how to make outdoor wiring in the house with your own hands.
Content
Features of the outer wiring
The outer wiring is very convenient in operation. Previously, in all apartments and private houses, the wires were laid in this way. With the invention of hidden wiring, the situation has changed, but now more and more people re-discover the charms of using outdoor wiring. In some cases, its application is necessarily, for example, when electrifying a wooden house, where there is no possibility to hide the wires into the walls.

So, the outer wiring is a method for fastening wires, cables and corresponding accessories on the surface of the walls, gender and ceiling. It allows you to easily find the source of the fault and quickly eliminate it, replace the wire area if necessary or make a wiring for mounting a new outlet or switch. In addition to the obvious ease of operation, the outer electrical wiring performs a decorative function. Especially beautiful looks with twisted products under ancient in the textile winding, but we will tell about it a little later.
Methods of installation
Compared to hidden wiring, the outside has its own features of the installation. By the way, installing it goes much easier and faster than if you were blunting wires and cables in the wall. This is another advantage.
Methods for mounting outdoor wiring:
- ordinary gasket on brackets;
- in corrugated or metal pipes;
- in cable channels or under plinths;
- retro wiring on porcelain insulators.
Consider in more detail each of the types of external wiring. So, if you need to quickly donate with electrification at home, select special brackets for fasteners. These are plastic products that are clogged into the wall. They capture the wire and reliably hold it. This is the easiest and budget way of wiring device. There are cheap brackets, but in order to match fire safety measures, for such a way it is necessary to use cables with dual or triple insulation. The lack of fastening the wiring brackets is that it looks very uneatetic and can spoil the interior. If in your case there is no alternative, carry the wires along the most inconspicuous path, for example, under the ceiling, in the corners or by the floor.

Corrugated pipes also look not so hot, but they create reliable protection and allow several cables at once, they are fastened to the pipe, and they are fixed to the wall with brackets or special metal clips. This method is most often used for economic premises, although the corrugation will appropriately look at the Loft interior.

The most aesthetic and convenient way of laying outdoor wiring - cortica and cable channels. Such products can imperceptibly merge with the interior or emphasize its style. The main snag with their use is that they require a perfectly flat surface for mounting. If the room is defective walls, they will have to align, which can do quite expensive, or look for an alternative option for laying cables. There are different models of cable channels that can contain from one to a dozen wires. Plinths with cable channels also use popularity. High products are pretty effectively, which simultaneously mask a large number of cables and create a stylish interior.

If you are going to make an outdoor wiring in the Cable Channel, consider that you will need a large number of components: corners, connecting elements, etc. The number of parts depends on the planning of the room, the presence of bends, angles, niches in the walls.
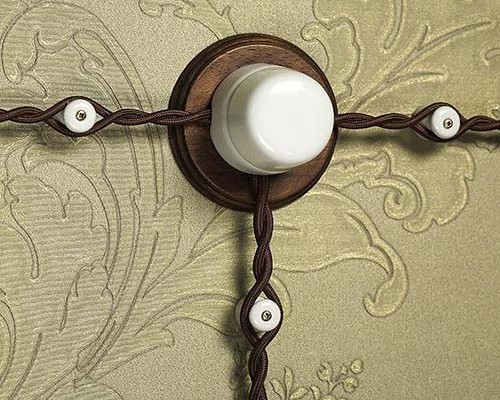
We left the most interesting type of installation. Finally, this is the use of retro wires in a tissue winding on porcelain insulators. Recently, such decorative outer wiring can be found in various thematic restaurants or stores "under ancient", in wooden houses or loft style interiors. In the fires and still use it at all, since in this case it is the best option. A 10 mm distance between the wire and the wall provides high fire safety. There are wires in a multicolored fabric braid, original porcelain insulators (even with drawings and engraving), so you can easily create a unique room design.

The retro cable for outer wiring usually has 2-3 veins, twisted with each other. Each of the lives has a textile insulating braid. To fix them at a certain distance from the wall, use ceramic "barrels" - insulators.
Features of the installation of external retro wiring:
- Ceramic barrels should be installed 4 cm from distribution boxes, sockets and switches.
- If you pave the cable horizontally, the installation of insulators must be made every 40-45 cm, otherwise it will be saved.
- If you mount the wiring vertically, you can withstand a distance of 50 cm between insulators.
- When creating a cable at the corner, set two insulators at an angle of 45 °.
- Till twisted cables from switches, sockets and corners. Stretches will not be, if you remove the tissue braid from trimming the wire.
- The use of porcelain insulators can be successfully combined with cable channels or plinths - part of the wiring will look beautifully on the wall, to the part will go under the plinth.
Elements of outer retro wiring
Twisted outdoor wiring is the most original and interesting way to electrify the premises. It allows not only safe to lay the cable, but to do it as beautiful as possible. Its main elements are wires, junction boxes and porcelain insulators. Consider in more detail the subtleties of selection and installation of each of them.
Wire wires
For the external wiring device in the house use special twisted wire. It can be made independently, but still it is better to buy ready, especially if you do this for the first time. Twisted wire is obtained by twisting of several (two or three) single-core copper wires with two layers of insulation. Typically, a pvewl or a GPVN with a cross section is taken, which corresponds to the current value. The number of twisted wires depends on the presence of grounding.

Before laying the wire, it is necessary to install ceramic insulators with a certain step, and only then shut a twisted cable. Make it is not as easy as it may seem at first glance. In order for the appearance of the wiring to be neat, it is necessary to change the direction of twisting after winding on each insulator.

Experts recommend purchasing a special decorative wire with silk or film insulation. The products are presented in a wide range of color range, so you can easily choose the option for any interior. The only drawback of this method of wiring lies in the high cost of components and restrictions in cross section to 2.5 mm². For this reason, the retro wires are used only where you need to directly emphasize the stylistics of the interior. That is, such a wiring is more likely an additional and may not be crowned with power consumption. The main wiring can be hidden in the box or under the plinth.
Insulators for wiring
Porcelain insulators are necessary for attaching the twisted wire and creating a safe distance between it and the wall. In addition to ceramic products, you can find and cheaper plastic, but from the point of view of fire safety, it is better to give preference first.

Ceramic insulators perform not only functional, but also decorative tasks. They can be a real interior decoration, especially if you select the pattern with painting or different colors. They have high dielectric characteristics, immune to temperature or humidity drops and are able to last almost eternity.
Distribution boxes
Distribution boxes are special areas where the wires are connected and wiring is organized to supply voltage to sockets and switches. Their presence substantially facilitates the gasket of the outer wiring. Otherwise, you would have to stretch the feed wires and cables to each instrument from the shield itself, and the whole "web would have been stretching around the house. Distribution boxes in the literal sense save time, means and forces.

Despite the absence of any restrictions on the number of dispensing boxes in the house, with their installation, some rules should be followed:
- Install the boxes in easily accessible places so that if you need you always been able to make another wiring or troubleshoot.
- If there are small children or animals in the house, carefully disguise or secure the junction box to avoid accident or damage.
- In rooms with high levels of humidity, it is better not to be installed, but if it is impossible, fix the box at a height of at least 2.5-3 m from the floor and 50-70 cm from the humidity source (shower, sink, bath). It is best to put them on the outside of the bathroom.
- Use self-tapping screws or dowels for fixing the junction box. Switch to it cable only after installing the box on the wall or ceiling.
- Connect the wires in the box can be swap or using terminals.
Flat Cable Mounting Specificity
If you do not like the retro-wiring, you can do the usual flat cable. But to establish it in compliance with all security measures, it is necessary to comply with the installation technology.

How to make outdoor wiring:
- To attach a flat wire, you can use brackets or nail it to the wall with small nails.
- To ensure safety, put the asbestos layer under the wire, the width of which should be slightly larger than the width of the wire.
- If you are going to lay parallel to several wires, withstand the distance between them at least 3 mm.
- After fixing the wires on top of them, you can set the masking box to the tone with the wall decoration.
- If you want to hide a flat wire into a cable channel, first make up a detailed installation scheme to calculate which connecting elements and accessories will be required. Also, it is also necessary to determine the suitable cross-section of the channel, depending on how many wires you plan to hide it. Sign in the inner space under the string is not very recommended - if one wire bursts and it will light up, everything will suffer. It is best to buy a cable channel with divorcers and lay each wire into a separate empty.
- When laying wiring into corrugated pipes, consider that if you need to replace the segment of the wire or drag the entire system, you will have to dismiss all the wires in the pipes.
The outer wiring can be comfortable and beautiful, but it still remains less secure compared to hidden. No wonder it was almost forgotten for a while. When choosing this type of installation, keep in mind that it requires careful circulation and competent service. If there are small children in the house, you need or carefully disguise the wires, or pave them out of the reach of children.
Finally, we suggest watch a video about the outer wiring and methods of its mounting:
Outer wiring: Photo


