Plastering walls is one of the most popular ways to finish the surface after construction and repair. Restoration of walls can be carried out using plasterboard or plastic structures. However, at least in comparison with the plaster, this method is less laborious, it is more expensive and often grows a large area, which is very bad in conditions of small apartments. That is why plaster remains the most commonly used option for applying the base on the wall.
Content
The most difficult in the process of plastering walls of the room is the process of recovery of corners. The difficulty lies in the fact that the angle should be direct, even vertically and, if possible, sharp. It is no secret that the decision of this task for beginners does not always work from the first time. On how to make smooth corners with your own hands - further in the article.
Technology work with plaster

Plastering angles of the room - the process is quite complex and requires careful preparation of the surface of the walls. Alignment of the angles of the room is made in two ways. The choice of one of them depends on the technology of the finishing walls:
- If the painting or blowing of walls will be applied to wallpaper without pattern, then the angles are aligned along the plane.
- If the ceramic tile or wallpapers will be used for finishing, which will be shrinking in the drawing, the angle must necessarily align in terms of the level.
For plaster corners it is very important to choose the properly of the material and calculate its exemplary consumption for the entire room. Type of plaster depends on the conditions in which it will be used:
- So, for external works or decoration of walls of high humidity, mixtures based on lime, cement or polymeric materials are used. They have sufficient strength and moisture resistance.
- For residential premises, it is better to choose plastering mixtures based on plaster. They are cheaper and much easier to work with them. However, it is impossible to apply them for external work.
On the package with dry mixtures, the manufacturer shows the terms and conditions for the application of this material. It is necessary to strictly adhere to them so that the surface serve as longer as possible.
Proper application of plaster on the walls. Preparation of tools and materials

For alignment of walls and angles, it is necessary to have a simple set of tools for working with plaster:
- Plumb. It is used to determine the deviation of the angle from the vertical. In this case, it will be easier to align it in terms of level.
- Level. Mandatory tool for conducting general construction and finishing works. It is necessary to verify the incidence of angles, the installation of beacons and perforated corners.
- A set of spatulas in which there must be a spatula for external and for inner corner.
- Rule.
- Stretch and plaster blade.
- Plaster grater.
- Wide painting brush for applying primer.
- Hammer to remove old plaster.
To prepare the solution you will need:
- A bucket of up to 10 liters or the other equivalent container. It makes no sense to take the capacity of greater volume, as it is not desirable to knead a large amount of solution if there is no experience in conducting such work, it is not desirable. Gypsum-based solutions will dry very quickly, and the dried plaster is not suitable for use.
- Drill with a mixing nozzle for kneading. It should be taken into account that the finished solution has sufficient viscosity, and for its kneading a tool with a gearbox or a powerful engine is necessary. In a conventional hand-made drill or a screwdriver (and some builders are trying to do with this tool) can simply burn the electric motor.
From materials to work on the plaster walls and corners will need:
- Primer deep penetration. It is used to strengthen the base for applying plaster. For a mid-size room, 10 liter canisters of finished primer should be enough.
- Plaster. It is necessary to choose the material depending on the conditions of its application. Consumption of plaster on 1 m 2 Indicated by the manufacturer. Therefore, knowing the approximate area of \u200b\u200bthe walls, you can calculate its need. Buying material better on 1 bag less than calculated need. It is better to buy a little than throwing surplus (there will be no stitching for a long time).
Preparation for coal and wall plaster

Plastering the walls and room angles are necessary only on the prepared surface. It should not have the "islets" of the old surface, which will be fastened. Otherwise, the new layer can simply disappear.
Order of preparatory work:
- First of all, all weakly holding the sections of the old plaster must be knocked down with a hammer and chisel. To speed up this process, you can use the perforator in the "Strike" mode and a special nozzle. Only work must be careful not to damage the brickwork.
- Then, with the help of a plumb, determine the presence of protruding pieces of old plaster. They are also removed.
- When the walls and angles are cleaned, you can proceed to the primer under the stucco. This process does not require special knowledge and is performed quite simple. The primer is applied with a wide brush over the entire surface of the walls and corners. At the same time, it is not worth saving the material, it should deeply penetrate the pores of the walls and ensure the best adhesion of plaster with the surface.
- Depending on the humidity in the room, the primer can dry from 5 to 20 hours. Typically, the preparation of walls spend closer in the late afternoon, in order to start shocking in the morning.
Installation of Mayakov

Lighthouses serve as a landmark for uniform coating. They are guides for which the rule will slide, providing a uniform layer of plaster. Lighthouses are two types:
- Gypsum. Move directly in the repair process. Make them from a gypsum solution on the wall, aligning with the help of the level and rule. The occupation is quite time consuming and, given the low cost of metal lighthouses, it does not make sense. Although, some masters still use such technology.
- Metal. Stamped from fine galvanized metal. Mounted on a gypsum solution and aligned in terms of level.
The number of beacons depends on the length of the wall and the length of the rule. The distance between the beacons should be less than 10 - 15 cm than the length of the rule. The first beacon from the corner must be set to a distance of no more than 30 cm.
Very often for plaster corners use a perforated corner. It greatly simplifies the task. The corner is installed on the solution and levels in terms of level. In the alignment of angles, the role of a kind of lighthouse plays the role.
Apply plaster correctly to align the corners

The technology of applying plaster on the wall surface depends on the thickness of the layer. If it is more than 15 mm, then the process is better to produce in two stages.
The order of work is as follows:
- The first thing is applied with a layer of solution, which will be less than the edge of the lighthouse by 5 mm. Special requirements for surface quality when applying the first layer are not presented. After drying it, the plaster is rejected again and only after that they apply the second layer in the lighthouses.
- The plaster is thrown between the beacons using the Kelma with a margin. Then neatly with the help of the rule stretch over the surface. In this case, the tool can be swathe from side to side, thereby making a solution denser. In no case cannot be reducing the rule from lighthouses. If it is allowed to allow an excavated surface to be even smooth.
- Ideally, if everything is done correctly, the smooth wall should turn out from the first passage. After the end of the plaster of one site go to the second.
- The stucco of the inner corner is carried out in three stages. First of all, one of the adjacent walls is leveling. It is also done along the lighthouse as the rest of the wall. Align the second wall of the angle only after the first dry. The technology is the same.
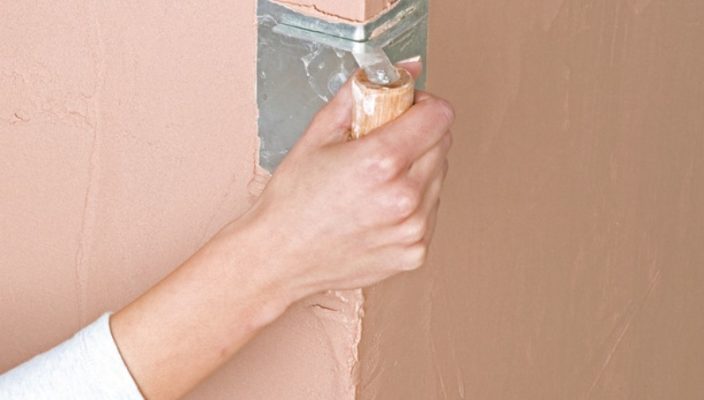
- The last step, the angle is final finally. First, a small layer of plaster is applied to it, which is straightened by the rule to eliminate small defects, and then an angle is formed by a special angular spatula.
- The putty of external corners is performed using lighthouses and perforated corners. The corner is installed in the same way as the beacons for the plaster. Its excess, which appear through the holes, are removed by the spatula. The corner is coming to the corner of the wall and levels in terms of level. The spacure of the outer angle is made only after the fastening of the corner is dry. The method of applying plaster to the outer angle is not different from the inner corner.
- After the end of work from the wall, lighthouses are removed by plaster. It is necessary to do it very carefully not to damage the entire layer. The resulting furrows close up in the same solution using the existing surface as lighthouses.
- After all sections of the wall are plastered, they need to be lost to remove small defects that manifest themselves after drying the solution. For this, plaster graters are used.
- Now the tile can be laid on this surface. For another finish (wallpaper or painting), the wall needs to be made smooth. For this, tap mixtures are used. It is first applied with a layer of start-up, after which - the finish layer. After each stage, the wall and corners are ground.
We form corners and carry out the finish finish: photo


