The presence of a pool on the household plot is not only convenient and practical, but also proof of good taste from the owner. This construction will be as an excellent place to relax the whole family and guests of the estate, Tai and an interesting detail of the landscape design, which can bring some kind of highlight. After all, as pleasant after the exhausting and roast day to plunge into the azure refreshing bowl of your own pool.
Content
However, in the functioning of private pools in our latitudes there is one big problem - seasonality. If the use of pools in southern latitudes can be carried out almost yearly, then with the promotion to the north, this possibility is excluded. You can extend the bathing season in your own pool by setting the roof over it. About how to make a roof for the pool with your own hands, let's tell me further.
What are the benefits of the roof over the pool

In order to make a decision on the start of the building of the pool under the roof, it is necessary to understand what advantages it gives. Thanks to this overlap over the bowl:
- You can noticeably extend the bathing season. Usually in northern latitudes at the end of September - early October, the water in the pool cannot warm themselves to a comfortable temperature. To extend the swimming season, it is usually heated. The roof over the pool will allow maintaining more heat that will not go into the environment, and, therefore, you can save energy to heating water. In this case, this design serves as a "greenhouse".
- Do not have to clean the pool often. This will especially be relevant in the fall, when the leavefall begins. The roof will protect the pool from the fall of leaves, dirt, precipitation, dust. This will significantly save funds on cleaning and cleaning water, as well as on the purchase of filters.
- You can extend the service life of the basin design. Thanks to the "Greenhouse", the temperature is much higher than outside. The absence of extremely low temperatures will extend the service life of the tile, as well as the concrete base of the pool.
- Another positive effect is that ultraviolet radiation, passing through a pavilion overlap, is refracted than its disastrous effect on the structural elements of the pool bowl.
What are the roofs for the private pool

Before proceeding with the order of materials, you should decide on the type of overlapping the pool. Its shape and design depend on the shape of the bowl, the wishes of the owner and overlap area.
The height of the roof for the pool is:
- Low. Allow you to cover the entire pavilion. Such structures significantly save funds for materials for their facilities. However, it will be practically impossible to swim under such a roof. In order to swim in the pool, such a roof will need to shift, which makes the pool almost inaccessible in cold weather (it will just cool too quickly). As a rule, the height of these structures is not more than 1 meter.
- High. These are full-fledged pavilions in which you can come in full growth. Allow you to comfortably swim in the pool in a closed mode. There are such designs are much more expensive.

By design, pavilions are:
- Static. These are usually pavilions with a high roof. Their design is in the same position. Such pavilions are not very convenient to use in the summer, since inside it will be too high.
- Sliding structures. Cover the pool only as needed. In order to swim in the pool, it is just folded. Typically, such structures are used for low pavilions, because it is very expensive to make a large sliding design.
By overlap area, the roofs for the pools are:
- The size of the perimeter of the bowl. In this case, only the pool bowl is closed. This is an inexpensive option, however, it makes it impossible to organize a recreation area near the bowl in the cold time.
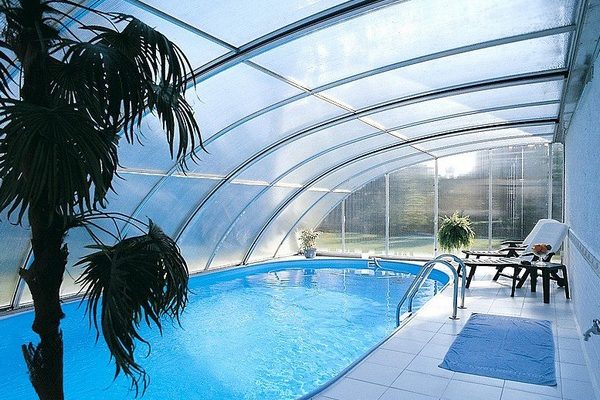
- Orangeneie. These are big, high, closed pavilion designs that allow you to rest near the pool year-round, creating inside the unique climate. Inside, they can also be placed a bath with a pool under one roof, which will allow not only to drop the room in winter, but also to plunge into cold water after the steam.
- The choice of the type of pavilion for the pool depends on the area of \u200b\u200bthe site and the availability of means. The most wait, and, accordingly, a cheap option - make a low sliding pavilion around the perimeter of the bowl. If the means and the area allows you to build a greenhouse.
Creating a weaving low pavilion with a roof over the pool with your own hands

This design is the simplest and cheapest for production. Therefore, in the absence of experience, it is recommended to start with it. It consists of two sliding arches and one stationary. The end of the first sliding arch is closed, so that it hermetically covered the pool.
Materials and tools for the manufacture of the pool under the roof do it yourself
Before starting work, it is necessary to prepare materials and tools. From materials and spare parts to solve this problem, you will need:
- Profile pipe with a size of 20 x 20 mm.
- Transparent sheet of polycarbonate. It must be minimal thick, so that you can be able to bend it normally.
- Electrodes for welding works with a diameter of 3 mm.
- Enamel and primer for painting of the pavilion metal structures.
- A set of fasteners for fastening polycarbonate sheets to metal structures.
- Cement, sand, crushed stone, fittings for filling the foundation.
- Roller supports and shift arches guides.
- Seals between sliding and stationary arches.
It will be guaranteed from the tool:
- Pipe bending machine.
- Welding machine.
- Bulgarian.
- Screwdriver.
- Rule, level, urban, roulette, pencil.

Filling the foundation for roofs over the pool
Although polycarbonate is considered not too heavy, the entire metal design is sufficient weight. That is why it is necessary for her own and strong foundation. In households in which there are sufficient widths around the pools, the roof mounting can be made directly on them, provided that they have sufficient strength. In another situation, it will have to fill the basis. The thickness of the concrete foundation should be at least 40 cm, and the width is not less than 0.5 meters.
Installation of the foundation is performed in the following sequence:
- On the perimeter of the pool or along its "workers" of the sides, the trench is equipped with a width of 60 cm, and a depth of 60 cm. The layers of rubble and sand are stacked on its bottom. After laying, each of them is thoroughly tamped.
- Next, the reinforcing belt from the bound fittings is stacked in the trench. In places of fastening guides, as well as a stationary arch, weld anchor bolts to which they will be attached.
- After that, concrete is poured. It is prepared from cement, sand and rubble in the proportion of 1: 2: 2, respectively.
- It is advisable to strengthen the concrete with a vibrator so that air bubbles come out of it.
Production of metalwork arches of sliding roof for pool

This stage is the most difficult, and without work experience with the metal, as well as welding, make it problematic.
The entire design of the roof for the polycarbonate pool will consist of 3 radial arches, 2 extremes will be closed from the ends. Arch width - 2 meters. For each one you need 3 arcs made from the profile pipe. Split width - meter. One arch is deaf, 2 - movable. A deaf arc has an internal arc radius by 5 mm more than the outer radius of the first movable. The same proportion remains between the first and second moving arches. Thanks to this, they will develop each other on the principle of the telescope.

Order of work:
- The ribs of stiffness from the same pipe are installed between steel arcs, at least 4-5 ribs.
- The most difficult thing in this work is the manufacture of arcs of the required radius. If there is no possibility to get pipe bending, you can contact the steel workshop in which there are rollers.
- After the arcs are ready, they must be welded into a single design (arch). In its foundation, it is necessary to put a profile tube, which in the case of a fixed arch will be screwed to the anchor bolts. In the case of sliding arches, roller supports will be attached to it. Roller supports need 4 pairs (two for each arc).
- So that the distance between the arcs at each point was the same, it is necessary to make a template.
- Next, the arc is installed on the support and grabbing the temporary seam. Its position is checked with a level. The next arc is then installed on the template. Its position is checked by the level and template. In case of deviations, the position of each of the arcs is adjusted. The 3rd arc is installed in the same way. After checking, the entire design is brewed for purity.
- The rest of the arches are also harvested in the same way. After they are ready, the metal structures are cleaned and ground, and then painted in the selected color.
Installation of metal structures and polycarbonate

Order of work:
- First of all, a fixed arch is established. It is screwed to anchor bolts.
- Then the guide moving arches of the roof roofs for the polycarbonate pool are installed. The length of the guide of the middle arch will be less than that of the extreme. They are attached to the anchor bolts.
- The next step towards moving arches is attached roller supports and arches are attached to their guides. After the arch is installed, the stopper is mounted on the last. Once all the metal structures are mounted, you can proceed to check the performance of the entire system and its adjustment.
- Next, the frames of the arches are trimmed by polycarbonate. For this, the holes are drilled in the coating and in the frame. The compound is made using bolts. It should be remembered that the bolt holes must be 1 mm more than its diameter. This is done in order for when expanding during heating, the polycarbonate did not burst.
- An acrylic sealant is applied on the place of the joints of the sheets of polycarbonate. It is also necessary to establish rubber seals between the arches so that the water does not register during precipitation.
Pool under the roof: photo


