Facing the walls of the room with ceramic tiles is popular for several decades. Excellent appearance, practicality and durability made this material one of the main premises in the repair. It used to be believed that the tile is only suitable for finishing the bathroom or kitchen. However, modern types of tiles made by "under marble" or "stone" are perfectly suitable as a facing material for a living room or even a bedroom. So that the result from the use of the tile is good, it is necessary to choose correctly and put the tile. About how to finish the walls with a tile with your own hands - hereinafter.
Content
How to choose a ceramic tile

Currently, the variety of colors and forms of the material can mislead the buyer. However, there are several tips that will help avoid trouble with the purchase of tiles:
- Select size. The sizes of the tile are not small now, and the buyer may have a dilemma, which one to buy. To finish the walls of the kitchen, tile or bathroom typically acquire a standard tile of 40 x 20 mm. For the living room or bedroom it is better to choose the material of large sizes. In this case, the seams will be practically not visible. However, it is quite difficult to work with a large tile, and this requires a certain experience.
- Pay attention to the quality. Buying tiles in building supermarkets need to check its quality. If the goods are sealed, then you need to ask the seller to print the packaging. If the seller is not going to do this, it is better to give up from buying. It is necessary to check that the tile does not have mechanically damage, chips, cracks. High-quality tile must have proper geometry. Check it is easy enough. You need to take two any tiles, attach to each other front and backs. Between them should not be a lumen. By buying several packages, you must verify the party number on the package. The same model from different parties can have several different shades that can spoil the whole picture. You can ask the seller the quality certificate in which all the necessary information about the product should be specified.
- Choose tint. Choosing a tile color must be guided by two factors:
- room size. For small areas, you need to stop your choice on brighter colors. They will be able to visually expand the space. In large rooms you can use dark and combined tones;
- main designer line. The tile should not be separate in the full interior of the room. It should be a continuation of the entire design line, so it is necessary to select it in the tone of other finishing materials.
Purchase glue for tile. In the same store you need to consult about which glue is better to use for the selected tile, and which average is its consumption per 1 m 2To determine how much buying the mixture.
Preparation of the surface for decorative wall decorative tiles

The walls that are planned to stick should be smooth. Otherwise, the tile on them will be bad. On uneven walls will have to put a lot of glue, because of which the tile can simply "swim".
Walls are aligned in two ways:
- Applying plaster for lighthouses.
- Punching sheet of plasterboard.
The first method is longer and expensive. Application of plaster on beacons is carried out in several stages:
- The wall is cleaned of the old plaster and is grounded with primer deep penetration.
- Mounted beacons for applying a solution with a step of 1 m.
- A cement-sandy solution is prepared in proportion 1 part of cement and 3 pieces of sand. Sand necessarily need to sift so that the solution does not have lumps.
- The finished solution is thrown onto the surface of the wall and smash through the beacons using the rule.
The disadvantage of this method is the repair time. The plaster will dry at least 4-5 days, which will stretch repairs for one week.
Leveling drywall - a way easier than applying plaster. Align the walls in the room of plasterboard sheets in one day and after a day to start laying the tile. For these purposes, moisture-resistant plasterboard are used, the front side is green. This process consists of several steps:
- Cleaning the surface from dirt and cracked plaster.
- The surface is grounded with a special solution.
- Then, on the wrong side of the leaf of plasterboard, glue for tiles around the perimeter and in the center.
- The leaf leans to the wall and is easily closed until it gets smoothly. The position of plasterboard is checked by a large level and rule.
- So that the plasterboard holds well on the wall, it is fixed in several places with a rapid installation dowels.
- The last step is a sheet ground so that it is good for the tile. After drying, the primer can be glued to the tile.
Wall decoration tiles do it yourself

After the walls are aligned and troughing, you can start laying tiles. This stage is the most difficult. Therefore, if there is not enough experience, it is better not to rush, but to do everything confidently and efficiently.
To start work, you need to prepare materials and tools. You will need:
- Slab.
- Drill or perforator with a mixing nozzle.
- Spatula with teeth.
- Tile crosses so that the tiled seams are uniform.
- Glue for tile.
- Rule and level.

Procedure for work:
- First you need to calculate how many tiles are required for one row to cut off several small pieces if whole tiles will not be able to close the whole range.
- So that the tile does not move on, around the perimeter of the room you need to install a support for the first row. A wooden plank or metal profile can perform as it can be perfect. They are temporarily installed on a dowel level. Now with the laying of the first row of tiles there should be no problems.
- Then it is necessary to prepare a solution. In the plastic bucket you need to pour water and add dry glue constantly stirring the solution using a mixer. The consistency of the finished glue must be medium. If you move with water - the mixture simply slips on the wall surface, the thick solution will be too thick, thereby increasing the consumption. On the bag, the manufacturer usually indicates the proportions of water and mixtures. In the absence of experience in laying tiles glue must be prepared in small quantities.
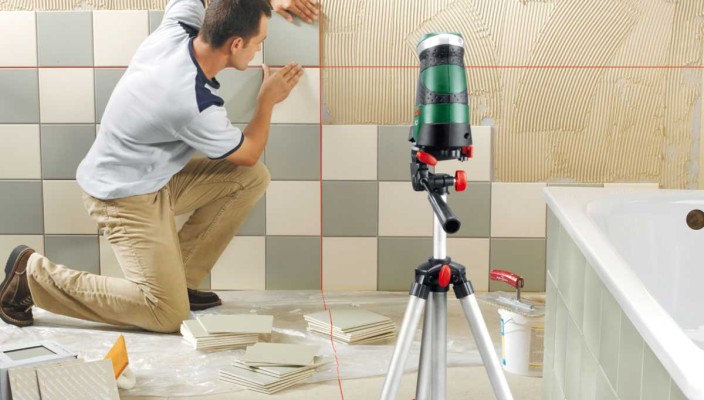
- Start the installation of the tile from the bottom corner of the room. To install the vertical in the upper corner, the self-tapping screw is screwed to which the plumb is suspended. It is drawn by a vertical line, which will be a guideline.
- In large rooms, the decoration of walls under the tile is carried out using lighthouses. This process requires huge skills and theoretical knowledge. Each wall is installed on 4 lighthouse - 2 below and 2 from above. Between the bottom beacons stretch the cord, which will indicate the level. It is also called "pier."
- With the help of a tooth spatula, glue to the surface of the wall is applied. The tile is installed in place and pressed against the wall. Light tapping on the tile surface with rubber hammer is allowed.
- The correct decoration of the walls with ceramic tiles is checked by the level and rule. When applying the level, all the tiles of the vertical and horizontal series should fit tightly to the end. To correct the error, the average is allocated for 10-15 minutes until the glue finally freezes. After this time, the tile is dismantled, remove the remnants of the glue and shifted again. Experts recommend laying out a plot of 0.5 m 2. If everything goes right, you can continue to work on.
- So that the seams between the tiles were the same, special plastic crosses are laid in them. Perform work on the decoration of walls with decorative tiles should slowly, constantly checking its position.
- For cutting tiles use special tiles. This device will allow smoothly and without chipping a piece of any length. Tile is placed with a pencil, lay in the device and make 2-3 pressing on the lever. After that, the tile easily breaks in the place of the cut. When laying the tile, it is necessary to do so that the cut slices are located in the corners, in this case they will not be as noticeable.
- In the process of work, it is impossible to allow uneven distribution of glue by tile. If voids are formed between the material and the wall, the condensate can accumulate in them, which will soon lead to a drop of tiles from the surface.
- In the corners of the room, decorative corners are installed, in the grooves of which the angular elements are becoming. If the decoration of the walls of the tile is made not to the ceiling level, for example, forming a protective apron in the kitchen, then a plastic finish plank is installed at the top.
- Quite often, engineering communications (outlets, plumbing pipes for which cuts should be made) are in places of laying tiles. They are made with a drill with a special diamond nozzle. If there is no one, you will have to cut the tile in half and in each of them bouncing the semicircle, and then connect the tile.
- After drying the glue, it will take about a day, it is necessary to remove plastic crosses and sweep the seams. To do this, there are special mixtures of which a solution for grouting is prepared. Most manufacturers in the mixture add a painting pigment, which will allow to apply grout into tone with tiles. The solution is kneaded in shallow dishes. It must have a consistency as an finishing putty.
- A solution is caused by a rubber spatula. After completion of the work, the residues of the grouts are cleaned with a wet sponge. When the grout finally freezes, the tile can be washed from dust and wipe the dry cloth.
Wall Decoration Tile: Photo


