Wooden gazebo on the country area - the embodiment of comfort, comfort and unity with nature. Among the greenery of the garden, the structure of wood looks harmonious and beautiful, besides, to build such a gazebo personally will not be difficult.
Content
Types of wooden arbors
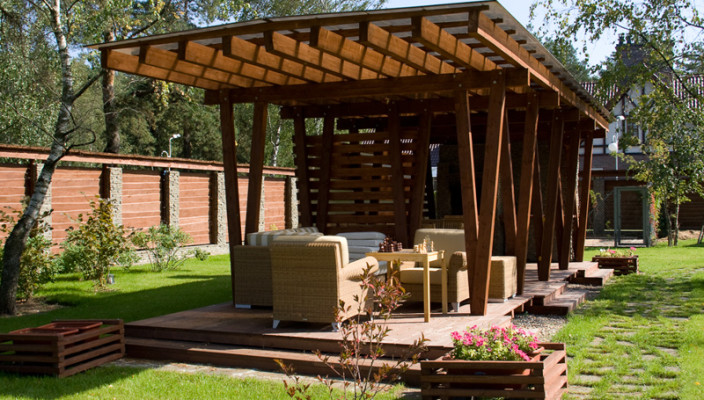
The facilities of this type can be divided into two large groups: open and closed arbors. Consider the features and advantages of open structures:
- Making a slight open arbor is easy, and this process does not take much time. You will not need to make massive capital walls and build a heavy thorough foundation. Any dacket can build a design, armed with the necessary instruments and minimal knowledge.
- In an open gazebo, you can place a mangon or focus. A gazebo of a tree with a brazier is the perfect option for summer pastime.
- The cost of an open gazeboo will be much lower than that of a closed design, because the materials on it will be needed significantly less. The personnel performance will save and on wages of masters.
- Such a gazebo looks easy and beautiful. Wide opening between supports allow you to view the garden from all sides. To ensure an additional coziness near the arbor, you can plant curly plants that will create a kind of green wall.
- In the decorative finish of open arbors, such materials such as natural stone, forged metal, ceramic or granite elements are perfectly looking.
- A simple open gazebo from a tree will protect from the scorching sun or rain. But this design option is more suitable for warm season. In winter and autumn, in severe cold, in windy weather or in a shower, the construction does not force from bad weather.
Closed arbors are more solid structures with walls and glazing. Such structures can be used for rest not only in summer, but also in colder seasons. With good insulation and the presence of heating in the gazebo, you can collect the company even in the winter frost or in slightly autumn weather. Materials and time on the construction of such a gazebo will need much more, but the results of labor can be used all year round.
Garden gazebos are also distinguished in shape and style. As for the form, the designs can be square, rectangular, five-marked or hexagon. There are also more complex options: round or oval arows.
Wooden gazebo can be performed in a certain style. Country, Italian, English, Mauritanian, Finnish and Classic are popular today. A qualitatively made and stylish gazebo can rightly become a central focus of the garden.
Beautiful arbors of wood, photo:


Wooden gazebo do it yourself
Preparatory stage
Before proceeding with the construction of the gazebo, its project should be created. The drawing of the arbor from the tree can be found or buy in the finished form, and can be painted independently. The individually created project will be original and unique, but it should be accessed with full responsibility and take into account many factors. These are the details that should be taken into account when working on the drawing:
- supporting loads on the design;
- capacity, which is determined by the maximum number of people;
- type, shape and size of the structure;
- location arbor in the garden;
- types of used building materials.
For a garden gazebo, it is also important to choose the right place on the site. To do this, first need to decide on the designation of the construction. If you want to create a secluded place to stay in silence, choose a secluded garden corner, located away from noisy roads. If a family for joint breakfasts and dinners will be gone in the gazebo, the design is better to build the non-depreciation from the main house. It is also desirable that the gazebo was on a small elevation, then dampness will not accumulate in it. In any case, the resting place should fit as best as possible in the overall landscape and garden design, harmonize with trees, shrubs, flower beds and reservoirs. If there is a particularly picturesque corner on the plot, try to place a gazebo so that a good review has opened it. An open building is also desirable to protect against wind. Remember that the gazebo needs to be laid a comfortable and beautiful path.

Creation of foundation
The first step of step by step construction arbor from the tree with their own hands is the construction of the foundation. The type of base should be selected depending on how massive and severe will be built. For different types of arbors, columnar, ribbon or slab foundations can be used.
A columnar foundation is considered the simplest by the option, in addition, it is necessary for its construction to minimize the means and building materials. This type of foundation is best suited for easy open arbors. Consider the process of building a column foundation Stepha:
- First prepare the necessary materials and tools. To build a columnar base, you will need a shovel or a garden boring, support poles, a construction level, a roulette, fittings, rubberoid and concrete solution.
- The support poles should be placed in the corners of the design, as well as under the carrier walls, by observing the distance of 2 m. The support pillars can serve metal pipes or wooden bars. Holes for pillars drill manually, blowing them into the ground by about 70 cm. The diameter of the recesses should be 10 cm exceeding the diameter of the supports. If brick structures will be used as columns, the holes in the ground are digging the shovel and give them a square shape.
- In the prepared pits, the sand layer is 10 cm thick. Then make a similar layer of rubble.
- If metal pipes are supported by metal pipes, they are first treated with an anti-corrosion agent, then they cut into the same fragments and roll into the soil so that the metal rummaged over the surface of the earth is 20 cm. In each pipe, the reinforcement segment is installed, the free space is filled with a concrete mixture, and the gap between Ground and pipe fill the ground and stones.
- Wooden supports are also pre-treated with antiseptic impregnations, covered with bitumen mastics and give dry. Then the bars are plugged into the ground and fixed with a cement mortar.
- Sometimes the reference poles are built of slag blocks or bricks. In this case, the dumped pockets of the square section are filled with sand and rubble, the 80-centimeter segment of the reinforcement is installed on top and poured the remaining space with cement mortar. After drying the concrete, the rubberoid is placed on it and the brick column is built on top. The reinforcement is paved in the center of the support so that in the end it performed over the surface by 10 cm.
For a small size, a slab foundation can be used. The process of creating it is described in the form of such steps:
- Initially, the boundaries of the alleged gazebo are placed on the site.
- On the entire perimeter of the placement of the territory, a layer of soil with a thickness of up to 50 cm is removed.
- The resulting recovery is carefully tamped and covered with sand. The sand layer should be equal to 10 cm. After that, the sand is well moisturized and once again tram the soil.
- On top of the sand, rubble layer up to 15 cm.
- The crushed stone mount the reinforcing grid of thick rods.
- In the corners of the structure, making a 10-centimeter indentation from the edge of the foundation, the segments of iron rods are installed vertically so that they rise above the soil level by 15 cm.
- Over the entire perimeter, the base is mounted formwork from plywood and then poured the foundation for cement mortar.
Large in size closed gazebos is best to erect over a belt foundation. This type of base is quite durable and massive, it is able to withstand the design of considerable weight. Fine breeding belt foundation is made as follows:
- At first, on the selected territory, with the help of small wooden stakes, the boundaries of the future design mark.
- Between the stakes stretch the rope. Focusing on this tape, in the ground dig a trench to a depth of 70 cm and a 25-30 cm wide.
- A layer of sand and gravel fall at the bottom of the RVA, then the metal reinforcement is placed.
- After that, we build a low formwork and poured a trench with concrete solution. The height of the formwork should rise above the soil level by about 10-15 cm.

Floor device Arbor
The next stage of creating a gazebo from a tree with their own hands is the installation of the floor. For this work it will be needed here:
- hammer and nails;
- building level;
- drill;
- electric jigsaw;
- wooden bars 10x10 cm;
- the edged board with a thickness of at least 2 cm.
The creation of sex in the gazebo consists of such stages:
- All wooden details of the future design are impregnated with antiseptic compositions and carefully dry outdoors.
- Then the bars and boards are cut into fragments of the desired length.
- Using the protruding parts of the reinforcement, on the perimeter of the construction, the wooden bars are mounted. Where the rods protrude from the foundation, the holes are drilled in the wood, they fought the reinforcement and bend the outside.
- Every 30-40 cm, intermediate lags are laid on the floor. The level of construction is tested by the construction level, the floor should not have a slope. Lags are fixed with nails.
- Then the boards are filling onto the floor, pre-covering them with a soil composition.
This method of creating a floor is suitable for square or rectangular arbors. In the case of round or multifaceted designs, the principle of operation will be slightly different. In the arbors of such a form, the bars are placed not around the perimeter of the foundation, but in the form of rays that diverging from the center.

Construction of walls Arbor
The walls of the design can be erected from logs or from wooden plates. Consider a Read more of the process of creating a log gazebo:
- If the walls of the wooden gazebos are made of logs, there is no need for the framework of the frame. On top of the foundation, lay a layer of rubberoid, which immediately put the first row of logs. Wood stacked throughout the perimeter of the structure, making a gap only where the door will be located.
- I mounted 4 rows of bars, proceed to the design of the angles of the arbor. For this, the pillars are divided into segments of 50 cm, they drink the grooves in them and laid in the places of wall docking.
- Having achieved the necessary height, again begin to install bars around the perimeter of the arbor. The upper crown of construction is fixed with metal brackets.
If you perform the walls of the arbor from wooden plates, the construction will be easier by weight, but in this case will have to pre-make the frame from BRUSEV. All work can be described as a sequence of actions:
- Thin wooden slats, which will be trimmed with walls, should be attached to the predetermined vertical supports. As such though it is best to use dry durable bars measuring 80x80 cm.
- The bars are first installed in the corners of the foundation, they check their verticality and is fixed for a while with spacers.
- To the lower strapping of the foundation of the supports is attached with nails or bolts.
- When angular racks are installed, intermediate supports are assembled between them, observing the distance in 1 m.
- After installing the frame, all its elements are bonded with each other with the help of top strapping. For such a strapping, they use exactly the same wooden bars, fixing them with nails.
- The next step is the removal of temporary struts and the walls of the walls with wooden slats.
- Rake can be trigged horizontally diagonally or in the form of cells. It is desirable that the wooden elements do not fit close to each other, and had the same gaps - so the design will look easier.

Creating a roof of the arbor
The next stage of construction of the arbor from the tree for the cottage is the construction of the roof. The roof may have a different form: one-, two-, four-tight. The one-piece design is easier to build, but the most popular option due to high decorativeness is the four-piece tent roof. It is done in the following way:
- Take 4 thick bars with a size of 10x10 cm, secure them with each other like the pyramid.
- Raise the design up and fix on the upper strapping using metal plates and bolts.
- Of the thinner bars, make the struts, having killed them horizontally between the rafters.
- Tension to the finished design of the waterproofing film and fix it with thin wooden slats.
- On top of the waterproofing, lay roofing material.

Finishing work
After the construction of the arbor, you can think about its decorative design and ensuring comfortable conditions for stay. It is advisable to carry out electricity in the gazebo, then in it it will be possible to stall not only days, but also in the evening. Note that all the work on electrification should be performed before the finishing finish. Do not forget that wood is easily flammable, so the wiring should be placed in a special corrugated hose, which in the case of short circuit will protect the structure from the fire.
Walls, floor and ceiling can be insulated if it comes to a closed gazebo. After laying hydro and thermal insulation, the construction is attached to the completed view using the finish finish. The walls of the gazebo can be seen by plasterboard or boards, plastering or salary wallpaper. Those who wish to preserve the natural beauty of wood can simply paint the walls and the floor or open them with a transparent varnish.
Complete interior of the arbor will help furniture selected under the style of the construction. With wood, other natural materials are perfectly harmonized, for example, vine. Wicker chairs, chairs and even the tables will decorate a wooden gazebo as it is impossible. Do not forget about small details: curtains, pillows, figuces and other accessories.
All internal finishing works spend only in warm and dry weather, so that the materials are not spoiled from moisture.
Arbors of wood, photo:


