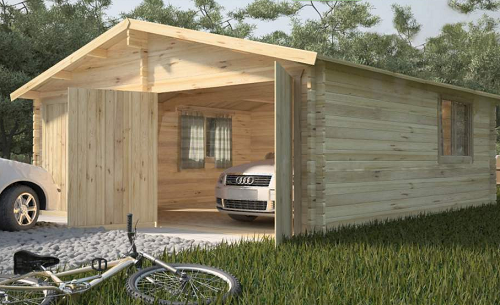
Wood garages for most Russian regions is the optimal solution of the "housing" problem for their car. The construction market is not lacking in timber, and therefore everyone can build a wooden garage to their taste. The problem is only in choosing a suitable technology. On how to build a garage from a tree with your own hands, read in this article.
Content
Frame garage
The choice of technology for the construction of garages, first of all, is reduced to the estimated financial costs. So, if you want to "get rubbed with low blood" and save not only money, but also time, frame construction will help you solve the problem. Today, this technology is actively used literally for everything, ranging from the construction of residential buildings and whole villages, ending with household, commercial, office and other buildings.
Frameworks are supplied in the ready, but disassembled form, and all you need - just collect them on the foundation and put the roof. Manufacturers guarantee long years of exploitation even in adverse weather conditions. Wooden elements are processed by special antiseptics, so such garages are not terrible neither rodent nor mold or temperature drops. Additional protective coating will help make them even more refractory, which in the case of wooden structures will be a significant advantage.

All these advantages guarantee the proper conditions for "storage" of the car, protecting it from bad weather, premature damage, hijacking, etc. And if earlier frame wooden garages were built for a long time and problematic, then modern technologies allow you to do it literally in a couple of days. By its strength, a lightweight design can safely compete with cargo garages from foam blocks or bricks, and costs go away several times less.
But that the framework stood firmly and fulfilled all the obligations prescribed to him, it is necessary to ensure the relevant conditions - to prepare the area, make a reliable foundation, roof, etc. Bookmark the foundation takes most of the time, but this is a mandatory stage that requires complete return. Here you may need construction equipment and help 2-3 people. After that, you can safely assemble the frame, fixing the elements with bolts and screws alone or together.
How to build a skeleton garage with your own hands
Before making a garage from a tree, preparatory work should be made - to develop a detailed project, calculate how much materials need for the foundation, external and interior decoration, will be inside the heating, etc. It is necessary to do this at once to approximately represent how much construction will cost, and what can be saved if necessary.
Drawings of wood garages can be viewed on the site of the manufacturer of frame structures and relate them to the estimated location of the future building. You can also develop your scheme in accordance with which the frame design will be captured. For a good spacious garage with an entrance and a gate, a plot of 10x10 m is enough.

Progress:
- Prepare the area for laying the foundation. It should be an absolutely smooth area cleaned from any vegetation and the rampant. To get the necessary smooth and smooth surface, pour sand-gravel intake and crumple it with vibrating plates.
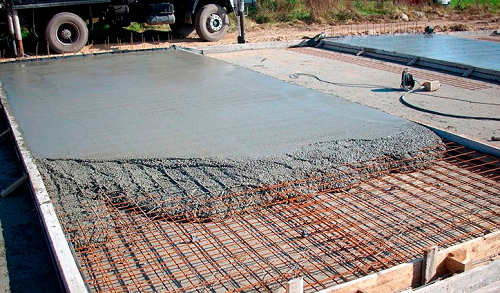
- For garages, the monolithic foundation is best suited, since the stove evenly distributes the load and simultaneously serves as a strong floor, which can be bred at its discretion (to make a screed, put the tile, etc.). But the monolithic foundation is suitable only if the site is located on solid stable soil. In other cases, you can lay columnar or tape foundations.
The formwork in the tank under the foundation should be installed from 3 sides. Fill the concrete mixture and leave to dry by 2.5-3 weeks.
- When the foundation is completely dry and hardened, you can begin to the most interesting - the frame assembly. Make the bottom strapping from the 100x50 mm boards. Do not forget to pre-process all the elements by antiseptic compositions from rotting and fire. Despite the fact that manufacturers produce already processed framework "skeletons", additional protection has not yet harvested anyone. For the construction of the gate and angular racks, use the bars of 100x100 mm, and all other parts (rafters and overlaps) make 100x50 mm from bars.
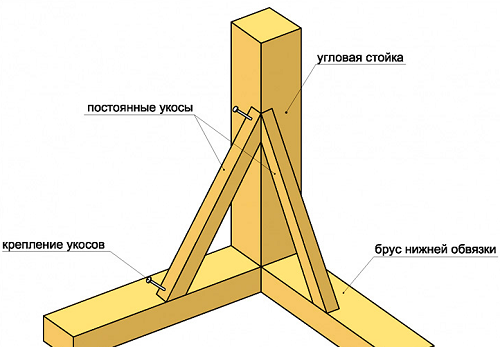
- Between the elements of the bottom strapping, leave a distance of 120 cm. The grooves under the racks there can not be made and secured the frame of nails and screws. This method is much easier and speeds up the construction process. To make a frame stronger, install the saws in the corners. In the course of construction, leave the openings for the gate and windows in accordance with the drawing. If you make a wide garage with a wall longer than 4 m, it is better to use 50x100 mm boards for ceiling beams, and for longitudinal elements - boards are not thinner than 50x50 mm.
- After a couple of days, the framework will be ready, and you can begin the construction of the roof. For this, boards 100x25 are used. We carry them out with a soft roofing material, for example, bitumen sheets. Place them right on top of the crate and fix it. The garage attic does not need insulation, so one bitumen sheets will be enough.
If funds allow, use metal tile or professional flooring to improve the roof. These materials are very simple in the installation and save a lot of time.
Important: Be sure to set the roof of the rainwater. To do this, you can use the simplest plastic sewer tube, cut along half. Drain will not allow moisture to accumulate between roof elements and prevent rust formation.

- Sewing the walls of the frame garage outside the best of all classes of class C. On top of it, fix the windproof layer from the vertically spaced boards of 25x30 mm with a nailed pergamine. For cladding, siding, the color and texture of which can be chosen on your taste. Inside, you can insulate the walls of mineral wool and enjoy inexpensive clapboard.
- As for windows, it is better to immediately install double glazing to prevent heat loss and save on lighting. It is recommended to do not "deaf" windows to air the garage when working with paint, oils and other toxic mixtures.
- Final stage - setting the gate. Here you can relax and pofantase, pushing out your preferences, the size of the territory and financial capabilities. If you allow the means, install the automatic sectional gate. Often when building garages from a tree with their own hands install strong swing gates.
The width of the gateway depend on the size of your car (standard 2.5 m).
To make the simplest swing gates, make an inner and outer frame from a metal corner and connect them between themselves with metal strips. To apply the top of the frame as a jumper, squeeze it completely with metal. For frames of flaps, use a metal profile 40x25 mm, and then cut the steel sheets with a thickness of about 2 mm. The role of the Casov will perform iron pins.


Interior arrangement of garage
When most of the work is behind, it remains only to organize the inner decoration of the room so that the car is cozy and comfortable for any weather. Use expensive materials for the garage does not make sense, because sooner or later they are soaked with smells of smoke, oils and gasoline.
To improve the ceiling, use a cheap wall paneling on which lay paper and put the insulation. An attic floor to spare 25 mm board and put an appropriate staircase. This room can be used to store spare parts, paints, oils, etc.

Garage heating is another important point that should not be overlooked. The room temperature should not be descended below + 16C, otherwise the rules for the storage of liquid car care products can be disturbed, and the bodywork is much more pleasant in warmth and comfort.
Important: For the heating of the garage, it is impossible to use electric spiral heaters. Otherwise, the risk of fire is extremely likely.
Portable heaters are also not the best option - their low heat transfer is not enough even on a small room. The optimal option will put the boiler and make water heating, install a 2 kW fan heater or a 500 W heatarbling (depends on power consumption).
Garage from Bruus
Wooden garages (photos) may not only be frame, but embodied "in the old manner" - from a bar. This is one of the most reliable, durable and inexpensive design options that can be done without assistance.
The garage from the bar has excellent thermal insulation characteristics and has natural ventilation - the walls "breathe", the smells are not stored. In addition, build such a garage is quite simple, even if you do not have professional skills.

The advantages of the garages from the bar compared to other materials:
- environmentally friendly natural material;
- natural ventilation of the room;
- the tree is easy to process without equipment and special skills;
- wooden garage harmoniously fit into the natural landscape of the country house;
- durability (deadlines for up to 50 years);
- efficiency (savings on heating, maintenance and repair).
Features of technology
Any building, whether it is a residential building or a small garage, requires a sturdy base bookmark. For buildings from a bar, you can make a monolithic, ribbon or pile foundation. The main thing - he must rise above the ground no less than 20 cm, otherwise the tree when interacting with the soil will start rotting and crumbling. For 100% protection against rapid wood damage between the first crown of Bruusyev and the foundation, waterproofing material should be laid.
The walls from the profiled timber should be laid in the log house. This can be done even alone if you order a finished log house. The cost will not be much higher at the same time, but the volume of work will be significantly reduced.
The floors in the garage from the bar can be pledged with a concrete tie or to add wooden board. Concrete floor is better to pour on a monolithic foundation. Below we consider an example of the construction of a garage on a batch foundation with a boardroom.
As for the roof of the garage, it is better to do it elementary - single or duplex. The construction of the charter system will depend on the roof form. In any case, water should be made for the principle described in the previous chapter.
Stages of construction
Build a garage from BRUSEV without any special skills:
- The plot on which the garage will be built, free from garbage, vegetation, remove the fertile part of the Earth (Dern) and align the surface. Make marking for the installation of a column foundation, sticking around the perimeter pegs and pulling the rope between them. Foundation pillars should be located at all corners and along the walls with a maximum step of 2 m.
- Make a sandy pillow, pouring a layer with a thickness of 20-30 cm. If the area is on an unstable bunch of ground, the thickness of the pillow must be at least 40 cm. Throw the sand, periodically watering it with water from the hose or watering can. The pillow in this case will perform the drainage function for draining extra moisture. Over the sand layer, put the waterproofing material, for example, a rolled backrueroid.
- Build pillars foundations from bricks or blocks and cement mortar. Constantly adjust the height of each post. Align them with the help of the twine, which you were tightened when marking. When cement freezes, generously dear pillars with bitumen mastic to provide high-quality waterproofing. Place the rubberoid layer for each pillar.
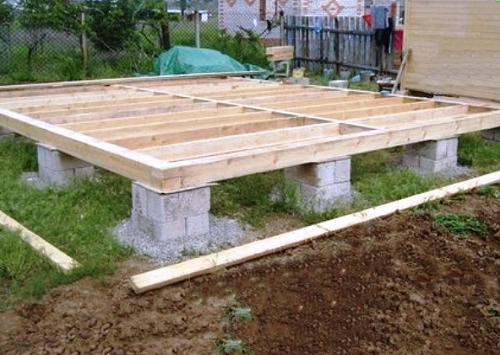
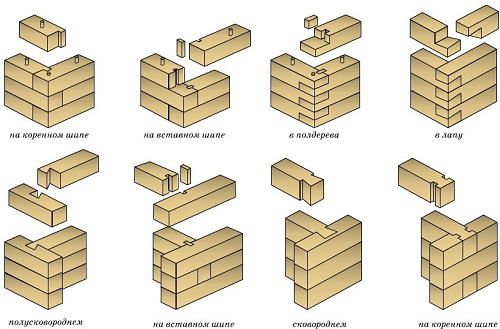
- Put the first crown on the poles of the BRUSEV mortgages and secure them in the corners "in the paw", on the plug-in spike or "in Poltera." Depending on the characteristics of building materials and your qualifications, the connection method will differ. If you collect a ready log house, there is usually everything is already adjusted under a connection, and you only need to docile elements.
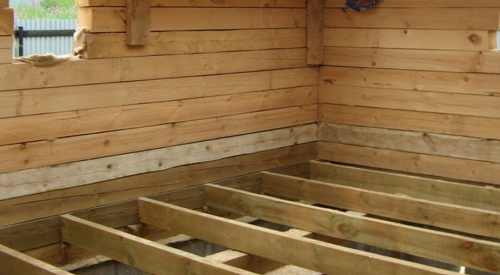
- Cut the lags into the mortgage bar - it will be the overlaps of the future floor. For lag, boards with a thickness of 40 mm are suitable. Place them on the end, making gaps depending on the load on the floor. Since the load garage will be quite large in the garage, the lags are recommended to lay every 50-100 cm. We must definitely feed the bars and boards by the antiseptic composition.
- The following bars put on each other, connecting them on the same principle. Between themselves, fasten them with brazings, drummed both elements of the coft so that the holes clearly coincide. Complete brave into a pair of a couple of cm so that when the wood is dried (and it will definitely happen), the slots were not formed.

- To the most upper crown, we cut the rafted, connecting them by the method "in Polterev". Calculate the shape of the roof depending on the size and shape of the garage. If he is attached to some kind of building, it is best to make a single-piece roof with a slope outside, and for a separate garage - a double.
- When the roof frame is ready, build a constant or temporary roof. As a temporary, it is possible to use a solid waterproofing film, for example, isosan. Spread it on the rafters so that she slightly saved, segments glue with a mounting scotch. The roofing overlap for such a garage can be made from the roll roofing, slate, ondulin or metal tile. Before laying overlap to waterproofing, you should mount the crate.
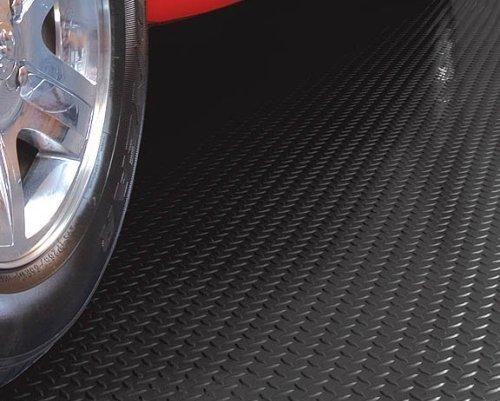
- Paul Make from the headboards, fixing them on the lags with self-draws or large nails. Before laying, placing the thermal insulation material between the lags, for example, mineral wool. Do not forget to cover the elements of the floor and walls with antiplast composition to reduce the risk of fire fire. If you are going to work in a garage with combustible liquids, it is better to use metal sheets to cover the floor, not a tree.
- Make an entry into the garage from 60 mm thick boards, putting them on the support bar. It is cutting into a mortgage crown at an angle of 30 degrees, and at the bottom, dear bitumen mastics. Speake the transverse boards. Install the gate of any suitable type.


Build a garage from wood with your own hands can any hardworking owner of cars even without professional locksmith skills. Moreover, if you have a hobby, in addition to car care, such as the assembly of large-scale aircraft models or burning around the tree, you can arrange your workshop in the garage. For this, it is enough to carry out additional heating and lighting. Thus, the garage from the usual specialized premises will turn into an integral part of the house in which it is pleasant to spend free time.


