To buy a country area on the shore of the lake or river, it is possible not to everyone, but to have its own reservoir near the house so seductively ... Fortunately, human nature is peculiar to ingenuity and hard work, therefore, reinforcing the famous proverb, we can say that if a person does not go to water, Water goes to man. In this article, we will tell you how to make a beautiful artificial reservoir in the country area.
Content
Total moments
First of all, when creating an artificial reservoir, it is necessary to repel from the overall design of the landscape. You need to place a pond in the right place, choose its correct shape, depth and design, so that in the future it has not turned from a place to relax in the source of problems.
So, you first need to determine the purpose of the reservoir. It may be a small pond, "puddle" purely for decorative purposes and landscape decorations. It is possible to make a reservoir more and deeper, adding a stream, fountains and waterfalls to it. Around it can be located benches and make a rest area. If you like livestock, you can settle in the reservoir of fish, tritons, frogs or other amphibians. The latest most spacious and complex in construction are artificial water bodies for swimming. They are among the average between the natural lake and the pool. If you want to build a watering for swimming, put water plants there and populate livestock, keep in mind that to implement such a venture will require impressive financial injections and regular care.

Swimming reservoir and ponds with plants and fish need completely different care. First, for them, water is needed for chemical composition. Secondly, it is advisable to make a canopy over the swimming reservoir so that the leaves do not fall there. Also there is absolutely necessary water filter. Otherwise, it will quickly turn into a swamp and will become a seatingman of the pathoral bacteria and insect pests. Much cheaper and prudent will be built pool and pond separately.
Water-style style
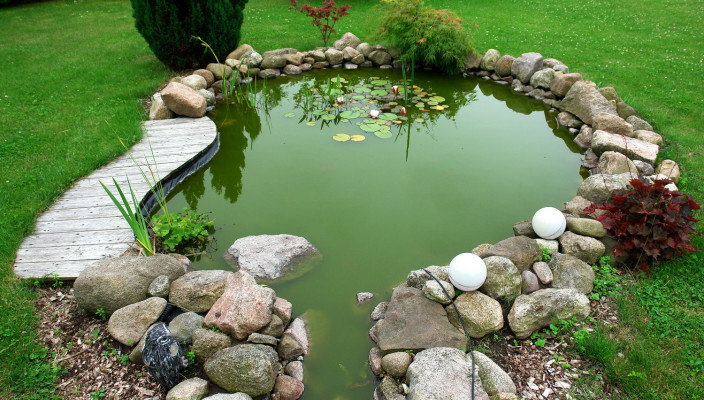
Choose the stylistic direction of the future reservoir is very important, because otherwise it will be knocked out of the common landscape and "calling" eyes. It is necessary to repel from the architecture of the house, materials from which walls, porch, tracks are built. For example, if the tracks are paved by stone, then the water can be chopped by stones.

If you want to make a picturesque pond with natural contours of the shores, it is best located in a garden depth near the arbor, a patio or a terrace, so that during the rest you could be admired by water.
Lovers of minimalism will like a concise Japanese style with boulders, coniferous evergreen plants and a lack of multicolor disintegration. If you want something torture and initiate, choose Chinese style by making focus on moisture-loving trees with motley leaves. Also in this case, a small decorative bridge will be appropriate. In order to make the most like a pond in the landscape, choose endemic plants for an artificial reservoir, that is, only those growing in this area.

As for the shape, the square and rectangular reservoirs look closely near the house, since it is advantageous to emphasize the vertical and horizontal lines of the structure. Also, such a gunboat can be built next to the patio or terrace, especially if there are rectangular flower beds around them or straight tracks. Geometry will combine all this in a single harmonious composition.

If you want to make a reservoir of a rounded form, it will look good on the lawn or lawn, in the garden with a pearl or not far from the group of trees. By the way, a round bars to build much easier than rectangular, especially if concrete rings, PVC capacitances or even large diameter tires are used as the basis.

Construction technology
So, you already know what kinds of artificial reservoirs are, so you can choose the appropriate. The second stage is the choice of space for the construction of a pond. It is very important, because if you put it in an inappropriate place, there will be a lot of problems with care. So, it is extremely undesirable to build a water on the sunny plot, as water in it will constantly "bloom." Green algae in any case will multiply outdoors, but if the pond is the solar time of the day is in the shade, "bloom" will not be so intense. It is also impossible to fully sweat the pond, otherwise decorative plants will not be able to fully develop. The sun should cover the water surface of about 5 hours a day, while it is desirable that the pond be discovered from the south-west.

The cost of its construction and the complexity of the departure depends on the size of the pond. Ideally, he should take about 3% of the plot, but if at its disposal only 6 acres, like many dachans, remove the whole 18 m² is not so simple. So in this regard, it is necessary to repel from our own physical and financial opportunities.
If you want to put in the pond of the plant, divide it into a depth of 3 tiers: for coastal crops, shallow water for water lily and recess for winter hibernation. If you grow fish, the deepest level should be located 150-180 cm from the surface below the level of soil freezing) and take 1/5 square.

You can build an artificial reservoir with your own hands from a variety of materials, but we will focus on the most common variants: with a film bottom, reinforced concrete bowl and using finished tanks.
Film pond
The use of a film to create ponds is perhaps one of the most popular ways, since it allows you to quickly and easily cheaply organize a cute reservoir. It is not necessary to possess professional skills or to work with special techniques. You need to start with the development of a detailed sketch with drawing deep levels and decorative design.

Brief instructions for creating a decorative pond with a film bottom:
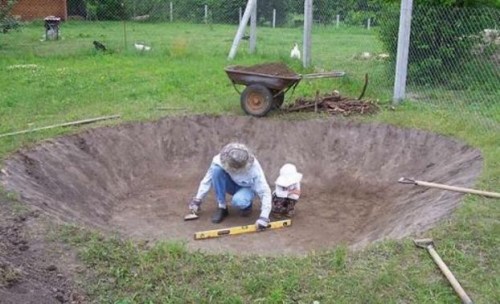
- Make marking on the selected area, indicating the contours of the future reservoir of the aerosol paint or the sandstone. At the same time, it is important to trace the opposite shores in one horizontal plane - it is impossible to build a pond on a slope. In the process of digging, it will also need to measure the levels of shores from time to time.
- Drop the pit first to the depth of the first tier for coastal plants, then tick the line along the contour, from which the pond will leave deeper. There should be a peculiar step of 20-30 cm wide.
- When the second tier is dug, tick the line to form the deepest part of the reservoir and select Earth from the designated area. Remember that for wintering fish is enough 1/5 of the pond and depths below the level of soil freezing. Be prepared for the fact that as we deepened in the pit, water can accumulate and it will need to pump it with a pump. As an option, you can dump a shallow pit in the neighborhood and overflow water into it.
- When the chopper is finished, take the cord and measure it taking into account the depth. On each side of the bowl, add about 50 cm on the allowance. After that, you can determine how many films for artificial reservoirs you need to purchase. Buy a durable moisture-resistant film for ponds.
- In order for the film to be damaged by stones or roots of plants, before it laying, the bottom and the walls are a geotextile, or a cheap rubberoid. As an option, you can pour a small layer of sand and thoroughly take it. The styling of the film is best to deal with on a sunny hot day, then it will be more elastic and well will fall into all the recesses of the pit.
- To arrange the edge of the reservoir, hide the trench by its perimeter, in which the edges of the film will be fixed. Wrap the film and sprinkle with fine crushed stone so that it should be fixed. Next, you can strengthen the edge by stones with plastic pipes. This is necessary so that the soil does not face into the bowl. So that all this looks beautiful, lay the shores with natural or artificial stone.
- Prepared for planting plants need to be placed in plastic pots, and then place them at the respective levels. The remaining space between the pots and the bottom of the reservoir gently lay out pebbles.
- Lower the hose in the pond and fill it with water. To pick up the pump of the desired power and performance, fix the testimony of the water meter before and after.
Useful advice: In order for the water to be forced, and your picturesque pondor did not turn into a swamp, you need to ensure the movement of the fluid. To do this, it is best for the stream: lift it up above the level of the pond and arrange the water supply from the water bouquet bowl by means of a submersible pump. To decorate the mouth of the stream, use stones, pebbles, clay jugs or plants.
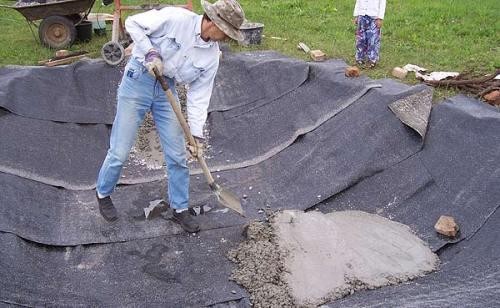
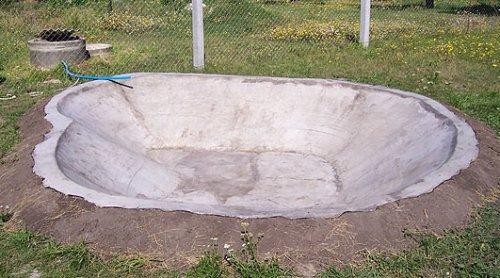
Concrete pond
The concrete pond will make more difficult and more expensive than film, but it will last much longer. It is also possible to make reservoir for swimming and swimming kids - in the lake with a film bottom. Water fun are impossible.
For the construction of an artificial water branch of 6 m³, about 70 cm deplings needed as follows:
- cement M500 - 750 kg;
- river sophisticated sand - 1.1 m³;
- crushed stone - 1.3 m³;
- wire 4 mm - 420 m;
- ruberoid - 3 pcs;
- primer concrete contact - 5 l;
- knitting wire for reinforcement;
- plasticizer.

Step-by-step instructions for the construction of concrete artificial reservoir:
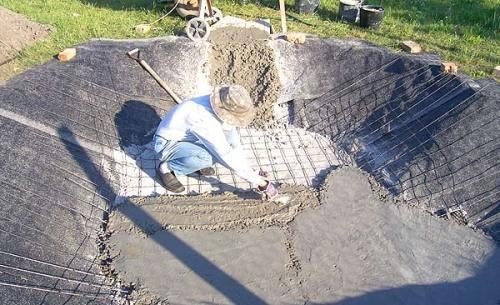
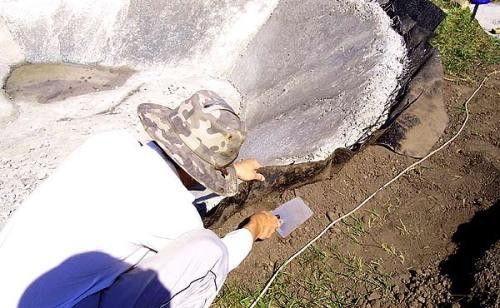
- Make the markup of the pit and dig the pit of the necessary sizes. The bottom should be flat and have a slope of 1: 100 in the direction of the water drain.
- Easy the bottom of the O5-20 cm on each other on each other and around the edges.

- Check concrete from cement M500, sand and crushed stone in proportion 1: 2.5: 3.5. For elasticity and enhance hydrophobic qualities, it is recommended to add a plasticizer. Cover the bottom of the concrete with a layer of 5 cm.
- Make reinforcement from the wire, linking it to a network with 10 cm cells.
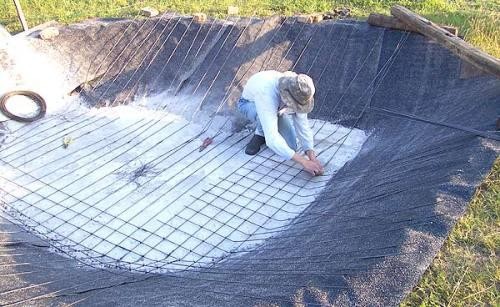
- Check another portion of concrete and fill it with a cutting layer of 5 cm.
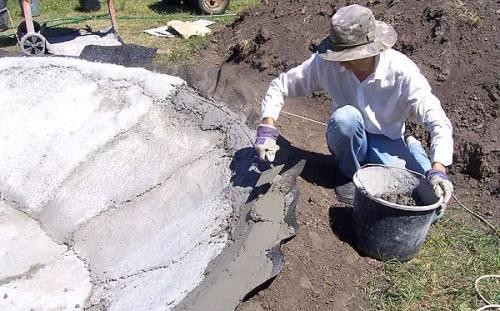
- Print reinforcement on the walls of the reservoir.
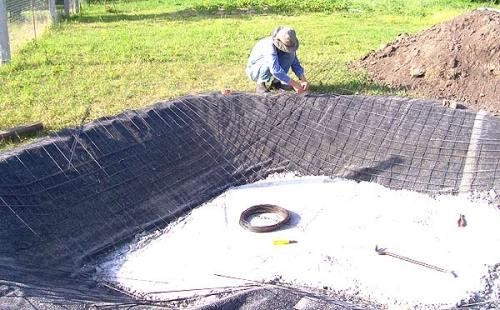
- Enter the concrete solution on the walls by creating a layer of 10 cm. To keep on the walls, make a solution thick.
- Begroen or cut the reinforcement along the edges at one level.
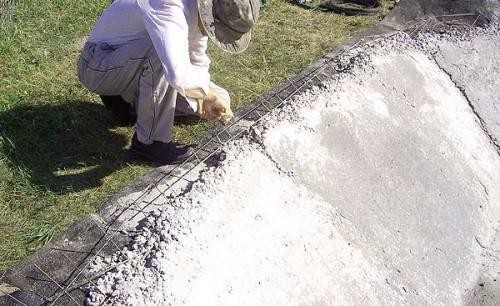
- Expute the ruberoid and form a formwork for the ground part by adding a little land under waterproofing.
- Squeeze the solution at the top of the pit.
- Display the walls in altitude to one level so that the water is not overflowing.
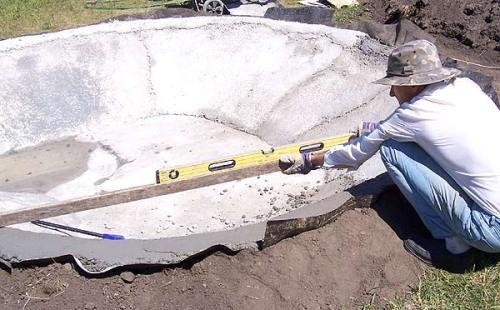
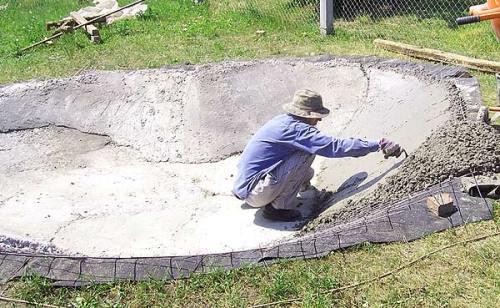
- On the walls and bottom of the reservoir, apply an aligning concrete layer with a thickness of 2-3 cm, mixing the cement with sand 1: 1.

- Align the upper edges in the same solution.
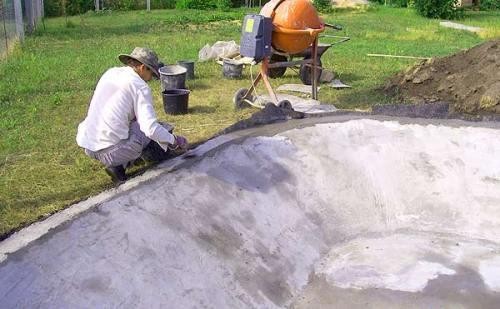
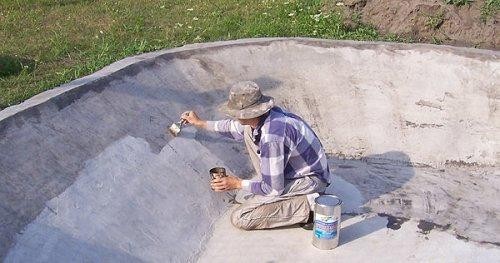
- Leave the reinforced concrete bowl to dry for 28 days. Once a day, spray concrete with water from the spray gun so that the evaporation of moisture is not too fast (the concrete can crack). If the weather was very dry, moisturize in the morning and in the evening. The bowl for drying time must be closed with a dark film from direct sunlight.
- After the specified time, cover the entire concrete surface of 3 layers of primer (wait for the drying of each layer before applying the next one).
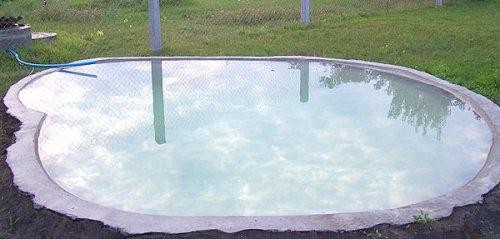
- Make the root of the shores and fill the pond with water.


Pond from finished capacity
So, you already know how to make a pond with the help of film and concrete, but if you are afraid of the complexity of the work, create your own aqueous water oasis with the help of a finished capacity. Ideally, the bowl should be more than 100 liters, since small containers will quickly dispel, and they need to constantly pour water.
An ideal option is an old cast-iron bath. Such can be received from familiar who make repairs or file an ad. Many will gladly give you an old bath for free if you offer yourself to pick up and take it.

To make a mini-pond from an old bath, dig up the appropriate form and depth, lower the container, pour the shores with sand or crushed stone and decorate the boulders. If you want to put such a plant in the pond, the bottom of the bath must be pouring a layer of clay with a thickness of 6-7 cm.

The video shows how artificial water bodies and ponds can be made using special PVC containers:
Artificial reservoirs: Photo


According to the result, it turns out very beautiful, of course it requires certain costs in terms of time. But definitely the option is very budgetary, compared to the use of the services of a specialist
When we decided to make a reservoir with my husband on our own country area, also considered different options that there are in this article. Still, they stopped on a simpler and budget: they ordered a plastic trough of large sizes, which was chosen here with delivery to the Moscow region https://www.svarplastik.ru/koryto-plastikovoe.html In the future, they prepared a shot and posted this tank in it. I would like to note that plastic is much practical, convenient and durable
What an interesting idea! I did not even assume that everything is so simple and practically at a minimum regarding the cost of building materials. So accurately take for myself note, because they were soon planned to equip their plot
Yes, in this regard, fantasy is really not limited. But it is better to immediately choose more reliable and durable containers. And in the future it is worth considering the original decor of the reservoir itself so that it organically fit into the landscape design