The porch is like a business card at home. If the house is made of wood, then the wooden porch will look very harmonious. What the structures of the porch did not like folk craftsmen! To build a porch, you can invite a professional brigade of builders, but to build a porch with your own hands is also quite real.
Content
What is a porch
The outdoor area in front of the entrance to the house to which the steps are called the porch. Porch can be:
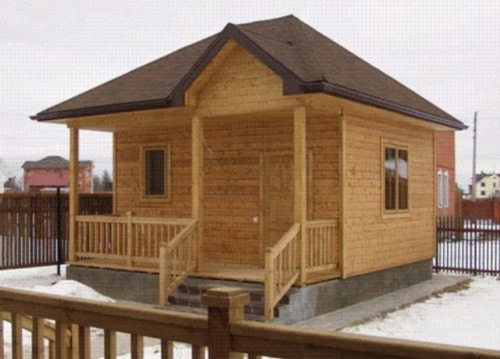
- built-in - made together with the house on one of the foundation and with general waterproofing. Above the porch is a visor or a common roof with a house. The wooden porch, the photo of which is located below, this:
- a lowered later.
Constructive elements of the porch
The design of the porch includes:
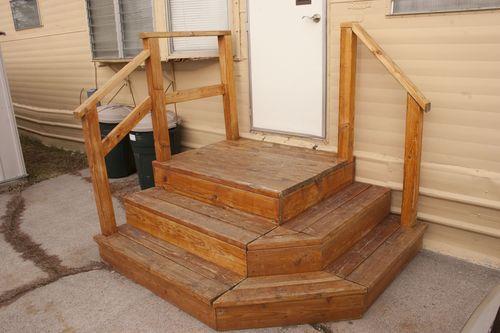
- stages. The minimum height of one stage 250, and the depth is 350 mm. A small bias on them, somewhere about 1.5 degrees, prevents rainwater accumulation;
- canopy. It should be 0.5 m above the platform;
- railing. If the porch is high, then without them can not do, and when the steps are only 2-3, then they just decorate it. Optimal height of 1 m;
- playground that precede the entrance to the house.
When designing it, it is determined by:
- how many steps will be the stairs leading to the porch. It depends on the height of the base. The amount of their odd;
- width of the porch. At a minimum, it must be 1.5 times more than the width of the entrance door. Two people who encountered on it should free better. If the porch goes into the terrace, then the width will be quite large. So that snow drifts do not interfere with opening the door in winter, it should be located 50 mm below the door threshold.
Everything necessary for construction
For the construction of a wooden porch need material:
- cement;
- boards. Oak, spruce, larch, fir;
- square sections of 80x80 or 100x100 mm;
- nails are 150 mm long, but instead they are also suitable for selflessness.
From the tool you will need:
- shovel bayonet;
- hammer;
- screwdriver;
- level;
- roulette;
- plumb;
- hacksaw.
Following the house Wooden porch with your own hands
Start work on the construction of the porch need:
- with carefully selection of the structure. The porch attached to the house should not look something in the thorny. For this, a single architectural style is withstanding. Ideally, the porch merges with the facade of the house;
- since the porch is attached to the ready-made home, it means that it is necessary to make a foundation.
Foundation
We choose a simple and inexpensive option: the foundation pile:
- dig a pile piles with a depth of at least 0.8 m;
- we arrange to support the sole, for which it is poured into the pit a cement solution, and then we smell a large crushed stone or pebbles. We make a bout. For soles you can also use flat stones;
- we take the timber, in length equal to the height of the porch. Covered by an antiseptic. If you have a spent automotive oil, it is quite suitable for this purpose, like the Olife. The support device is possible not only from the bar, but from two, bonded by nails of boards with a thickness of 50 mm;
- we place the timber in the pit and fill with concrete. Observe vertical will help the plumb;
- when concrete hardens, the foundation is ready.
Arrange the base for the site
- all supports align at one level;
- we perform on the supports acknowledged. There will be spikes;
- in the lags we make nests under the spikes;
- we establish lags on support;
- one of the supporting beams is kpripim to the wall using self-tapping screws or nails.
We will further build a staircase. The central element is a valid. We will pay attention to its manufacture.
We make a guide, Kosur
On the theater set the steps and it depends largely on how reliable there will be our porch of a wooden house. This carrier element is an inclined board with a thickness of 50 mm, located on the side of the steps. The same board, but located under steps, is called Kosur. There are 2 types of performing ledges in the tutor:
- cut;
- embedded.
We will consider the 1st Type. To make the tent make it easier, spend time on the template:
- we take 40 cm strip of dense cardboard or organic;
- one end of the strip we apply to the platform support, and the second place on the reference site;
- draw a pattern, cutting out the stages. The width of the recess is the same as the sizes of a sticky.
There may be such a situation that the edged board is available in stock, already what is needed for the manufacture of the taper. Then we choose one of the options:
- we screw up the screws from the bottom of the edged board. Additional bars, the width of which is the same as that of the bearing oblique board;
- at the bearing board we attach one or more outdoor boards. They will close it and the whole design will strengthen;
- instead of edged board, use non-cut.
Note: Often the design of the staircase includes 3 tents: on the sides of two and one in the middle. So that the steps were strictly horizontal, all the testers are performed identical.
Support for Taitiva
For the TETIV, the reference site is assumed, so:
- when everything is solved with dimensions, dig a pit under the supporting platform. Its dimensions depend on the size of the theet;
- in bulk the sand layer, on top of the layer of rubble and poured with cement mortar;
- during operation, check the horizontality using ready-made tenants;
- after the solution is hardening on the reference platform, we mount the theettes, attaching them to the supporting site designs;
- it remains to place the supporting overlays under the assets and attach the lags last to lags using the "Schip-PAZ" connection.
Fastening the guards to the lags by the "Schip-Paz" method:
- we take a board in which you pre-peep the grooves and secure it to the beam of the site;
- insert in the grooves of spikes the tents;
- as an additional mount, you can use metal stripes or steel brackets. The frame of the bottom of the porch is ready.
Playground and steps
Flooring on the site is simply manufactured:
- attach the boards to lags using self-tapping screws;
- so as a result of drying the tree between the boards, there were no big gaps, lay them as close as possible to each other.
Performing steps in the triangular ledges cut in the theater, the point is simpler than the mortise steps. Connect the risers and sticking up the same method as the testers, and the boosters to lagas, i.e. "Spike in the groove."
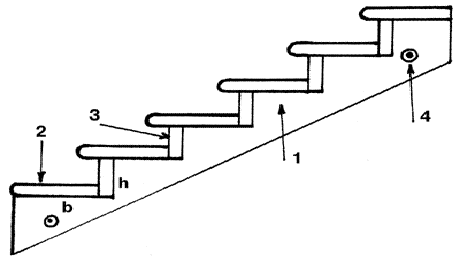
That's what it looks like:
- 1 - Kosur;
- 2 - disposal;
- 3 - risers;
- 4 - metal rod, which are bonded between the boosters or theetics.
Viewing this video will simplify the task of the wooden staircase device for the porch:
We arrange the walls
To make a wooden porch protected from bad weather, the walls are also needed. For their manufacture, it will be necessary:
- cutting a 2.5 cm cutting board;
- bar 5x5 cm.
Technology is as follows:
- from the square of the square section, we arrange a framework. In this design, the minimum distance between vertical and horizontal elements is 50 cm;
- vertical racks and horizontal ties are mounted with each other with metal corners in which there are holes for screws. There are other ways, but this one is considered the most reliable;
- dowels Freak Frame to the wall of the house;
- the lower part of the carcass is krepim to the site;
- further we are cutting the frame cutting board. The use of a tie board will make the skin more dense, but it will increase its cost.
Hold the porch
An excellent material for the roof of a built wooden porch is polycarbonate. Advantages of using this material:
- if the porch is completely closed, then even windows can not do, because enough light penetrating from above;
- simple and easy roofing design. No fitness devices required.
The roof will arrange after the framework of the frame before it is trimmed. Wherein:
- depending on the size of the sheets, the distance between the rafyles is selected. The end of the first sheet and the beginning of the second must necessarily go to the wooden bar;
- the attention should be paid to high-quality stools;
- for fastening polycarbonate sheets, it is advisable to use screws and moisture-proof thermoshab selected in tone.
How to build a wooden porch and avoid annoying mistakes, told in this video:


