The creation of an artificial reservoir is an absolutely difficult process subject to certain rules. The most responsible stage is the choice of the principle of waterproofing device. Given the current variety of opportunities, the choice in favor of a particular way is sometimes quite difficult to do. Therefore, before you give preference to the appropriate option, carefully read the information about the benefits, disadvantages and technology of the most popular modern solutions to ensure the long-term operation of the reservoir and its stable attractiveness.
Content
- Do I need to do waterproofing?
- What materials use for waterproofing a pond?
- Installing a finished rigid form
- Arrangement of a pond with film
- Waterproofing pond clay
- Waterproofing liquid rubber water
- Waterproofing from concrete
- Mechanical waterproofing of the water branch
- Pond without waterproofing
- Conclusion
Do I need to do waterproofing?
In some cases, it is quite permissible to create water without creating reliable waterproofing, but in this case, either the life of its operation will be short, or the need to use heavy equipment to compact the ground at the bottom. 
The use of one of the technologies for the arrangement of such a layer still introduces some advantages, significant:
- a longer period is preserved attractiveness;
- reduced the risk of rotting water;
- the ability to maintain the clarity of the design line of the pond;
- an obstacle to penetration and reproduction in the water of unwanted insects and bacteria.

There are 3 main methods of an artificial reservoir design device:
- Use additional consumables to create a separation layer between water and soil.
- Mechanical soil seal, due to which a barrier is formed to absorb moisture into the ground.
- Organization of the most natural reservoir without waterproofing.

Important! Choose a suitable technology, taking into account the following criteria:
What materials use for waterproofing a pond?
If you prefer the first way and decided to make waterproofing for the pond with one of the available suitable materials, carefully consider the features of using each. The most sought-after types are:
Installing a finished rigid form
Such products are presented on the market a fairly wide model range near the following materials:
- plastic;
- fiberglass.
This method is boldly note, as the easiest and less labor cost, than all other options. Plastic forms are particularly popular today, and within the framework of private landscape design, and when issuing commercial or public areas. 
Advantages
- The ability to pick up an interesting design of the shape of the pond with a variety of models represented by manufacturers.
- Easy installation, which allows you to quickly perform the waterproofing of the pond with your own hands, without the involvement of specialists in this direction.
- Environmental purity of materials used in casting, thanks to which it is permissible to use for the design of pools or even artificial drinking sources.
disadvantages
- Lack of water expansion possibility if desired, change the design of the site.
- Possible deformation after freezing, as well as after a long period of operation cracking.

Installation technology
All work on the arrangement of waterproofing the pond in this way does not take a lot of time, completely under the presence of appropriate equipment to fully complete the project for 1 day.
Sequencing:
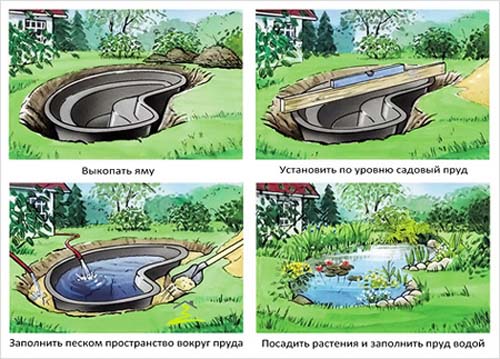
- Drop the pit, lines and the dimensions of which are completely coincided with the purchased finished form.

- Thoroughly confuse the soil.
- Make a sand pillow throughout the surface of the future pond layer to 5 cm.
Important! To facilitate their sand seal, wet it.
- Install the finished shape in the pit.

- Pour slowly water inside by adjusting the position of the pond by level.
- Put the gaps formed on the edges between the soil and the sand form.

- Reduce the coastal surface with stones in such a way that the edges of the waterproofing material are not blocked.

Video
Review the example of how to quickly create a pond on your own area using a finished shape.
Arrangement of a pond with film
Another modern solution that provides ample opportunities not only for the original design of the reservoir, but also changes in its form during operation. There are several varieties of this material, more sought after:
- pVC film;
- butyl rubber canvas.

Important! When choosing such a waterproofing material, we note that the butyl rubber-based film is more expensive, but at the same time more elastic and durable. PVC products are an excellent solution for a small reservoir or in the case when you plan to gradually change the shape of the pond.

Technology laying
The principle of waterproofing the pond film also does not cause any difficulties in carrying out work, but to comply with some sequence and follow the recommendations are still necessary. 
Waterproofing film laying algorithm:
- Drop the recovery in accordance with the parameters specified in the project.
- On the coastline, throw a small trench around the perimeter so that in the future it is convenient and securely secure the film.
- Clean the surface inside the pit from the stones and the ingrown roots of the plants.
- Carefully compact the soil in the pit.
- Form a sand pillow of a wet material.
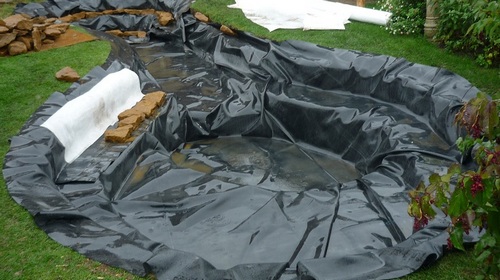
- Place the geotextile on top to create an additional protection of the waterproofing film.

- To put the cloth on the bottom of the pond as quickly as possible, work in one of the proposed ways:
- On each tier, fix the film by stones to prevent its shift.

- Avoid strong tension of the web - better if there is a small sag of sagation on each tier.

- Rice waterproofing film.
- Fasten along the surface by stones, leaving the clearance of the material to 50 cm.

- Fill water into the pond.

Important! Start up a small water pressure. If as the filling, in some places there is a film tension, loosen it, to prevent tearing.
- Leave it for a day or two, that the web is completely cracked down and took shape.

- Finally, attach the waterproofing film in the trench on the surface with a small cross section beams or plastic pipes, the excess fabric tucked under them.
Important! If desired a waterproof cover film, drain the water, sand and bottom pour again fill a small water pressure.
- Zadekoriruyte selected plants and stones.

Video
View videos with an example of an example of waterproofing artificial lake PVC film.
Waterproofing pond clay
Despite the painstaking and time costs associated with the design of the waterproofing of the pond of clay, this method and this does not lose its relevance. It is preferred mainly those owners of their own sites that seek to fulfill all construction work exclusively from natural materials, but at the same time ensure the strength and reliability of the designed structures. 
Waterproofing technology:
- Make a pit pit, withstanding project parameters.

Important! To simplify the clay application procedure, vertical surfaces make inclined or gentle.
- Choose for the preparation of the mixture exceptionally pure clay extracted from the bottom layers.
Important! Pay attention to the absence of an impurity of organic residues, sand or small stones.
- Stir clay with water until the pasta mass is obtained.
Important! When calculating the desired number, consider the fact that the shrinkage of waterproofing will follow 15-20%.

- Cover the surface of the pan of soot or wood ash.
- Apply a clay mixture to the bottom of the pond, a layer of 10-15 cm.
- Failure as drying to ensure a dense connection of the clay castle with the soil.
- Apply the second layer of clay into a slightly harvested, but not fully frozen the initial layer of waterproofing, 20-30 cm thick.

Important! The total thickness of the clay castle will eventually be about 30-50 cm, depending on the type of soil under the reservoir. Given this fact, the depth and dimensions of the artificial pond will decrease, therefore, in order to obtain the necessary parameters, the cutting out of a slightly larger size.
- After drying the waterproofing, pour the layer of fine rubble, the diameter of the fractions of which does not exceed 4 cm.
- Seal stony mass.
- Make a sandy layer, carefully his ramming.
Important! Surface layers will exclude the flushing out of the clay during the operation of the reservoir, will ensure the purity of water in it and a good index of the waterproofing property.
- Wait for a complete rejection of the clay castle .
- Fill carefully, low water pressure in the pond.

Waterproofing liquid rubber water
This method is relatively new, but becomes increasingly popular among consumers. 
The use of liquid rubber, the basis of which make up bitumen and polymer particles, gives many advantages:
- very high strength, which practically eliminates the occurrence of punctures or wear;
- durability of waterproofing coating - the standard service life varies from 20 to 50 years, depending on the number of layers and the specific composition of the mastic;
- excellent characteristics of elasticity;
- affordable cost of mastic;
- ecological purity, acceptable to design of water bodies of any type - for breeding fish, pools, decorative landscape with diverse vegetation;
- good frost resistance eliminates the appearance of cracks even subject to the installation of a pond in latitude with harsh winters.

Important! As a disadvantage, we note the fact that it will take expensive spray equipment for application, which is not fully advisable to create a single reservoir, and the operation of which requires certain skills. Therefore, if preference was preferred in favor of waterproofing a pond with liquid rubber, it is better to resort to the help of profile specialists.

In order for you to estimate all the simplicity of performing the work with this material, we give an example of a standard sequence of waterproofing with liquid rubber:
- Drop the pit.

- Place geotextiles, consolidating with special brackets.

- Connect spray equipment to tanks with mastic and hardener.
- Apply a liquid rubber on the entire inner surface of the pond with a thickness of up to 4 mm.

- Make a technical break from 15 minutes to 2 hours, depending on the type of hardener.
- Apply subsequent few layers if necessary, withstanding the same periods of time between each waterproofing procedure.

Video
Review the video in which the process of creating waterproofing liquid rubber is clearly shown to independently evaluate all the advantages of such a solution.
Waterproofing from concrete
This option of waterproofing is one of the most expensive, time-consuming and long. In addition, the competent execution of the project without certain construction skills is unlikely to succeed. 
Advantages
- The ability to create a design of any complexity.
- There are no restrictions on the purpose of operation.
- The ability to create how the pond is deepened in the ground and install the bowl on the surface.
- If necessary, let us reinstall the bowl to another place.

disadvantages
- Contatability to destruction with constant exposure of moisture, which is why an additional waterproofing layer is required, for example, liquid rubber or glass.
- Mobility of the soil and temperature differences adversely affect the reliability of the bowl.
- Significant financial costs.
- The need for a device of an automatic drain system or pumping water before frost.

Device technology
The scope of work with this approach varies depending on the scale of the project, its complexity and the intended place of installation. 
The standard sequence consists of such steps:
- Marking of the site.
- Drain pit or creation of formwork for forming a bowl.
- Preparation of concrete solution.
- Fill form.

- Washing exit, which without the use of special accelerator additives, lasts about 28 days.
- Applying additional protective waterproofing.

Mechanical waterproofing of the water branch
To carry out the waterproofing of the artificial water branch, this principle will not require any consumables, but necessarily the use of an excavator or other similar equipment. 
Recommendations for the implementation of the waterproofing of the pond on the technology of Zeple Holzer:
- Drop the pit under the water.

- Pour water to the bottom in the amount required for immersion of equipment by 30-40 cm.
- Consistently trambed soil with a bucket until a sufficiently dense upper layer is formed.
- Having finished the soil seal, fall asleep layer of land on the bottom of the pond with a thickness of 20-30 cm for planting selected plants.
Important! The effectiveness of this method is that with pressure on the soil, small particles fall into the lower layers of the soil, filling emptiness. Large parts remain on the surface.
Pond without waterproofing
The creation of a reservoir without a waterproofing coating is quite acceptable, for example, in the case of a high location of groundwater or clay terrain. 
The procedure for registration of such a reservoir is extremely simple and consists of the following steps:
- Create the desired shape of the pit.
- On the perimeter on the surface, take the trench.
- Put the sand layer at 10 cm.
- Place geotextiles, consolidating it to the soil with special clips.
Important! The size of the canvas is descended in such a way that the clearance is to secure on the shore.

- Create another layer of sand, also 10 cm thick.
- Intect the edges of the geotextile in the trench around the perimeter or firmly secure them using plastic pipes.
- Put the trench with a soil for planting plants or re-adjust stones.

Conclusion
Regardless of how exactly you preferred, be sure to use high-quality materials and follow all the rules for creating waterproofing. In this case, you do not have to regularly perform restoration work and spend a lot of effort and time to caring for a water stroke of the reservoir.


Waterproofing for roof PBC isostop
Liquid waterproofing, liquid rubber isostop
Waterproofing of the roof with their own hands from 90 p. square meter ?. After the frozen, it forms a seamless frost-resistant and elastic membrane resistant to the external environment. Waterproofing roof + material from 350 rubles per square meter. Buy here a bucket of 2200 rubles. - https://izostop.com