Everyone starts poultry farmers, who plans to do regular playback young birds need a home incubator. And it can be grown not only chickens, geese, turkeys and ducks. The equipment will allow to breed and exotic birds: parrots, quail and ostrich. For information on how to make the incubator and will be discussed in this article.
Content
The main structural elements
First you need to determine the number of eggs that will be loaded into the incubator. On this depends the device inside of the incubator.

If you plan to place more than 50 eggs, be sure to install the fan in it. It will ensure uniform temperature of all parts of structure. When you place a small number of eggs do not need a fan. Just need to correctly position the heating elements.
Most incubators for the poultry industry consists of the following four parts:
- housing;
- heating systems;
- trays for eggs;
- devices controlling the humidity and air temperature.
Frame
The housing of the incubator can be made of various materials and equipment:
- plywood;
- chipboard sheets;
- packaging cardboard boxes;
- old refrigerator.
The underlying condition for the creation of the hull is the conduct of effective thermal insulation. To do this, you can use felt, foam, vatin or other insulation. When using chipboard or plywood wall walls are made double.
The normal movement of air flows is carried out when there is a gap of 5-8 cm between the extreme part of the tray and walls of the housing. If a large incubator is created, several holes are made to remove carbon dioxide.
It should also be provided for the presence of a gap between the bottom of the design and the floor. Air without problems should flow through holes made at the bottom of the case.
Heating system
Incubators for eggs are equipped with heating devices. They can be placed in different places of construction:
- above the trays;
- around the perimeter;
- under the tray.

The most optimal option is the installation of heating elements at the top of the incubator. So the maximum heat transfer is achieved. The distance between the tray with eggs and the heating device is influenced by the type and power of the latter. When using the nichrome helix, it is 10 cm, incandescent lamps - 25 cm or more.
It is worth noting that when booking 50 eggs, the total power of heating devices should be 80 W. Moreover, it is advisable to install 3 lamps of 25 W than 2 pieces of 40 W. Their connection occurs in a consistent manner.
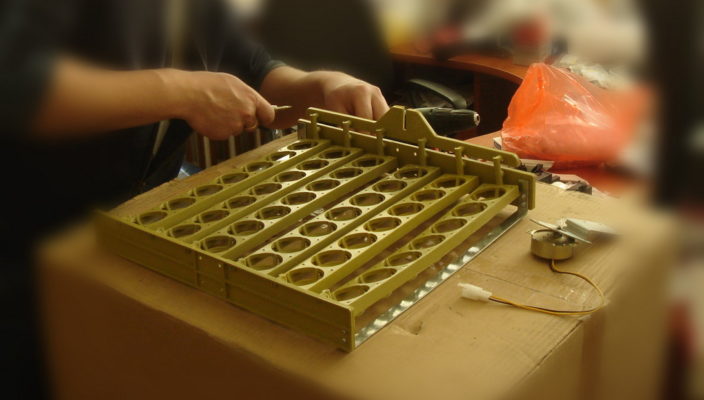
Tray for eggs
In the homemade incubator, the egg laying is carried out in a tray made of wood. The frame of the tray is made of a metal or piping grid with cells 5 * 5 mm. So that during operation, the grid has not saved, on the bottom side it is strengthened by the rails.
The height of the tray tray is 6-8 cm. The tray itself is recommended to be installed on the legs up to 10 cm long. If it is possible, it is best to make trays, the principle of operation of which is similar to extended furniture boxes.
Inspection of eggs is carried out with their permanent turning. If it is carried out in manual mode, then one side of the eggs should be marker. It is possible to make a device, thanks to which the entire tray for eggs will be performed.
To do this, a movable frame is installed in it, which has no bottom. This device must have the following dimensions:
- width - 1-2 mm less than the inside of the tray;
- length is 10 cm than a similar tray size.
Between the small sides of the movable frame at a distance of 8-10 cm apart fixed slats. Eggs should be placed between the rails. The principle of operation of the movable frame is that when it is rotated once all the eggs turned at 180º.

Apparatus for controlling the humidity and air temperature
Constant humidity and air temperature are inherent attributes for the normal development of embryos of birds. To maintain their special instruments are used.
To control the humidity psychrometer used. It can be bought in veterinary pharmacy or make their own hands. The latter come from two identical thermometers and fixed on a small board.
One end of the thermometer is wrapped 2-3 layers of bandage and lowered into a container filled with distilled water. A second thermometer stays dry. The difference in temperature between the two thermometers and is the basis for determining the air humidity.
The normal temperature range is maintained by the thermostat for the incubator. Suffice it to an electronic device, which has a capacity up to 300 watts. It regulates the temperature within an accuracy of about 35-40ºS in 0,2ºS.
The thermostat is placed in a plastic housing and additionally equipped with a temperature controller, the sensor and the load indicator. Fastening thermostat is carried in the outer part and the sensor - in the interior of the incubator. It must operate continuously throughout the day.
The device incubator
There are many schemes incubator, from the most simple designs and finishing products with increased complexity. In this review, we describe the three types of incubators:
- made of ordinary cardboard boxes;
- higher complexity;
- electronically controlled.
Incubator of the carton
Create this structure is the most simple and affordable solution for the incubator device in the home. The top of the box is cut:
- window;
- three holes.
The holes are located at the same distance, and are designed for three rounds, into which the incandescent lamp. Power of each lamp is 25 watts. They are suspended on the 15-cm distance from the eggs.

Holes are cut in the side walls of the box. Suffice it to four holes, which are located at the bottom of the carton structure.
The front side of the box is equipped with a door with a size of 0.4 * 0.4 m. It should be strengthened with a film and open from top to bottom. The door should lay down to the housing as close as possible. There should be no heat leakage from the incubator.
The egg tray is made of thin wooden skulls. The height of the side is 6-7 cm. To the bottom of the frame attached a mesh with small cells. The tray should be inserted without any problems and, if necessary, extend from the cardboard incubator.
Moreover, it should be provided for the presence of a gap between the side walls (near the holes for ventilation) and the tray within 6 cm. In the front and rear part of the design, the tray can be installed closely. Out of eggs are engaged in the first day.
Installation of the tray is installed on a pre-made legs. Their height is 10-12 cm. On any side of the tray, the thermometer is attached. He should not touch the eggshell. Under the tray placed a small bath, filled with water.
The optimal humidity inside the incubator depends on the timing of chicks. At the beginning of the incubation period, only baths with water and a small moisturized cloth are used, which is placed inside the box.
When it comes to the output of chicks, the increased humidity in the incubator is maintained due to the bath and greater than the size of the cloth. The rag is regularly erased in soapy water, which improves the evaporation process.
Construction with elevated complexity
There is an excellent opportunity to make an incubator with your own hands, which is characterized by the increased complexity of the design. And it should be characterized by:
- absolute tightness;
- uniform mixing of air flows.
Creating the same temperature and removal of exhaust gases, which are allocated during the development of embryos, will become possible due to the device for effective forced ventilation. Place the eggs should be in this order:
- chicken - in a vertical position, the sharp end is sent down;
- goose - in a horizontal position;
- turkey and duck - in an inclined or horizontal position.

Features of the functioning of the coupling incubator depends on its mode. If there is an automatic mode:
- the angle of rotation of the parties is 90º;
- the turn itself is carried out with a period of 1 hour.
If manual mode is provided, it can be carried out once in 3 hours. The fastening of measuring instruments (psychrometers and thermometers) is carried out at one level with a tray. But they should not touch the eggshell. The best place to accommodate them is the door. It is recommended that the heating elements do not affect the sensor controlling the temperature mode.
At the initial stage of the incubation process (about 12 hours), the testimony of a dry thermometer should not be above 41 ° C. In the future, there is a decrease in temperature for eggs chickens and turkey to 37.5-37.7 ° C, for the eggs of waterfowl - up to 37.8 ° C. The testimony of the wet thermometer should be at the level of 28.5ºС. This will correspond to a humidity of 53%.
At the final stage, the temperature regime should be:
- 37ºС - on a dry device;
- 33.4ºС - on a wet thermometer.
In this way in the incubator will be installed humidity in the amount of 80%.
Electronic Control Incubator
When making a frame of such an incubator, it is better to use wooden bars, which are trimmed from two sides plywood sheets. The space between them is insulated with the help of foam.
A axis is created in the design ceiling, to which the tray of the pan with eggs occurs. The axis is the pin, with which the automatic eating coup will be carried out. It is displayed through the top panel.
The tray itself is recommended made from a metal grid that has:
- cells of 5 * 2 cm;
- wire thickness - 2 mm.
The inner part of the tray is covered with a caproic grid.

Installation of the control thermometer is carried out above the tray. And it is located strictly along the axis. Turning the tray should not be accompanied by contacting the device with eggs. The temperature scale is displayed in the outer part of the incubator. To do this, use the top design panel.
4 electrical lamps are used as heating elements. The power of each of them should be 25 watts. It is necessary to provide a spotted lamp covering with a sheet of metal with a thickness of 1 mm.
The optimal humidity in the incubator is maintained using water tank. Usually used packaging from white tin. It sold 3 copper arcs of the P-shaped-shaped height of up to 8 cm. The rag is hanging on these arcs, the end of which concerns water in the bath. This occurs an increase in the area of \u200b\u200bevaporation.
Effective air exchange is carried out using 8-10 holes, which are made in the ceiling and at the bottom of the incubator. This ventilation system suggests:
- fresh air flow from the bottom;
- heating streams by heating elements;
- moisturizing air from the wet rag;
- heating of eggs located in the tray;
- exit outside through holes in the ceiling.
The temperature sensor is placed inside the incubator. During the first six days, the temperature should be within 38ºС with a gradual decline of up to 37.5 ºС in the following days.
The operation of the operation of the incubator is reduced to:
- adjustment of the temperature sensor;
- periodic energization of eggs;
- pouring water in the bath;
- washing rags in soapy water.
To output electronic readings in the outer part of the structure, a relay is used, which:
- should work at voltage from 5 to 15 V;
- it has contacts that provide for the use of 100 W lamps.
Video to create an incubator at home:


Describe pliz about the movable tray in more detail, how to do something, I do not understand how it is arranged. And you can go to it.