At the end of the garden period, the task of long-term storage of vitamin billets occurs. Get a suitable place to accommodate the crop is easy, equipping a vegetable pit - it can be placed under the house, in the basement, garage, and even under the loggia. Your supplies will retain freshness for a long time, while you will not need any cost of electricity. To equip an independently similar storage for vegetables is quite real, while you can use the simplest tools and materials.
Content
Advantages of vegetable pit equipment
Reliable with their own hands or purchased for winter fruits and vegetables will need to be stored somewhere. No refrigerator can accommodate several bow and carrots boxes or bags with potatoes. It is possible to make it easier for the comfortable cellar to accommodate vegetables - this method you can organize a storage space in vivo, with a specific microclimate. In such a vintage storage will remain fresh for a long time.
The most convenient in operation is the so-called subfield - a vegetable pit in the house either in the garage, because it will not take an extra room on the plot, besides using such a storage for vitamin blanks, including in the cold, it will be much more convenient than the cellar on the street .
Select Place and Subsequent Planning
Initially, it will be necessary to determine the choice of place where the vegetable pit is planned. Traditionally, it is equipped under a storage room in a private house or under garden house. For residents of apartment buildings there is an opportunity to organize a convenient place of storage, equipping a vegetable pit in the garage.
It is important to note that with the seeming simplicity of the design, for the arrangement of such a variety of cellar, it is not enough to dull the pit. If you are interested in information, how to make a vegetable pit, you need to take into account the following information.

When planning construction it is necessary to take into account a number of moments:
- in order not to damage the electric cable or pipes in the soil in the soil, it will be necessary to ensure that engineering and technical communications are laid in this place. From this point of view it is more convenient to equip the pit in the basement or the garage;
- it is necessary to determine the features of the soil - it is important to collect information about the level of groundwater placement at the planned area of \u200b\u200bconstruction (for this it may be necessary to seek help from a specialist). In order for the design to be quite durable, it is necessary to choose a place with a level of groundwater level below the bottom of the storage facility - at least half a meter. If they are placed close enough, it is not necessary to ignore this problem - in this case, you will need to equip a reliable system of waterproofing (otherwise you can get a vegetable pit, regularly flooded with water). Such arrangement will entail tangible financial and labor costs, and the water can still find a loophole and over time to leak inside;
- the vegetable store will require a suitable temperature and humidity mode. So that the fruits do not frown and do not fall asleep, the humidity of 85-95% is optimally suitable, as well as the temperature regime is slightly higher than zero (from 2 to 5 ° C). Storage in these conditions will save products from damage and allow you to maintain maximum substances in them. Follow the temperature in the vegetable pit will help the thermometer placed there;
- to ensure the influx of fresh air to the repository, it is necessary to equip ventilation in it - to output the supply and exhaust pipes;
- in addition, to exclude the germination of vegetables throughout storage, it will be necessary that in this room it was dark.
How to build a vegetable pit with your own hands
Deciding with the most appropriate place for a vegetable store, you will need to choose a suitable project. A vegetable pit in the garage with their own hands can be equipped next to the observation pit, dividing them with a partition. According to personal preferences and financial capabilities, wood, concrete slabs or brick can be used to build a vegetable pit. The metal will suit to a lesser extent, as in such a cellar it will be enough difficult to establish a suitable temperature regime.

Next, it will be necessary to draw the scheme of the device of the future vegetable store to calculate the number of necessary materials. After that, you can start performing work. Build such a vegetable pit with your own hands is easy.
This will require planning and equip:
- Reliable waterproofing - in the case when groundwater is locked near the bottom of the vegetable pit, it will be necessary to organize a circular drainage system. If there are additional foundation walls, it is also necessary to provide waterproofing. For example, the walls of the vegetable store can be equipped with two slate layers with bitumen layer.
- Warming - walls and ceiling usually erected from bricks or concrete blocks. At first glance, this material seems impenetrable - nevertheless, concrete includes many microcracks through which moisture can penetrate into the vegetable pit. Wet plates are frozen in the cold, so insulation will be needed. For insulation of a vegetable pit, you can use the following materials:
- preheated bitumen, applied in two layers, will help insulate a vegetable pit and create a reliable waterproofing of the ceiling;
- glass gaming - after the pre-installation of vapor and waterproofing, with the help of this material it is easy to warm the walls and the ceiling (hereinafter referred to as the surface of the glass wool should be covered with slate or clapboard);
- wooden bars (lags) or insulation slabs (for example, infernox) - they should be drove to fix on self-drawing, and then process the gaps and joints by mounting foam;
- a solution based on a mixture of sawdust and cement at the rate of 1: 8. This mixture should be applied onto the walls, as well as the ceiling of a vegetable pit layer at 15-20 cm. After waiting for a complete drying of the insulation, after a few days it should be plastered;
- thermal insulation paint - its layer in 1 mm will create insulation of vegetable pit, similar to the installation of mineral wool with a thickness of 5 cm.
- Ventilation providing a suitable microclimate in the repository. The easiest option is to place two pipes in different corners of the vegetable pit, which will ensure the supplies and exhaust ventilating room. For this, asbetic or plastic pipes with a diameter of 0.1-0.15 m are optimally suitable. The supply pipe should be placed in such a way that it starts at an altitude of 0.2 m from the floor surface, and at the same time towering outside over the ceiling of the vegetable pit (also on 0.2 m). The exhaust pipe should be brought into the premises of the underground under the ceiling and remove the outside above the roof (at least 0.5 m above the roof of the pantry or garage). By setting on the ends of the valve pipes, in the future you can adjust the power of the air flow. In order to avoid penetration penetration, it is necessary to close the air ducts with a fine metal mesh. To protect against precipitation over the outer ends of the pipes, special cape-caps should be fastened.

Stages of work
The sequence of actions for the construction and arrangement of a vegetable pit may look like this:
- first, it is necessary to dug the pit with dimensions exceeding the planned by 0.5 m. The depth of the pockets for storage of vegetables is usually from 1.8 (optimally at least 2.5) to 3 m. Next should be tested under the foundation;
- to equip the base of the vegetable pit, it is necessary to align the bottom of the bottom and put the pillow from the broken brick layer and rubble, or rubble and sand (respectively, 10 and 5 cm). Each layer should be carefully tamped;
- the prepared foundation will be required to pour preheated bitumen. Next, it will be necessary to install metal reinforcement and perform a concrete screed. In addition, the base of the vegetable pit can be pouring concrete, after pre-setting the layer of waterproofing material (for example, a polyethylene film). This base will protect the storage from the penetration of moisture. Sometimes the floor of a vegetable pits are covered with wooden boards;

- next you need to build walls. To do this, you can lay out brickwork with a brick thickness either in the Pollipich, or build concrete walls. At the same time, it is necessary to take into account the following - so that the walls of the vegetable stores effectively confronted lateral pressure characteristic of the earth pit, the concrete should be associated with the rods of steel reinforcement;
- next, you will need to wash the walls with hot bitumen. In addition, they can be insulated by setting a layer of suitable thermal insulation material. After that, you can start the finish finish of the walls - you will need to reinforce them with the help of a mounting mesh and plastering;

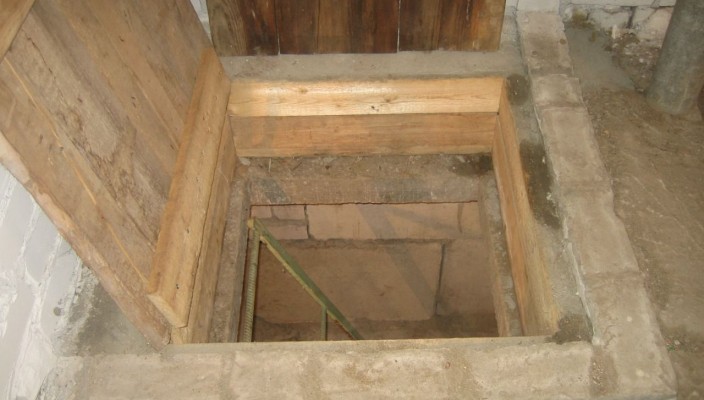
- the pit ceiling can be made of a brick laid on the board - either you will need to build concrete floors, having prepared a formwork by installing the framework of the reinforcement and the bay of concrete into it. In the ceiling, you should provide holes for the ventilation holes, as well as a place for descent equipment, and install the lid stop. LAZ is recommended to be located in the middle of the ceiling - in this case, there will be more space in the pit to arrange racks and shelves along the walls;
- next, it is necessary to insulate the ceiling, having flushing it with bitumen and setting the appropriate thermal insulation material (for example, foam, slag or clayzit).

For the arrangement of a vegetable pit, you can build shelves from boards or install plastic racks, as well as accommodate in it installed on each other boxes.
Metal vegetable pit
If there is a high level of groundwater on the plot, a vegetable pit can be equipped with a vegetable pit. To do this, it is best to take advantage of the finished capacity - for example, to purchase a part of the tank. In addition, it is possible to use a piece of gas pipe with a diameter of 1.8 m (its design is provided by the waterproofing layer - it will only be necessary to brew ends, and the container for equipment for the storage of vegetables will be ready). Next, the suitable size of the pit should be left. By placing the prepared container in it, it is necessary to install vertically on the sides of it with drainage PVC pipes with a diameter of at least 0.2 m, and flood space with sand-gravel mixture. This measure will prevent the displacement of the container under the action of groundwater.
If in the future water will appear in the drainage pipes, it will be necessary to retach off using the pump. When arranging a metal vegetable pit, special attention should be paid to the supply and exhaust ventilation - otherwise the condensate will be accumulated on the bottom, which can be destructively affected by the state of vegetables placed in storage. Pipes should be equipped with dampers and weld, starting them under the ceiling of the tank, so that the exhaust rise above it is 3 m, the supply - by 1 m. Placing the container in such a hole with salt, can significantly reduce the humidity of the air inside. The ceiling of such a storage will need to be insulated.
Vegetable pit - Photo


