It is considered everywhere that it contributes to relaxation and has a positive effect on the body of rest near the water. For this, it is not necessary to purchase a plot near the natural reservoir. In the presence of desire, to independently arrange a decorative pond on the country area from the subwoofers is easy. To build a reservoir from the former bathing is quite bye for everyone.
Content
The idea of \u200b\u200bthe arrangement of a pond from an old bath
With the advent of new high-tech materials, many residents of private and apartment buildings replace old metal baths with new, more modern acrylic or shower cabins. In this case, the problem of disposal of the former bathing is faced. As a rule, this product of the old quenching is made on conscience, so it can be used for long years - for example, in the country area in the form of a mini-reservoir. If you either do not know your neighbors where to give a bathing bath, try using this idea and "breathe" in her new life. To do this, it will be necessary to transport such "building garbage" in the form of an old bath in the countryside to try to turn it into a mini-gun.
How to make yourself a pond from the bath
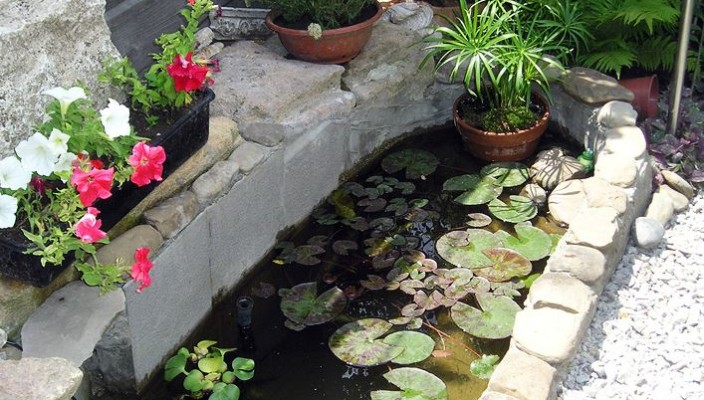
Using the equipment of the water branch, you can create a new recreation area at the cottage for the family. A small decorative pond from the old bath perfectly will fit into the overall picture of the garden plot, decorating the landscaped composition of the adjacent territory. Such a dream is easy to implement - this is at first it will be necessary to familiarize yourself with how to make a pond from the bath. Various master classes of a pond from an old bath can be viewed on the Internet. Equipped with its own mini-reservoirs will decorate the landscape of the country area, and the observation of the pattern of lush greenery at the edge of water, aquatic plants and, possibly, even floating small fish, will undoubtedly please you and your households.

Selecting a place on a plot for a pond
First of all, it is necessary to choose the most suitable place for mini-reservoir. You should not arrange a pond in a lowland, a raw place where tale and close groundwater can accumulate.
According to Feng Shui, it is recommended to use the southern or eastern part of the territory of the site. It is optimally suitable for even, drained dry place, with a dense soil, which includes clay and sand. It is worth using a privided area of \u200b\u200bthe garden territory, you can also position the mini-pond on the sunny side of the site - in this case, after the equipment of the reservoir, it is desirable to put plants and shrubs near it that will form a shadow. The following should also be taken into account - if in the selected place in the winter there will be a layer of snow, the inhabitants of the pond in the form of fish will have chances of survival in winter frosts.
Tools and materials
To make your own hand pond from the bath, the following devices, tools and materials will be required:
- crushed stone (1-2 buckets);
- pebbles, bricks, stones of various sizes;
- cement and sand;
- clay (for plant landing on the bottom of the reservoir);
- wheelbarrow;
- bucket;
- capacity for cement mortar;
- master OK;
- metal grid;
- shovel;
- sheet of tin or old pasty pan (for drainage equipment at the bottom of the pit);
- glue for cement-based tile;
- dye either color film;
- roulette;
- building level.
Sequence of work

To convert the former bathing in the element of the garden landscape in the form of a mini-reservoir, it will be necessary to do the following sequence of work:
- First you need to prepare a bath as a suitable tank under the pond. For this:
- it is necessary to cement the side drain hole in the bath. After drying, the cement can be started to the next stage;
- then it will be necessary to give the surface of this container a more natural look - for this you can cover it with a color film or paint into natural tones (beige, gray, black or brown). Or you can process the surface of the bath with a special adhesive composition for giving naturalness. To do this, wear protective gloves, mix the diluted with water according to the instructions for ceramic tiles with coloring pigment of the appropriate tone - it will turn out quickly solidifying the tough mass. Immediately after the preparation of the mixture, flashed from the inside the surface of the bath. An uneven rough layer of such adhesion will imitate the natural bottom of the reservoir. The bath treated in such a way should be topped with a film from the rain and leave for drying during the day.
- While the scratched bath creates, you can dig up according to her body form. Place the bath in the place of the planned location of the reservoir to place the location of the pond. To do this, you need to surround the container with small pegs and pull the rope between them. According to its location, it is necessary to apply the marking of the reservoir boundaries, remove the corresponding layer of the turf and dig a pit under the pond. It is required to pick up such a depth so that the side of the bath is placed below the main level of soil at about 25 cm.
- In the place of the drain you need to dug extra deepening for the drainage arrangement. Dropped land can be removed away - it will not need it for further arrangement of the reservoir.
- Next, build a funnel for drainage. Rolled in the form of a cylinder sheet of tin or a hole with a hole in the bottom is required to be placed in the prepared deepening and fill in gravel or rubbed - by 20 cm above the bottom of the main pit. Such drainage will allow drain water from the bath in the winter.
- On the bottom of the pit it is necessary to put a small layer of rubble and cover it with a layer of sand - in general, such a coating will be about 20 cm. After that, it is necessary to ravage these materials and carefully remove the tin funnel or a pan.
- Install the bricks in the corners of the pockets and lower the bath in the prepared recess (so that its bottom drain hole coincides with the rubble drainage). For such transportation, somewhat strong hands or winch will be required. Align with the help level symmetry the arrangement horizontally the upper edges of the container. Fill over the sides of the sand bath, moisturize it with water and sink as close as possible.
- Place the metal grid on the sides of the sides - a solid strip or in the form of four pieces along the bathing boards. Mix the mesh with a solution to give the stiffness design, inserting some pebbles into it. With the help of wire on the grid, you can form rings for further equipment of horizontal shelves in the bath - in the future it will be possible to place plants. In this way, you can form asymmetric, more natural outlines of the future reservoir. Wait for concrete bread.
- At the bottom of the capacity of the future reservoir, put clay, add some water and wake the bottom. For high-quality fixing the root system of aqueous plants, a layer of 6-7 cm thick will be sufficient.
- On the perimeter of the pond gently remove the top layer of the turder, put the reinforcing grid. Cover the trench with a layer of thick cement-sand mixture, leaving a small groove with a depth of 30-40 cm for planting coastal plants. To decorate the pond, you can put round stones around the bath in any order, pebbles or slatry (so that the edges of the bath are covered) - and secure them with a concrete solution.
- In the process of filling the water mini-pond, make sure that the soil does not occur at the bottom. It will be necessary to place the end of the garden hose on the bottom of the bath and turn on the water - so that it comes with a thin jet (it is desirable to cover the end of the hose to splashing).

By equipping such a mini-pond from the bath on their own, it will be possible to begin further planted aquatic plants in it and the inhabitants of its inhabitants of your choice.
Plant decoration Pond from the old bath
For landscaping, mini-reservoir is recommended to take the following actions:
- lowned along the perimeter of the reservoir, an earthen groove can be planted various perennials, coastal moisture and marsh plants, and there are several large stones there for the formation of the coast of shores;
- featuring a group of aquatic plants to its taste, land them into an improvised pond. To do this, it will be necessary to fix the roots of the plants in the layer of bottom clay and stones, place them in the vases at the bottom of the bath or among small pebbles on horizontal shelves.
For decorative design of the surface of the reservoir, small or dwarf lips, water lilies, ores are suitable. Water plants with roots and formed clicnoe kits can be in the nearest natural reservoir. Run fry of small fish from the reservoir (for example, the riding).
Natural asymmetric is easy to give water from changing the width and height of its shores. This can be implemented in the following ways:
- to form on the one hand on the shore of a mini-beach from Crushedbon;
- place nearby Alpine Gorka or Mixboro.
The introduced microorganisms, fish and planted plants gradually multiply and form a pond microclimate on the plot. Gradually, the water will lose transparency, a natural flare will appear on the walls of the reservoir. Thus, the artificiality of the man-made pond will not rush into the eyes, thanks to decorative landscaping, he will acquire a completely natural look.

Useful advice
With the help of a mini-pond from the bath to really create with your own hands on the summer plot fantastically beautiful corner. When it, it is possible to fully apply their creative abilities and fantasy. To care for a reservoir of small size in the open area is easy. Nevertheless, at the same time try to take into account some practical advice on the design and operation of the pond:
- it is not recommended to settle in the cottage mini-reservoir from a snail bath, as they are able to multiply in significant amounts and purify the surface of the bath walls;
- you do not need to try to predict the mini-pond in the country aquarium in the fresh air with goldfish and crystal clear water. In addition, karasi, launched in the pond, will make water extremely muddy, as they prefer to dig in the bottom soil;
- for the settlement of the artificial reservoir, fishing fish are suitable, actively cleaning the aqueous surface;
- in a mini-reservoir, it is not necessary to change water from the bath, it is necessary only periodically (one or twice a month) to add it. Water overflowing over the pond is absorbed into the ground;
- the cleaning of the mini-pond will be required in the case of not controlled reproduction in it of any microorganism or plant.

If there are fish in the mini-pond from the bath water in the cold season, you can not merge - the intention of ice layer on the surface will be promoted in it the microclimate in it, the heat of the deep layer of the soil, as well as a layer of snow by frost.
If you want to leave water in a water branch to wintering, place several plastic bottles on its bottom - they protect the bath capacity from cracking in case of freezing a significant amount of ice. A minor frosty winter will also need to take care of the cracking of the snow layer with a thickness of at least a half-meter covering the surface of the pond.
Pond from the old bath - Photo


How to make a pond from the bath - video


