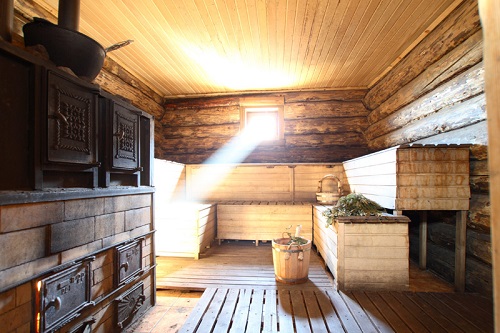
Previously, during the construction of a bath, and it was almost every home, the heat insulation was given little attention. It did not happen due to the illiteracy or laziness of the builders, simply in those days have not yet had durable heat-insulating materials that could withstand regular contact with moisture and temperature differences. Therefore, our ancestors as followed by the walls, the ceiling and tolerated the uncomfortable cooler of the bathroom. Fortunately, progress does not stand still, and today there is a large selection of suitable thermal insulation materials for a bath. This time we will tell you how to insulate the floor in the bath and make it as much as possible.
Content
Why insulate?
The bath floor is regularly exposed to adverse factors - temperature differences, humidity, chemicals (soap, oils for bath, chloric, etc.). In the waters of water and pours constantly, so the floor does not have time to dry. Not all material is able to cope with such conditions, and even ensure comfort and beauty. The destructive effect of high temperature in combination with humidity is exposed to all structures, especially the floor. These are ideal conditions for growing mold and fungus, therefore the durability of the entire bath depends on the surface of the surface of the surfaces.
The main purpose of the bathroom is to ensure the rapid flow of water through the drain hole. Otherwise, moisture will be stirred and soaked. Mostly the floor in the bath is built of wood or concrete. Wooden coating is more common due to its low cost and naturalness, but the specific operating conditions lead even the most durable wooden flooring. Unless, of course, do not provide its correct heat and waterproofing.
Important: Paul in the bath can not be stuck with laminate, linoleum or other synthetic materials, since they contain chemicals that are allocated during heating and harm health.
Today, the optimal option for the floor in the bath is the creation of a concrete screed. It is relatively inexpensive, quickly and simple, and if you do everything in the mind and in the process of installing the floor to establish heat insulation, then such a coating will delight comfort for more than 10 years.

Regardless of the wooden floor or concrete in your bath, it must be insulated. Otherwise, the temperature difference will lead to the appearance of condensate in the already humid room, and visitors will experience discomfort from the cool surface. It is known that the legs should be kept in warmth, so if you visit the bath for the purpose of rehabilitation, and there is cold sex, there can be no speech about the effectiveness of the procedures.
Selection of insulation
Thermal insulation materials for the bath should be selected with special care, since not each of them is able to "survive" in such extreme conditions. If in residential buildings with normal humidity, the use of mineral wool insulation is permissible, then in the case of a wooden bath, it is better to abandon them, preferred materials with a closed cellular structure. These include foam, extruded expanded polystyrene foam, perlite and others. Consider the most popular insulation for the bath.
Polyfoam as insulation
Polyfoam has long been used for insulation of walls, gender and ceilings in various buildings. Its characteristic feature is a cellular structure and practically zero water absorption, so it is so good for a bath.

Denote the advantages of foam for insulation baths more specifically:
- As we have already said, the polyfoam practically does not absorb moisture, therefore it cannot cause the appearance of fungus and mold.
- The foam is not rotting and is not subjected to damage insect pests.
- The material does not burn and does not support combustion, so it can be used for insulation of rooms with elevated temperatures.
- He durable and over the course of several years retains its performance (durability depends on the brand, thickness and manufacturer).
- This is an environmentally friendly insulation, safe for health and environment. The only one, when exposed to a very high temperature, the foam can melt and challenge - this smoke can harm the respiratory system.
- It has low thermal conductivity, which makes it a good insulating material.
- The optimal option for insulation of brick baths and concrete floors.
- Polyfoam can be easily cut manually and customized under the desired size of the room.
- It is light, so it does not waste the design and does not enhance the load on the foundation.
- Even novice self-taught builder will cope with the installation of foam.
For insulation of the floor, not every foam is suitable. Specialists recommend choosing products with high compressive strength - these are green styrodur plates from the German BASF concern, corrugated Natur-III-PZ or smooth Natur-III, Pleeplex, Blue solid roofmate plates.
It is very important that the bathing tutor will be environmentally friendly and did not secrete harmful chemicals when heated. The usual foam and extruded (foamed) expanded polystyrene is suitable in all respects. By the way, polystyrene foaming is carried out with carbon dioxide, not chemicals, so it is absolutely harmless.
From the disadvantages of the material, it is possible to allocate that when horizontal laying requires an ideally smooth surface, so you need to prepare the floor. In the case of a cement screed, it is not difficult, but for the insulation of the wooden floor, it is necessary to hold alignment.
Ceramizite for insulation
The second most popular after foam plastic insulation for the bath is clay. Extruded clay pieces by high temperature and pressure perfectly retain heat and do not absorb moisture. Ceramizite is used as a drainage in the arrangement of foundations and even when planting decorative indoor plants, which speaks of its waterproof and safety.

Ceramzite has a porous closed structure, due to which it perfectly retains heat indoors. When buying for insulation of the floor in the bath it is better to take it with a margin, because during transportation some granules may break.
The thickness of the heat-insulating layer of clay is determined by the estimated loads on the floor, which, in turn, depend on the furniture installed in the bath, the masses of the furnace and the number of people who will simultaneously be there.
Useful advice: For better clutch of clamps, it is recommended to purchase granules of various diameters.
Perlite for insulation
Perlite was invented relatively recently, much later clamzit or foam, but quickly gained popularity, thanks to its good thermal insulation abilities. The insulation has volcanic origin and is an acidic glass with a liquid content of no more than 1%, which explains its strength and water resistance. His name Perlite received due to external similarity with pearls.

In addition to waterproof and excellent thermal insulation qualities, perlite is not able to burn or maintain combustion, to react with chemicals. However, it is necessary to work with it extremely carefully, because the granules are very lungs and quickly scatter with the slightest imitation of the wind.
To prepare the heat-insulating solution, perlite mixed with water in proportion 2: 1, thoroughly stirred to a complete shrinkage of the liquid, after which the cement is added and mixed again. As a result, a rather dry solution should be obtained, a consistency resembling crumbly dough. It is placed on the surface with a uniform layer with a thickness of up to 10 cm and leave to dry by 5-7 days, after which it is poured with concrete.

Useful advice: Before mixing a chop solution, close all the doors and windows to eliminate the appearance of drafts. Cement is better to use the brands not lower than M300. The crumbly mixture of perlite and cement should be kneaded until it becomes less plastic so that it can be easily distributed over the floor surface. If desired, it is possible to lay waterproofing on top of the frozen insulating solution and put the reinforcing reinforcing grid.
Mineral wool insulation
As mentioned above, mineral wool insulation are not very suitable for flooring in a bath due to their fibrous structure. They may be soaked in moisture and spoil the bath ahead of time. But if we are talking about a concrete field, then this option is quite acceptable. Concrete itself does not miss moisture, but if mineral wool plates protect the extra layer of waterproofing, they will serve for a very long time and perfectly protect from the cold.

Concrete floor
To make a warm floor in the bath, first you should warm the foundation, lay there waterproofing and organize a wastewater for water.
The classic structure of the bath with concrete floor looks like this:
- First pour the foundation.
- The concrete overlap is put on it.
- The plate is littered with waterproofing.
- Then there is a heat insulating layer (clamzit, foam, mineral wool or perlite solution).
- Cement screed, reinforced with reinforcing grid.
The last layer can be the electric floor in the bath, which is covered with tiles. Such a coating can be slippery, so wooden grilles are often put on it, which, if necessary, removed and dried.
Concrete Ceramizite
Before entering into the backfill of the ceramisit on the first concrete screed, you need to install beacons. Subsequently, they will help to align the finish tie. Secure the beacons using a cement mortar - when it dries, you can float the clay.
Carefully monitor that the surface does not have slope or irregularities. Otherwise, all work on insulation will come to no.

It is not necessary to install the reinforcing mesh - it is needed in cases where the bath will be large, or it is planned to put a large number of shelves, furniture and other heavy items.
The floor insulated with clay is becoming as strong as possible after a month of active operation.
How to lay a clay:
- Fill the first layer of concrete and align the surface as much as possible using the construction level.
- After drying the screed, set the beacons.
- Pull the grainsite from the granules of various diameters with a smooth layer with a thickness of about 8 cm.
- Fill the second layer of concrete, put the reinforcing grid (you can use a chain or conventional fittings).
- Spend a cement screed, aligning the surface on beacons.
Nothing covered screed will dust and look not very aesthetic, so it is better to bonded with tiles or wooden panels.
Concrete floor
The insulation of the floor in the bath in conventional foam and extruded polystyrene foam is almost the same.

The process consists of the following steps:
- On the installed concrete slab overlap laid waterproofing.
- It is mounted on the plates of the foam joint into the joint as close as possible.
- On top of the insulation, you can put another waterproofing layer or immediately make a concrete tie, reinforced with reinforcing grid.
- As in all other cases, the concrete floor is recommended to bind with ceramic tiles or lay wooden grids on it.
Important: For the insulation of the floor in the bath, the thickness of the sheets of foam should be at least 10 cm (ideally 15-20 cm). Such thick sheets cost quite expensive and take away free space, so many prefer the penplex - with a thickness of only 2 cm it replaces 10 cm of foam.
Wooden floor
Despite the fact that concrete floors serve much longer, many prefer to make wooden coatings, because they are much cheaper, more attractive and natural. Unlike cold concrete or tile, the tree itself holds the heat much longer, slower heats up and more pleasant to the touch.

Not every breed will be suitable for building a bath floor. So, it is not recommended to use boards from coniferous trees, since those when heated can be separated by resin.
The following wood breeds are ideal:
- linden;
- oak;
- larch;
- nut;
- ash;
- cherry;
- birch;
- alder.
Useful advice: So that the wooden floor in the bath longer remains as much and maintained its original appearance, it must be treated with antiseptic compositions. This rule applies to sex in all rooms, except for the steaming, since antiseptics under the influence of temperature will be highlighted by caustic chemicals.
Useful video about the field in the bath, requirements for it and insulation:
According to the design, the wooden floor is almost the same as concrete, only instead of concrete ceiling, wooden beams are placed, and a cranial timber is nourished on them. The insulation is placed on top of the draft floor and protected by waterproofing.
All the above materials are suitable for floor insulation, with the exception of mineral wool and fiberglass. Parchment used to be used as vapor insulation, but today in the market you can find more efficient and durable materials.
Progress:
- The draft floor must be equally aligned before laying the heat insulating layer.
- Place low-grade boards on a cranial timber than a slightly shorter than the distance between the beams.
- Put the rolled waterproofing, putting a piece of material on 10-15 cm. The ideal option will be a waterproofing "breathable" film. When laying, take a 20-cm allowance. Attach the waterproofing using a stapler and curtain the connection location parts with a special wide ribbon.
- On top of the waterproofing, put the second series of cranial boards.
- On the boards tightly laid the insulation slabs, pour clairzit or distribute the chopping mixture.
- On top of the insulation, put the second layer of waterproofing. In the case of perlit, it is necessary to wait for a complete drying of the solution.
- Around the drain pipe will be free space - fill it with a mounting foam.
- Attach the finish floor boards, cut the remaining films of the first waterproofing and attach the plinth. Picture floor Install in such a way that the ventilation space of 3-5 cm wide remains between them and waterproofing. So the tree will quickly dry after wetting.

Some prefer to arrange warm water floors in the bath, but do their own hands without proper skills and experience almost impossible, so it is better to hire specialists.


