The primer must be involved in carrying out any "wet" finishing works - shtchelivation, painting, etc. Its main task is to improve the quality of the clutch of materials with the wall. In construction stores, you can find many primer compositions of various purposes, but why not save and not make a primer with your own hands from the primary and cheaper materials? It is about this that will be discussed in our article.
Content
Why need primer
Before proceeding with the construction "cooking", it is worth understanding why the primer needs, and what it happens. Yes, the primer can be different, and each of the species is distinguished by the impact on the surface, but a little later.
So, the primer is a liquid mixture, which is applied to the base (wall, floor, ceiling, furniture, etc.) and creates a dense film for better clutch with finishing materials - putty, paint, wallpaper, etc. If you finish without primer, it will last less laid.
Some paints are not able to hold on untreated surfaces, especially smooth, but one layer of primer is enough to fix it. In the case of loose, old or shrinkable bases, it can strengthen them, extending the deadlines. Thus, we are approaching different types of effects on the surface.

Types of primers depending on the impact:
- To improve adhesion between the surface and finishing material.
- To increase the strength of the walls (strengthening formulations). Used when repaired in old houses, reconstruction of buildings, wall decoration from porous bulk materials.
- Hydrophobic primers of deep penetration - improve water-repellent and other protective surface quality, clog pores in walls, floor or ceiling, without disturbing natural ventilation (allow you to "breathe").
In addition to the main purpose, almost all compositions have an anti-corrosion and antiseptic effect, and when special ingredients add special ingredients. The characteristics of the primer are determined by its composition, and in the case of home cooking, you can strengthen certain qualities at your discretion.
How to prepare primer
If you started a large-scale renovation in the entire apartment or plan to update the exterior of a country house, recipes for cooking home primer will help to save. The price of purchased compositions is not so high, but still higher than those described in this article. Despite the simplicity of manufacture, homemade primers are not inferior in the characteristics of factory mixtures, and sometimes superior them in quality. The most important thing is to accurately comply with the proportions. Then, when you learn how to make high-quality primer, you can experiment and add other ingredients to improve the characteristics, but still limit the classic recipes.
To increase strength
Such formulations are used in cases where it is necessary to strengthen the walls or ceiling in the old house, if there is no possibility to build new ones. It happens that as a result of increased dampness or weathered walls in brick houses, they begin to crumble, but they don't make sense to demolish them, since they are still quite strong. In these cases, the strengthening primer is used. It is also useful for the processing of concrete surfaces so that they are not dust, for example, when pouring the floor in the garage.
Required ingredients:
- joinery bone glue - 500 ml;
- copper vigor - 100 g;
- soap household 65% - 1 pc.
Copper vigoros can be purchased in any horticultural store. Prepare the composition is necessary in enameled capacity, so prepare a bucket or a large saucepan, which will not be used for cooking. Other materials, such as steel or aluminum, are not suitable, since they can enter into a chemical response with ingredients.

How to cook primer:
- In the enameled pan, type 7 liters of cold water, put on fire and bring to a boil.
- While the water is heated, soda the household soap on a large grater - so it will dissolve faster.
- After boiling, reduce the fire to a minimum and pour in the water grated soap, stirring with a wooden spoon or stick.
- When soap is dissolved, add the required amount of joinery and copper mood.
- Mix the mixture thoroughly and tomit at minimum heat for 30 minutes. Every 3-5 min. Mix to maintain the homogeneity of the solution (do not allow the formation of lumps).
- After half an hour, resume the hot solution through a sieve or gauze, folded in 2-3 layers, and leave cool at room temperature.
The cooled primer can be used to process concrete surfaces, bricks, etc. In addition to strengthening, this primer will protect the base from the appearance of mold, so it is ideal for processing walls in the basement, with the roof reconstruction works, for repair in the bathroom or pool.
Useful advice: If during the cooking process, lumps were formed, before filping them to break them with the help of an ordinary mixer or submersible blender.
To improve adhesion
This type of primer will allow you to paint even the most picky glossy surface, for example, metal pipes or tin sheets. It includes the usual chalk, which creates a rough base that improves adhesion with the finishing material.

What ingredients will be needed for cooking:
- economic soap 70% - 1 pc;
- malyary glue (dry) - 200 g;
- alumokalia alum - 250 g;
- chalk (powder) - 2 kg;
- olife (without additives) - 30 ml.
If it was not possible to find chalk in the powder, it will have to melt it manually. It is important that it be very small, like dust, otherwise it will not be possible to create a smooth rough surface. It is necessary to prepare primer in the same aluminum container.
How to make primer to improve adhesion:
- Boil 1 l of water and pour boiling water alumokalia alum.
- In a separate dish, we have a 10% solution of paint glue.
- Put the glue to the slow fire, warm up and portion add grazing soap, thoroughly mixing each time uniformity.
- When soap dissolves, add the olive and quartz mixture.
- Satch up chalk and mix thoroughly so that there are no lumps. If the composition turned out to be too thick (and high-quality primer should be rather liquid to fill all the pores), add hot water.
You do not need to polish the primer, and after cooling you will have a great composition for processing any smooth surfaces.
Important: Such adhesive primer must be spent during the day, because then it will lose its qualities.
Grounding deep penetration
The most popular primer is deep penetration. This is explained by the fact that any owner wants to protect the walls of his house as much as possible, and how to make it better if not from the inside. The mixture contains PVA glue, which provides an increase in the waterproof of the walls.
It should be stopped in more detail on this component. It is known that PVA is applied not only for the stationery - there are also building compounds that are added to cement and other mixtures to enhance their hydrophobicity and plasticity. PVA is also joiner, and purely furniture, and "luxury", and "extra" - in general, for every taste. But for the preparation of the primer is not suitable for each of them. So that you have a truly high-quality primer, the glue must be precisely building, but used as an additive, and not the main component.

What happens if the glue is too much? Since it turns into a waterproof elastic film after drying, its excess can lead to the peeling of this film from the surface along with the finishing applied to it. If the PVA is too much, the primer will move faster due to the severity of its own weight. It happens that the primratovka is oversaturated with glue, but PVA has a yellowing property with time, and ugly spots begin to be viewed under light trim.
What ingredients will be needed:
- construction PVA - 1 l;
- water - 8 l;
- cement - 1 trowel.
How to prepare primer from Pva with your own hands:
- Divide glue in water and mix to homogeneity.
- Add a bit of cement, mix.
- Strain the mixture through a gauze folded in 2 layers and apply to the surface.
Instead of cement, you can use powder chalk. The primer should be easily and evenly applied to the surface, leaving a barely noticeable white trail.
Useful advice: First, fill with glue into the container, and then gradually add water, actively stirring the composition.
Before processing a large-scale surface, try primer on a small unauthorized area - if after drying it does not appear on the wall, there is no noticeable film, then the proportions are selected correctly. If there is a film, you should add more water.
The primer from PVA not only deeply penetrates into the wall, protecting it from moisture, but also has an antiseptic effect no worse than any factory composition.
IMPORTANT: Do not harm such a primer in the future - apply the whole composition immediately or keep no longer a day, because it loses its properties.
Alternative recipe for homemade primer deep penetration:
How to apply primer
Learn to primitive any surfaces can be in 10-15 minutes of practice. The main thing is to comply with the sequence of actions and do everything quickly.
How to apply primer:
- You can process the surface of the primer only after preparatory work - clean the wall, floor or ceiling from the former paints, garbage and dust. If you are going to cover a concrete surface, you will not fully delete it.
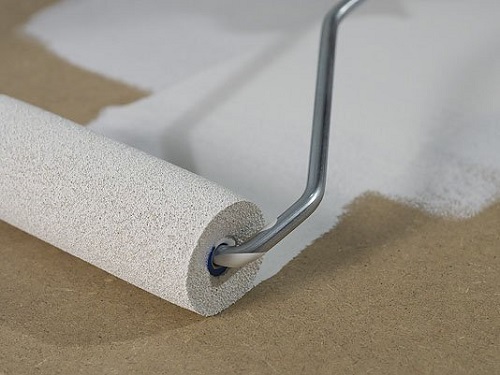
- Pour the primer in the paint bath with the provided barrier to remove the excess mixture. Apply the composition better by paint roller, and hard-to-reach places to process flat brush.
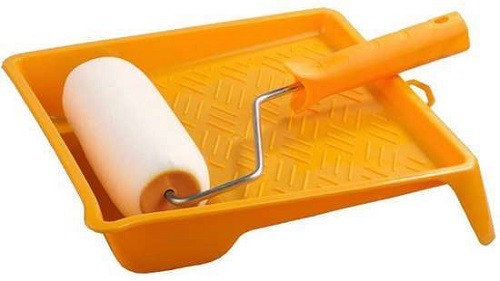
- Moisten the roller in the solution, with a light pressure ride along the embossed surface of the bath to remove the surplus, otherwise, when applied, the primer will splash in all directions. Especially well this moment must be used when processing ceilings.
- Apply to the walls on the walls on top-down one movement, trying not to spend one place several times.
- When the first layer is dry, repeat the entire procedure.

If you have not enough primer, then before cooking a new portion, thoroughly wash the container so that there are no particles of the previous mixture. If this is not done, it will turn into lumps and spoil the new batch of primer.
Useful trick: Many specialists make primer based on the wallpaper glue instead of PVA. It is especially good for processing the ceiling and walls if bright decoration will be applied to them. PVA can over time can yellow, and with the wallpaper glue it will never happen. According to the qualities and depth of penetration, it is almost similar to the construction PVA.
If you are gathered to cover the walls of acrylic paint, then it is not necessary to use a special primer. The fact is that acrylic is distinguished by good adhesion to almost all surfaces, so the main task will be alignment and stripping of the foundation. To prepare the walls before painting, dig an acrylic pigment with water 50/50 and treat the surface.
Primer: Photo.
For the maximum economical soil flow, use a short pile rollers with a length of about 8 mm (no more than 12 mm).

And even better to buy concentrated acrylic dyes -, as a rule, they already contain the soil.

Before applying the prints, the walls should be prepared - scratch potholes, smooth out irregularities, remove old paint and varnish and dust. In some cases, cheaper to see the walls of plywood or plasterboard than spending on solutions alignment.

The primer gluits the smallest particles of the concrete screed dust and help make reliable and durable floors in a bath or garage.

It is not recommended to apply a primer with spraying - such compositions are always very sticky, and wash the blurred furniture or other surfaces after them. Even if everything is closed with a film, sprayed primer will definitely penetrate where it should not be. In addition, it is quite uneconomically - much less solution will leave if the roller is working.


