Among the entire variety of ceiling coatings, aluminum ceilings are extremely popular. These suspended structures consist of subtle rivers, which together are collected in a solid coating. Rush ceilings have aesthetically attractive design and have excellent performance characteristics. Next, we will tell you about the advantages and disadvantages of this ceiling coverage, as well as imagine your attention instructions for the installation of a rush aluminum ceiling.
Content
Types of rush ceilings

There are several types of rush ceilings. Depending on the position of the regions, they are divided into:
- Open ceilings. When installing such a ceiling coating between the rails, small gaps are formed. These joints are further closed with additional inserts or remain in the open state. Open ceilings are considered ventilated, as air can pass through the gaps in the ceiling coating. Due to the diversity of modern materials today, interrepusted inserts are produced in various shapes and design. When using them, you can refresh the surface of the ceiling to be updated with additional colors.
- Ceiling closed type. The ceilings of this type between the rails are not formed gaps. This is ensured due to the presence of special locks on the sides of the planks. Such solid solid surfaces have a rather attractive appearance.
The design style is distinguished:
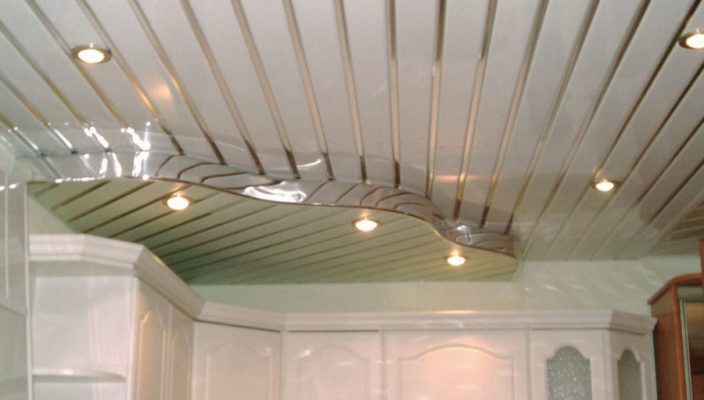
- Italian design ceilings. The outer parts of the planks in such ceiling coatings are rounded.
- Ceilings of German design. At the ceilings of such a style outer parts of planks are smooth.
Choosing one or another type of ceiling and the method of its attachment, you should take into account the area and parameters of the room in which the repair will be performed. If the room has a rectangular shape, then the joints of the rivers in this case should be located from the window towards the wall. In square rooms, the joints must be arranged diagonally. In addition, the correct choice of aluminum for the ceiling should be made. The material must be high-quality, strong reliable. Ceiling planks should not have visible chips and damage.
Advantages and disadvantages of aluminum ceiling

Advantages of aluminum ceiling:
- Work on the installation of aluminum ceilings are simple, they can be made independently, without assistance.
- Installation and dismantling of the cutting ceiling is very simple. Thanks to this there is always open access to communications hidden in the ceiling niche.
- The ceilings of this type are characterized by good quality.
- Aluminum ceiling coating is considered moisture resistant, which can be installed in rooms with elevated moisture levels (in the kitchen or bathroom).
- Wearness, long service life. Properly installed river aluminum coating on the ceiling can last up to 40-45 years.
- The material from which the removal ceiling coatings is made is environmentally friendly. Considering this, such ceilings can be installed in bedrooms and children's rooms.
- In the course of operation, pathogenic fungi and harmful mold are not formed on the surface of such a ceiling.
- The ceilings of this type are resistant to ignition, so they can be installed in the kitchen premises.
- On the surface of this type you can mount various types of lamps. In addition, even special lighting devices, which are designed to be installed in the cavity of the cutting ceilings.
- The surface of the aluminum ceiling has some reflective properties, due to which there is always enough natural light in the room with such a ceiling coating.

Disadvantages of aluminum ceiling
- By installing aluminum ceilings in the apartment, be prepared for the fact that about 30 cm of the useful area of \u200b\u200bthe room will be hidden by this design. This lack is insignificant if there are high ceilings in the apartment.
- Considering the design of the cutting ceiling, it is impossible to replace one separate part, without disassembling the surrounding part of the coating.
- Some types of such coatings have a fairly high cost.
Rush aluminum ceiling design

Aluminum ceiling background design:
- Stringers. Are a carrier element. Facing rails are fixed. Have a p-shaped shape with teeth around. The teeth perform the role of fasteners. Most often made from durable materials, such as galvanized steel or aluminum.
- Suspensions. Speakers as balancing attachment for stringers. In the design of the suspension there is a main rod and a bracket to which Stringer is attached.

- Rake. Facing elements of the ceiling coating. They are thin direct planks whose width does not exceed 20 cm. The length of the ridges can be different from 2 to 4 m. Rakes made of aluminum, so that the ceiling coating and obtained such a name. Mount to stringers of rails using special protrusions located at the edges. Reiki produce various colors, so this type of ceiling is great for lining of ceilings of any design and texture.
- Interreplicate inserts. These are thin plates intended for the "masking" of the joints between ceiling slats. They are manufactured, like railings, aluminum.
- Corner profile. It makes it possible to disguise the seams between the crotch ceiling and the wall of the room.
Consider further how the installation of an aluminum ceiling is performed.
Installation of aluminum ceiling
Tools and materials


Tools for rush aluminum ceiling:
- Drill.
- Hand hammer.
- Level to control the correct design of the construction.
- Roulette for measuring measurements.
- Knife.
- Marker for applying markup.
- Dowels and screws for fastening design elements.
- Scissors for metal.
Mounting carcass

Mounting the frame for the cutting ceiling is performed by almost the same technology as the installation of gypsum panels.

Consider a Read more Framework Stages for Aluminum Rack Ceiling:
- Before starting work, it is better to draw the design layout on paper to make it easier to mount it. For this, the drawings of the aluminum ceiling are compiled. They must display the exact dimensions of the future design.
- Next, we plan the ceiling height with a pencil. For the design of aluminum, you need to choose a height, based on the type of the lamp that will highlight the ceiling so as not to damage the material.
- With the help of the level, we plan the attachment points of a used corner throughout the perimeter of the room. Then secure these items to the wall with a step of 40-60 centimeters.
- The next step will be the installation of the main guides. They are fixed to the ceiling with special suspensions. The edges of the guides should lie on a wounded corner. Install the main guides so that the first of them from the wall is from it at a distance of no more than 0.6 meters.
- Then, 0.6 meters long transverse guides are installed at the required distance. If the ceiling frame is mounted correctly, then the direct angle should be between the guides, and the cell size is 60x60 cm.
- Before mounting the suspensions, the markup is made, in which the places of stringers are displayed. Next drill holes in the base coating. They are fixed with the help of anchors of the suspension rods.
- Then stringers are attached to the suspension (the main carrier structural elements). They are located with a step of 1 m. To attach stringers to the suspension it will take a screwdriver. The accuracy of the frame design should be verified using a level.
Installing RECE

Setting the framework on the frame is performed in the following order:
- Remove the packaging film from the rails and give them a little acclimatize (lie 5-10 hours in the open form in the room where the repair will be performed).
- According to previously made drawings, cut strips for their further installation. Note that their length should turn out about 4 mm less than the distance from one wall to another.
- Lock the rails on the Stringers. For fastening, special fixtures are used on the bearing elements. The correctness and evenness of the fastening of the rail can be adjusted using previously installed suspensions. They allow you to adjust the installation height of the planks so that the surface of the ceiling turns out to be smooth.
- Check the correct installation of installation work with the help level.
- Please note that the last ceiling bar is most likely to be trimmed by width, since the ceiling dimensions do not correspond to the dimensions of the rail. For proper cutting, the planks must be pre-drawing at its entire length to draw a flat line. Marking is done with a knife for a ruler. Then with light loosening movements, the extra part of the plank is removed.
- By setting the last cropped ceiling rail, you should consolidate all the coating around the perimeter using the profile. In addition, if the installation of a closed-type ceiling is performed, it is necessary to place decorative interremptic inserts in the joints.
- Next, the holes are cut to further install the lighting devices. For cutting holes apply scissors for metal.
- At the final stage, the installation of decorative plinth is carried out around the ceiling perimeter. Plinth allows you to hide the slots formed between the walls and the ceiling coating.


