Currently, there are many ways to install sexual coating in the construction of specialists. Among the most popular: Installation on the final screed, on the dry tie and laying on the lag. It is the last method that is the oldest and proven, about which we will talk about in this article.
Content
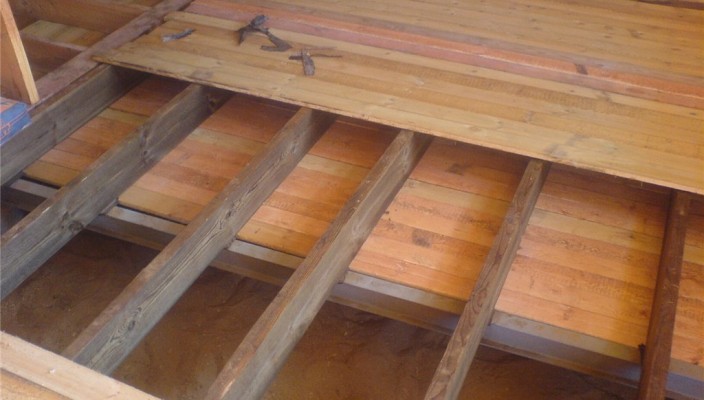
What is lags

Lag - flooring frame, on which the finishing floor is placed. As a lag, as a rule, a well-dried wooden bar is at least 2 meters long and a cross section of at least 110x60 mm. However, recently builders are used by lags from polymeric materials that have the best performance. When installing lag in a wooden house, logs often use logs. Lags made of logs are stacked using the same technology as designs from other materials.
When choosing a material from wood, it is necessary to pay attention to the quality of wood:
- First, as we said earlier, it should be dried, otherwise, during operation, the tree will be deformed that, in turn, can damage the flooring.
- Secondly, wood should not contain bitch. At the site of the lag, there will be the least strength and there is a big risk of its destruction under load, which will lead to the emergence of failure failures. It is advisable to process the oil before installing wood to extend its service life.
Advantages and disadvantages of gender on lags

The main advantage of such a floor configuration is its relative cheapness and simplicity of installation. In private houses, when the height of the floor over the foundation can reach several tens of millimeters, it is not entirely effective to make a concrete screed, since for the intake of such a distance it will be necessary for a large amount of filler, which costs rather silent. In addition, the use of a lag design will allow you to mount the ventilated floor.
The air layer under the floor will make it warmer due to low thermal conductivity, and will also not give to accumulate moisture, which negatively affects the finite coating. With the help of Lag, you can fix any surface irregularities, aligning them in terms of level. Under such a floor, you can lay a layer of insulation and noise insulating material, as well as conduct communication trigs. The design of the lag is rather durable and with proper installation serves for a very long time.
Floor disadvantages on lags are associated with wood features. As a rule, they are manifested in violation of the installation technology or the rules for selecting bars. If the loggy section is incorrectly selected, the distance between them is incorrectly calculated, the substrate with a violation of technology is laid, such a floor will not serve for a long time. In low ceilings, floor laying on lags can reduce the size of the room.
Selection of lag for flooring flooring

This operation is better to entrust professional builders who will be engaged in installing gender. However, if you are going to engage in these works yourself, when choosing a material, you must consider several main conditions:
- Dimensions of the room. Depending on this parameter, the number of lags, their cross-section and length are chosen. As a rule, bars have across the room so that the floorboard, which will be mounted on them, lay down along. Thus, the seam board will not be visible when light from the window. The calculation of the size of the lags is simple. To do this, use the dependence of the size of the span of the room and the dimensions of the bar. For a span of a length of 2 meters, the minimum segment of the bar is 110x60 mm, for 3 meters - 150x80 mm, 4m - 180x100 mm, 5m - 200x150 mm, 6m - 220x180 mm. If the room enters the border value, then choose the size of the lags more, with a margin. That is, with a span length of 5.3 meters, it is better to take a 220x180 mm ram.
- Load on the floor. For intensively passing premises, such as a corridor or kitchen, the number of lag should be greater, just like their size. Such a floor is laid on solid wood species capable of withstanding heavy loads. On the Internet you can find a variety of videos on the installation of lag, which oriented in the correct choice of material.
- The distance between the floor lags, and, accordingly, their number is calculated depending on the thickness of the gender. The dependence is as follows: with a thickness of the board 20 mm, the distance between lags should not exceed 300 mm, with a thickness of 24 mm - 400 mm, 30 mm - 500 mm, 50 mm - 1000 mm.
How to install lags: Highlights

The frame configuration depends on the material from which the coating will be laid. If planned flooring from a solid flooring, then the lags can be placed in one direction. If you need to install leaf panels of thick plywood, chipboard or OSB, then on the place of their joint you need to put transverse lags so that all the joints lie on them. Otherwise, the junction that "hangs in the air" will be fed and as a result of friction of two plates to produce not very pleasant sound. Before installation, it is necessary to consider the waterproofing system. To do this, it is better to use runneroid, rupture or polyethylene.
How to install lags for the floor on wooden beams

In old houses with wooden floors, lagows are attached directly to wooden beams. Before starting the floor of the floor, it is necessary to evaluate the reliability of the beams. If they are in poor condition, it should be taken to strengthen them. Brucks are attached to the beams with screws whose diameter should not be less than 6 mm. Before fixing the lags align in level. During work, it is necessary to be extremely attentive in order not to split the board. To do this, before screwing the screw on the site of its installation, drills a hole with a diameter half of it is less than its size. Fasteners for lags are installed in a step of 300 mm.

If the beams are located at a distance of more than the thickness of the main coating allows, the lags are stacked in two layers in cross-order. The first layer is attached to the beams, and the second is placed on it with a smaller distance between the lags.
Installing lag with your own hands on a concrete base

The most often wooden floor is installed on concrete overlap. In old houses, especially in those in which overlaps consist of several small concrete slabs, the floor is laid on the lags. The fact is that, the more the junctions between the slabs of the overlap, the less gently they stacked. Yes, and the plates themselves, at the paternos of construction, they were not too qualitatively, which, in turn, corrected wooden flooring. It is still worth noting, the wooden floor on the lags due to its good qualities is often found in new buildings.
Installing wooden lags on concrete - not too complicated operation and it is completely able to do it yourself. An important point in the production of such works is the arrangement of waterproofing. It is needed so that the tree does not absorb moisture, which comes from concrete. If the means allow, the insulation must be stacked on the entire surface of the overlap, if there is no - under the substrate lag. Polyethylene or runneroid can be used as waterproofing.

Bruck laying is produced using a level. The first laid two extreme lags at a distance of at least 50 mm from the wall. Align them in terms of level. We produce height adjustment using wooden bars and wedges. So that the wedges did not fall out of the lags, the side of the bar sewing them with a nail. Substrates for lags set with increments of no more than 50 cm. When the extreme beams are exhibited, sewing them 2 - 3-black boards. The remaining lags put on these boards. After the frame is mounted, laid the heat insulation layer. To do this, it is better to use mineral wool in rolls.

In some cases, when the surface on which the lags are planned is too uneven, a draft screed is poured before assembling a sex frame. Such a step will make for the floor a stronger and even base.
Installation of lag on the ground

This method of laying is most often found in private houses. Initially, it is necessary to prepare the soil: it is carefully tumped. To do this, you can apply a large heavy log using it as a roller. It is recommended to make a simple traamman, welding the iron handle to a metal plate with a thickness of 20 mm and the size of about 300 x 400 mm.
After the surface of the surface we fall asleep a small layer of 2-3 cm of clay or other filler. Next, proceed to the fill of the foundation pillars under the lags. This operation is done in the following order:
- On the walls we make marks corresponding to the position of the lag.
- Then from the edges of the marks retreat 20 cm and make new labels to set the rush. In the same way, I act on another axis of the room.
- At the intersections of the cords, we drive the pegs - they indicate the position of the corners of the poles.
- Further, in the outlined places, we remove the part of the soil, the pit is tamped and falling asleep crushed stone, after which they are tamped again.
- We establish a formwork with a height of 100-150 mm.
- On the bottom of the foundation pit lay a layer of waterproofing.
- We reinforce the foundation of the grid from the reinforcement with a diameter of 8 mm, welded or twisted wire. The size of the reinforcement in height should be 50% of the height of the foundation pole.
- Pour concrete. To do this, use the "skinny" mixture in which sand or dropping more than cement. After that, let him dry 2-3 days.
- After drying the concrete, we remove the formwork and put on the columns of the rubberoid pieces.
- We put two layers of bricks, and the second layer should be placed perpendicular to the direction of the lag.
- The brick top is a soundproofing gasket.
- We carry out the installation of lag. Confirm them to the support columns with the help of the corners. Corner to the foundation is screwed with a dowel, and to the lag - with a screw.


