Modern designers are often enough as an interior decoration use arches. The most suitable material for the arch structure is considered plasterboard. Such jewelry is not expensive, but it gives the interior elegance and uniqueness. Plasterboard arches perfectly fit into any design ideas due to its diverse and bizarre forms. Run arch personally not be easy, if you carefully observe all the following rules and guidelines.
Content
- Types of arches made of plasterboard
- Why arch made of plasterboard - perfect interior decoration?
- What tools are needed for the manufacture of plasterboard arches?
- What plasterboard used for the arch assembly?
- How to make arch of the drywall?
- Creating a future arch project
- How to perform the preparation of the opening?
- How to perform cutting work Drywall?
- How to make a frame for the arch?
- How to install drywall on the arch frame?
- How to decorate a plaster archway?
- How does the material perform decoration arches?
- Conclusion
Types of arches made of plasterboard
In order to properly make an arch made of plasterboard with their hands in the first place is to understand what they do there.
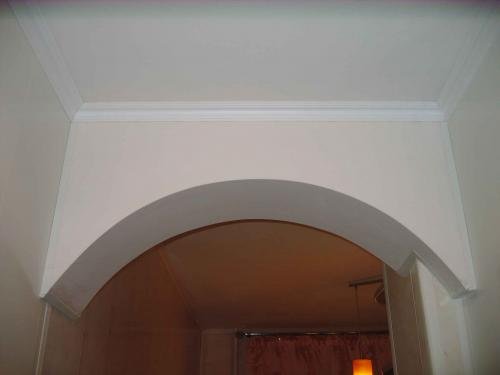
- "Classic" or round. The radius of curvature is equal to half the width of the structure arched opening. This type of arch is advantageous to use in the classical interiors. The only significant drawback release that it visually takes much the height of the opening.

- "Portal" is the easiest and cheap solution. Such an interroom arch of drywall will become the perfect addition of the classic interior or style of Hai - Tech. It is also appropriate to install the arch "Portal" in the field of angle formation from the walls.

- Openwork arch. A distinctive feature of this design is the presence of through holes that are located along the opening line.

- Gothic arch. The highest point of such a door arc made of drywall is formed by convergence under a small angle of two planes.

- Arch "Romance". This design is characterized by the presence of two slightly rounded parts and a flat element from above. The advantage of the arch point the low consumption of plasterboard.

- Arch with a displaced center (asymmetric). Refers to a number of economical structures. Asymmetric arch is often used in modern interiors, but it looks not boring and rarely when bored. It can be formed by a circle of a small radius or at all have only a rounded corner.

- Designer arch (multi-level). The manufacture of this type of arch must certainly require the skills of handling plasterboard and fantasy.

Important! If the height of the door opening is 2 meters or lower, the installation of the plasterboard arch is not appropriate, since it is initially a small space, it will be visually further reduced. In this case, the only proper solution will be the easiest rounding of the corners of the doorway.


Why is the arch of plasterboard - the ideal version of the interior design?
To understand why such a constructive solution is so popular, it is enough just to list several major advantages of the arched design:
- gives the interior of uniqueness;
- simplicity of installation work;
- the design of the arches from plasterboard is infinite;
- cheapness;
- plasterboard is a convenient material for completing complex and rounded structures;
- this material is easy to cut and mounted, and when wetting it can be given a curved form;
- the surface of the drywall is smooth, and this significantly simplifies the process of putty;
- ease of material allows you to install yourself without difficulty.

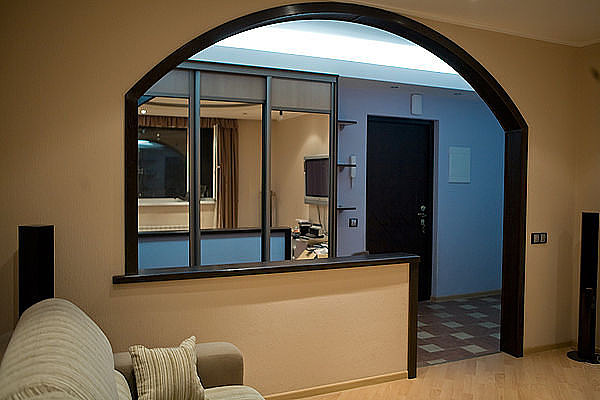
Important! Assessing the interior of the room in advance how attractive is the interior of the room, and how can I transform even the simplest accommodation, it is worth viewing a few photos of the arches from the plasterboard already embodied ideas.


What tools are needed for the manufacture of plasterboard arches?
To mount the arches yourself, will definitely need to purchase a set of the following materials:
- ceiling guide profiles 2.8x2.7 cm (sometimes 6x2.7 cm);
- sealing tape;
- nails-dowel;
- roulette;
- aluminum rule;
- hammer;
- electrolovik;
- hoven for metal;
- screwdriver;
- a knife for cutting drywall;
- a set of spatulas;
- putty for sealing seams;
- perforator;
- protective corner of plastic;
- self-tapping screws 2.5-3.5 cm;
- acrylic primer;
- plasterboard sheets.

Important! Carefully approach the choice of a set of materials, since the result of the work performed and the appearance of the plasterboard design will be directly dependent on their quality. Given the fact that consumption is assumed to be small, it is quite appropriate to acquire expensive high-class materials. With this approach, it will not have to re-design the plasterboard arches in a couple of weeks.


What is the plasterboard to use arches for mounting?
To perform the installation of the arch will suit the plasterboard of any thickness. When choosing, focus on your own design project, as well as on the thickness of the walls of the intended finish.
Important! Standardly, for the end part, the material is acquired with a thickness of 1.2 cm, and for the arches - 0.9 cm.

How to make a plasterboard arch?
In the process of manufacturing the arches from plasterboard, follow the next sequence of actions, and you will not have detects or incorrectly performed works:
- Create a design project.
- Prepare the opening.
- Remove plasterboard on the details.
- Mock the frame.
- Install the arch.
- Reduce the arch.
Important! In addition to the text instruction, be sure to browse the video on the installation of the arches from the plasterboard to visually see the whole process and understand the basic principles of design and design.

Creating a project of the future arch
To develop an arched project, follow these steps:
- Decide with style.
- Perform the calculation of the diameter and the height of the structure.

Important! To calculate measurements to perform accurately, draw the doorway on paper. Based on the created drawing, cut the template of the natural value from the cardboard and attach it to the measured interconnection effect. Such a method will help you to see in advance how the arch will look after it is mounted. At the same stage, decide on the backlight of the plasterboard arch and other methods of decorating.


How to prepare the opening?
To perform installation of the arc from drywall, prepare the opening. Initially dismantle the door opening box to increase its height. Then carefully clean the surface from the residues of the detached material, dust and contamination. 
How to perform the cutting of plasterboard?
Properly make the arch from drywall - easy, if you have all the tools at hand and be able to use them. 
Perform the drawing of the material as follows:
- From the highest point and to the end of the arch arch, remove the height and width measurements.
- Cut out 2 identical rectangular elements of the desired parameters from the sheet of plasterboard.
- On the resulting material, apply the layout of the lateral side of the structure.
- If the upper element of the arch is arcuate, then draw an arc using awl (or nail), a dense thread and a pencil.
- Fix the nail or sewn in the center of the future semicircular line, and a strained thread with a pencil at the end swipe the desired dimensions.
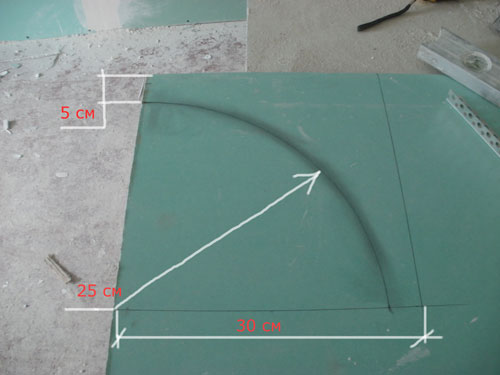
- Using an electrolybiz, cut along the planted line.
- Cut item to the leaf of plasterboard, circle a pencil and cut out. It will be the second top of the arch.
Important! The upper elements of the arched design in the process of fitting must be freely mounted in the opening, having a gap to 0.7 cm.


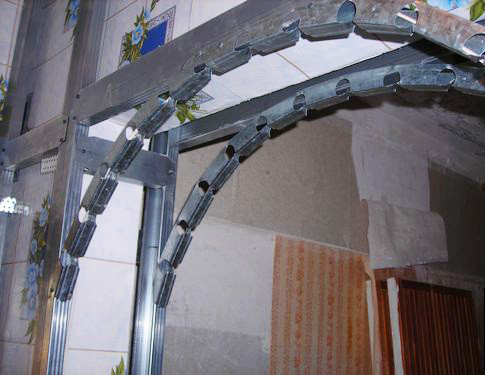
How to make a frame for arch?
To secure the arch in the opening, the framework of metal profiles should be constructed on which the cut-off drywall spare parts will be mounted. 
To do this, follow these actions:
- Perform accurate measurements of the length of the arch of the arch and apply marking on the guide profile 2.8x2.7 cm.
- Cut the profile with scissors for metal.
- Remove the profile curved shape.
Important! To do this, over the entire length of scissors, make cuts on the edges, observing the indentation 5-7 cm.

- In the same way, prepare the second metal profile.
- In the wall of concrete or brick, drill the hole with a hole every 25-30 cm. 5 cm deep.
- Insert a dowel in the holes.
- Install the arcuate profile on the inside along the drywall radius.
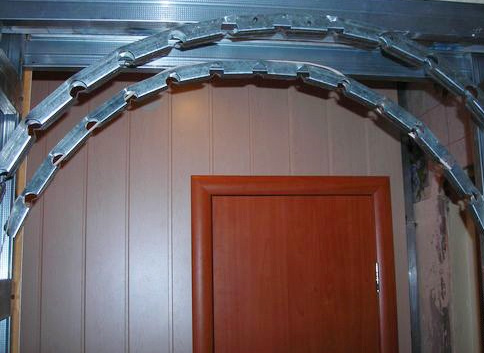
- Fasten it with self-assembly for metal from the drywall.
- Perform a distance between the internal and outer edges that needs the manufacture of jumpers.
- For the manufacture of jumpers, cut off part of the rack profile.
- Shorten the ribs that are on both sides of the profile.
- Fasten the jumpers on the arch by self-drawing, observing the distance of 10 cm.
Important! There should be 4 vertical racks suitable in the height of the billets, and 2 horizontal suitable in width.If the wall in which the arch is mounted, has a greater thickness, the base should be fixed from the outer and inner edge of the opening.


How to mount the plasterboard on the frame of the arch?
When installing the arches necessarily do all actions carefully to avoid damage to the gapsokarton elements. Only in this case you will be able to get the expected attractive result and exclude the overrun of materials. 
Sequencing:
- Make cross-cuts on the inside of the drywall strip and take care of the edge gently.

Important! To obtain a more efficient result, make the molding of drywall by the other method described below.
- Make a perforation on a billet with a needle-coated roller.
- Moisten the detail of water.
- Look out the gypsum of the place.
- Carefully bend the sheet in the desired direction, observing the proportion of the template.

- Screw all elements of the design of the arc from drywall self-draws.

Important! To withstand the distance between the fasteners of 6-7 cm.


How to re-establish a plasterboard arch?
Before starting finishing works, make sure that the edges of the structure are evenly inclined. If it does not meet the requirements for a specific decorative material, cut the protruding places with a knife. 
Sequence of further action:
- Over the entire design of the plasterboard arches, pass the sandpaper, pouring the protruding corners and irregularities.
- Get all the seams with a putty makeup.
- Shakes creep sickle ribbon.
- Place the corner perforated profiles on the spacure mixture.
- Wait until the putty dries.
- Speak the irregularities of sandpaper.
- Open the design layer of primer and wait for it drying.
- Sharpen the arch with a special finish solution.
- After drying, treat the surface with grinding.
- Start decorative design.


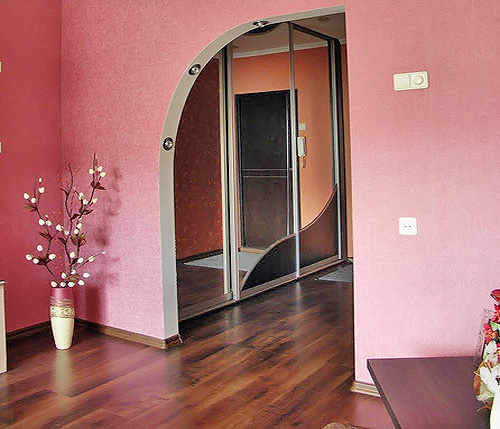
What material to decorate the arch?
There are many ways of decorative decoration arches from drywall, the choice of which directly depends on your individual preferences and stylistics of the interior. 
From the following list of the list, select the option that will be most suitable for all criteria - prices and latitude of designer capabilities:
- Finishing with wallpaper. This is the traditional arc design method. Wallpaper varieties are limitless, while each of them have a kind of color scheme, a pattern and texture. With this finishing material, the interroom opening may look not just attractive, but really original. Also, this material is considered practical, especially wallpaper on a phliselin or vinyl-based basis.

Important! Specialists are recommended for decoration arches, pick up a wallpaper with a bulk pattern.
- Painting with water-emulsion. From the point of view of practicality, this option is considered the most appropriate. The surface made by applying water-resistant paint is easy to clean, and also has a high damage stability indicator. If you have skills in the field of artistic painting, then a wonderful drawing can apply on top of the paint layer.
Important! The design of the arch will require a small amount of paint, so it should not be bought to the finishing material. In the future, the reliability of the structure and its appearance will depend on the quality of the applied paint.

- Crossing arched opening with decorative tissues. This finish will look very extraordinary and noble. Among the entire variety of materials, give preference to the passage, viscose, flax, jute, jacquard, atlas. Each of these tissues has a specific structure, color and pattern. But it is worth noting that this type of finish is not suitable for each interior, so we carefully think over all the details of such design.

Important! An ideal option will be such a type of decoration for premises in the style of luxurious classicism or baroque.
- Decorative stone finish. The most expensive and time-consuming version of the decorative decoration arches. But this approach is the most reliable, and undoubtedly give chic to your interior. Also do not forget about the durability of stone finishes, which will serve you for many years.

Important! This method is perfectly combined with almost any style of the direction - the main thing is to guess with the color range and the size of stone elements.


Conclusion
Installation of interior architecture from drywall do it yourself easy to perform enough, if you clearly adhere to all the rules and recommendations for its manufacture. Get exclusively high-quality materials, carefully think about the design project, and you will undoubtedly succeed to decorate quickly and unstantively and improve your housing.


