The sauna is one of the most pleasant places where you can spend your leisure. Clean the body and "soul", chat with relatives or friends, order and strengthen your health - all this can be done using a pair. Previously, Russian bath was the only place of hygiene not only in the countryside but also in the big cities. Now, when every house has water, electricity, gas and sewerage system, and, accordingly, there is no problem with the shower, sauna or bath turned into a place of rest, which is simply a pleasure to combine "business with pleasure". Build a sauna in their area at first sight is not very difficult, however, in its construction there are nuances that need to be observed that the result was "on high". To learn how to build a sauna with your own hands - explain further.
Content
- saunas
- Tips and recommendations for the design of the sauna
- How to put the foundation of the sauna with your own hands
- Ventilation and basic sauna design requirements
- Construction of the walls and roofs of the sauna
- How to make a sauna oven with your own hands
- Proper lighting in the sauna
- How to insulate the sauna do it yourself
- Features of the manufacture of sex in the sauna do it yourself
- Features of the construction of a frame sauna
- How to make a sauna with your own hands: video
Views of Saunas

There are several types of saunas that differ in temperature and humidity.
- Russian bath - features an average temperature regime (up to 60 ° C) and high humidity (up to 65%).
- Finnish sauna. It has more extreme temperatures (up to 100 ° C) and low humidity (up to 20%).
- Wet sauna. This is the most extreme view. The temperature reaches 80 ° C with high humidity up to 30%. In such conditions, people can only be healthy.
- Turkish sauna. The temperature in such baths does not exceed 40 ° C, with air humidity up to 80%. In such baths, people can be long, taking massage and other medical procedures.
- Japanese sauna. The most exotic type of sauna. It is a conventional hot water container. The temperature fluctuates from 40 ° to 60 ° C.
Tips and recommendations for the design of the sauna

It is impossible to successfully building a sauna without proper design. The sauna is not too big and difficult room, so the project to it can be done independently. To do this, consider several important points:
1. Arrangement of construction. Concerns only those saunas that are located in separate buildings. When planning the location of the structure, several factors must be considered:
- first, the availability of communications. In the sauna, there must be a water supply, sewage, electricity. Otherwise, its use will be complicated;
- secondly, distance from home. Return over the frost through the entire area after the pair - the pleasure of "below average". Also, the sauna is trying to arrange in the backyard to hide from the neighbors' eyes. The most optimal option of the sauna is an extension to the main home. This will significantly save on communications and reduce the distance from the steam room to the house.

2. Number of rooms. The use of the sauna should be comfortable. To do this, it should be provided for at least four separate rooms:
- directly steam room. High temperatures. Has a small area, which is calculated based on the planned simultaneous number of visitors;
- washing or shower. It is desirable not to combine the steam room and shower. Some builders neglect this in the hope of saving on construction, however, it only leads to additional costs. The fact is that soap can have a negative impact on the wood, which is covered with a pair and from which racks are made. Yes, and the quality of the couple in such a steam is noticeably deteriorating;
- restroom. This room is not entirely necessary. It is necessary in order to spend time in a circle of family or friends to bath procedures or after them. As a rule, this room is the largest area;
- pregnant. A small room for removing and storing the outerwear. The only one that does not need to be missed. Usually its area does not exceed 2 m 2.
3. Hydro and vaporizolation, insulation of walls. The presence of insulation in the sauna, as well as vaporizolizing materials is mandatory, otherwise mold and fungus on the walls are simply provided.
How to put the foundation of the sauna with your own hands

After the Bani project is ready, you can start the foundation tab. Of all the types of foundation, the ribbon basis will be the most optimal option. It will take:
- Sand.
- Crushed stone.
- Plaques for formwork.
- Armature with a diameter of 10 mm.
- Concrete.
Procedure for work:
- The first thing on the project in the places of construction of the walls is digging by a trench, a slightly more than one brick and a depth of 0.7 meters.
- The bottom of the trench is stacked with a layer of sand 10 cm, and the same layer of rubble. They must be carefully tumped. Then the formwork is placed in the trench, inside which the reinforcing belt is mounted.
- Next, concrete floodbing inside the formwork. Prepare it from the cement-sand-choggy mixture in proportion 1: 2: 2. Since the end of the fill before the start of the construction of the walls (unimportant, wooden or brick) must be held at least 20 days.
- After pouring the concrete, the leveling layer of the solution and a layer of waterproofing is placed on top of it. For the latter, a regular runneroid is used.
- During the construction of a brick furnace, a separate foundation for it is necessarily satisfied.
- The construction of the sauna walls is no different from the construction of houses and other buildings.
Ventilation and basic sauna design requirements

Ventilation in the sauna is one of the main elements. Mounted with errors Ventilation will not give a double room to warm up normally, and after the adoption of the procedures will not give a completely dry. And the natural convection of the air with incorrectly performed ventilation will be impossible, as a result of which the steam room will heat up unevenly.
What should be the ventilation in the sauna:
- The receipt of fresh air to the pair should be provided with a ventilation window. Make it at an altitude of 50-60 mm from the floor under the furnace. Also fresh cooled air should come through the gap between the floor and the door. Its width should be 50-70 mm. Thus, the cold air will take place at the bottom, heated with warm ovens and ride up, thereby displacing already spent hot air.
- To remove air from the steam room, two ventilation holes on the opposite wall are installed, which are connected using one box. The first hole is made at an altitude of 1 meter from the floor, the second is under the ceiling. All air vents such as input and outputs must be equipped with gate shutters so that optimal ventilation modes can be created depending on the steps of using the sauna:
- wait. The supply hole is open, the upper exhaust is closed, the lower open;
- usage. The supply hole is closed, the upper exhaust is closed, the lower open;
- dry sauna after use. All holes are open.
Construction of the walls and roofs of the sauna

The most important thing at this stage is to determine which material the walls and the roof of the sauna will be erected. The real sauna, naturally, is built of wood - both from the rounded log and from the bar. Wood better supports moisture balance, because it is a natural material. Yes, and when heated, it highlights pleasant couples that are good for health. However, not all regions have access to cheap wood. In this case, the walls are brought out of the brick. Shlakoblock should not be used, as the slag contains many harmful impurities that are not too useful for health.
Most often for the baths are building single-sided roofs from a rounded timber. The contour crate is erected from strong boards. The distance between each of them should be at least 30 cm. Fix the bars starting from the skate. Roof frame is covered with ceramic tiles or slate roofing.
How to make a sauna oven with your own hands

The furnace is one of the main devices of the sauna. It is this unit that serves to heat the steam and heating of the entire premises. For saunas, stoves are used. The principle of their work is based on the fact that the furnace gives its heat-laid stones laid on it, which in turn are peculiar batteries.
Kamenka are:
- Deaf. In such furnaces, the stone mass is separated from the furnace with a partition from chamot or steel. The advantage of such a design is that smoke does not pass through the stones, leaving them clean. Deaf Kamenka can be coated with any firewood, which cannot be said about flowing. You can pour water on stones in any quantity, and at any time, without fearing to flood the firebox.
- Flowing. The stone mass in such furnaces is located in the casing above the furnace. In this case, the exhaust gases pass through the stones and go out. You can turn such a furnace only to firewood that does not give a large nagar (aspen), or pellets. Watering stones from such a furnace can only after full fuel slightly before the formation of gray ashes. Stones will need to constantly remove them from soot. The advantage of such a furnace is a uniform and relatively fast heating of stones, which significantly saves fuel.
According to the material of the furnace manufacture:
- Stone.
- Metal (steel or cast iron).
The latter at the expense of its compactness and small cost were gained great popularity. The parameters of the furnace are dependent on the size of the pair and adjacent rooms.

The simplest design of the sauna oven, which can be made with your own hands, is a simple bourgeitry. They are used in small saunas of up to 20 m 3.
- For its manufacture, a sheet is 6 mm thick.
- Length Bourgeisk - 900 mm.
- Width - 600 mm.
- Height taking into account the casing for stones - 800 mm.
- Two doors should be provided in the burzhuyk. Upper - 300 x 230 mm - loading size. Through it, fuel is served in the furnace. Lower - 300 x 100 mm size - to adjust the thrust and harvesting ash.
- The diameter of the chimney for such a furnace should be at least 100 mm.
- The grade grille can be made from angle of 25 x 25 mm and a steel strip of 20 x 20 mm, the strip is placed in increments of 15 - 20 mm.
- On top of a glass of steel rod or reinforcement with a diameter of 6-8 mm, the "basket" is digested for styling stone. Since the weight of the stones is quite significant, the quality of welds should ensure the reliability of the design.
- Since the steel furnace weight is not too big, it does not require a separate foundation for its installation, which reduces the cost of building a sauna.
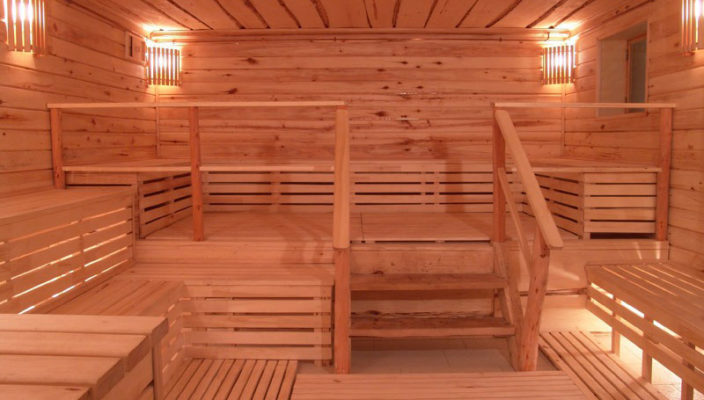
Proper lighting in the sauna

Since the sauna refers to the premises of high humidity, the requirements for lighting in it are very tough:
- The light switch must necessarily be outdoors steam room.
- The lamp must be necessarily moisture protection, hermetic. They have it on the opposite side of the wall at the entrance.
- If the lamp is two, then the wiring is located under the stuffing of the steam room in a special metal-plastic sleeve.
- The light from the lamp must well light the furnace so that it can be seen from any corner of the steam room.
- In the rest of the sauna premises, the requirements for the installation of lighting are the same as in the house.
How to insulate the sauna do it yourself

A prerequisite for the construction of a sauna is its insulation. It is equally concerned with both wooden and brick buildings. Proper insulation will lead to a significant reduction in firewood consumption for steaming, as well as reduced heating time. In addition, the pair will not quickly cool.
The insulation of the sauna is carried out everywhere:
- Walls.
- Ceiling.
- Floor.
For the insulation of the floor, it is mainly used by clay, on top of which the screed is poured and the tile is stacked.
Mineral wool is best suitable for the insulation of the walls. It is not hygroscopic, withstands high temperatures. The wool is installed on the lattice from the bar, a layer of vapor barrier is placed on top of it, then the wall is sewn with lining. This is the best material to cover the sauna with your own hands.
The ceiling is insulated by the same wall as the walls.
Features of the manufacture of sex in the sauna do it yourself

The most practical option for both pairs and other sauna premises are concrete floor. Many prefer to lay wooden, but it requires very careful care, and, given the humidity, its durability is in doubt.
The floor in the sauna is manufactured as follows:
- The layer of rubble and sand is poured.
- A reinforcing belt and lighthouses are established.
- A black screed is poured.
- Sweep layer of clay.
- A pistol screed is poured.
- The ceramic tile is stacked.
Features of the construction of a frame sauna

Frameworks have now become extremely popular due to its low cost and high installation speed.
- The feature of the frame building is that it consists of a wooden frame, which will be covered outside and inside with finishing materials.
- The frame, as a rule, is installed on the pile foundation. Paul in such a bath can only be made wooden. It is installed on special lags.
- Making the crate with their own hands is the most important stage of construction of a frame sauna. For this, a wooden timber is used. The window frames, internal and outer sheathing will be attached to it.
- From the inside the frame sauna is triggered, and outside - professional flooring or vinyl siding. The insulation is necessarily stacked between the trim.


