The gate is one of the most important architectural elements of the design of the private house. Not only the convenience of arrival and cargo car depends on the proper choice of the gate configuration. There are many varieties of gate designs. The fact that such a sliding gate is, as well as how to make them with your own hands, let's tell further.
Content
- Features and varieties of the design of the retractable gate
- Requirements for the setting of the gate of the tight type
- What materials and tools are necessary for the manufacture of a rollback gate
- Choosing a material for making a rollback gate
- Severity of manufacturing design with your own hands Calculation and project development
- Installation of pillars and the foundation of the sliding gate
- How to make a frame and tinted the slotting of the sliding gate with your own hands
- Setting the gate mechanism
- Installation and checking the work of the sliding gate
- Selection and installation of the electric drive
- Retractable gates do it yourself: video
Features and varieties of the design of the retractable gate

Basically in private homes use the following types of gates:
- Swing. Consist of two, most often equal, halves that swap the yard or outward. The advantage of this type of gate is that there are no many space for their installation and operation. They will become an ideal solution for narrow courtyards, where there are simply no places for the skipping sash. The disadvantage of the swollen gate is their complex automation.
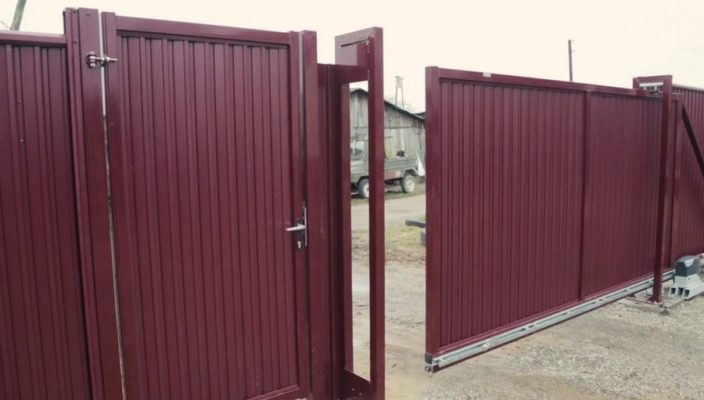
- Sliding gates. Are among the most popular species. Consist from one, less often two sash, which are revealed in two sides. Have a more complex design than swing, however, due to this, it is easier to automate.
Currently establish several basic types of retractable gates:
- Suspended gates. The sash of such a design is suspended on a special beam, which connects two columns of the opening. The disadvantage of such a design is that oversized transport, if necessary, will not be able to drive through the opening. The advantage of the suspended sliding gate is their reliability.
- Rail gate. The features of such a design include the presence of a reference rail, which moves the sash. The advantage of the rail gate is that they can overlap the gorgeous opening of any width, which cannot be said about console structures. However, the presence of an obstacle in the form of a lower rail is not always permissible.

- Console gate. They differ in the absence of reference rails and suspended beams in a portable opening. Due to this, the performance characteristics of this design are significantly improved. All elements of this type of gate are hidden behind the fence section, which improves their reliability. The disadvantage of the console design is the limit of the width of the portal opening. True, for a private house it is not a decisive factor.
Requirements for the setting of the gate of the tight type

Installation of the sliding gate of the console type involves the presence of certain conditions:
- The width of the front part of the site should be sufficient for the free movement of the sash. The length of the cantilever sash is equal to the width of the portable opening plus 2/5 width, as well as plus tolerances of 200 mm on each side. The side of the fence for which the sash will "hide" will not be less than a given length. Otherwise, the installation of the cantilever gate is not possible.
- Metal structures should be strong enough to withstand the side loads. In its manufacture, special attention should be paid to the quality of welded seams.
- Accessories of the retractable gate must fully comply with the conditions of operation - weight of the sash, its length, weather conditions. Incorrectly chosen fittings can cause problems during the work of the gate.
What materials and tools are necessary for the manufacture of a rollback gate

For the manufacture and mounting of the retractable console gate requires certain materials.
For making sash, you need:
- The pipe is profiled by a cross section of 60 mm x 30 mm, the wall thickness is at least 4 mm. It is used to make an external frame of the sash.
- The pipe is profiled by a cross section of 40 mm x 20 mm, the thickness of the wall is at least 4 mm. It is used for the manufacture of the inner frame of the sash.
- Professional flooring, sheet steel galvanized to cover the gate frame.
- Electrodes, screws for metal, primer paint.
For the manufacture of supporting frame system:
- Schweller No. 20 (width of the shelf 200 mm) for the manufacture of the supporting structure of roller supports.
- Armature with a diameter of 8-10 mm. For the manufacture of the reinforcing belt of the base structure.
- Anchor bolts for installing roller carriages.
- Cement, sand, crushed stone, knitting wire for filling the foundation.
To install columns:
- The pipe is profiled by a cross section of 100mm x 100 mm, to set the pillar rod.
- Armature with a diameter of 8-10 mm - for the concreting of the pillar, as well as the installation of the mortgages.
- Pipe Profile with a cross section of 40 mm x 20 mm - to install nachets.
- A strip width of 50 mm to set the mortgages.
- Decorative brick for pillars.

Accessories of retractable console gate:
- Roller carriage with adjustable plates - 2 pcs.
- Roller upper support - 1 pc.
- Roller bottom support - 1 pc.
- Upper and lower catchers - 1 pcs.
- Tire guide - 1 pc.
- Stitch stroke 1 pc.
- Electric drive and controls. For automation of the gate, ready-made kits are sold, which include the electric drive, the recognition system (keychain) and other controls.
From the tools you will need:
- Welding machine.
- Drill.
- Screwdriver.
- Set of wrenches.
- Level, plumb, square, roulette, pencil, chalk.
- Concrete mixer. It will have to prevent quite a lot, so it is better to mechanize this process.
Choosing a material for making a rollback gate

If everything is more or less clear with the metal, and it is almost impossible to make mistakes in his choice, then you are quite difficult to choose accessories and approach this issue is very responsible. As a rule, accessories are sold in finished sets that contain all the necessary elements.
What to pay attention to when buying accessories:
- Quality assembly parts. There should be no compromise here. All items must be made of high-grade steel (there should be no plastic presence). In roller carriages, rollers should be steel, assembled on high-quality bearings. The guide must be straight without bends.
- Availability of warranty by the seller. This is a very important point. If there is no guarantee, such a kit is not worth buying. Large loads and extreme operating conditions may cause serious problems in operating the gate. And changing roller supports in winter - the pleasure "below average."
Severity of manufacturing design with your own hands Calculation and project development

Work on the manufacture and installation of a rollback gate is carried out in the following order:
- Development and coordination of the digital gate project.
- Preparation of the foundation and installation of pillars with naschelniki.
- Preparation of the foundation for the schueller and its installation.
- Assembling the frame of the sash and the covering of it with a professional flooring.
- Installing the sliding gate fittings.
- Checking the installation and test test tests.
- Installing automation.
Project development Even in the case of independent making and installing a rollback gate, it is better to entrust professionals. They will be able to make drawings and pick up the accessories under the necessary width of the carrier opening.
Installation of pillars and the foundation of the sliding gate

The first stage in the construction of a rollback gate is the construction of columns:
- For this, there are 2 pits with a size of 500 x 500 mm and a depth of 1 meter. A layer of sand and a crushed stone with a thickness of 150 mm, and thoroughly tarnished onto their bottom.
- Then the reinforcing belt from the cut reinforcement with a diameter of 10 mm is placed onto the bottom.
- In the middle there is a pillar from the profile pipe, which is welded to the reinforcing belt.
- At this stage, the trigger is laid to automate the gate. It is necessary to do this even if at this stage does not plan to install the drive. Wiring can be hidden for future work. When everything is ready, you can install formwork and pour it with concrete.
- Both columns can be built in parallel in order not to waste time. As soon as the concrete freezes, the pillar is folded with decorative brick, while doing mortgages to install naschelniks.
- Next, near the pillar, in the direction of which the sash will open, dig a trench of 400 mm wide, equal to half of the width of the opening, and a depth of 1-1.5 meters. The crushed stone and sand is also stacked on the bottom.
- Then the reinforcement is welded to the channel below, so that the so-called banquette is turned out. Then the formwork is installed in the trench, which establishes the metalwork of the chapellor and the concrete is poured. Until full strength, the foundation should have to simultane at least 25 days.
How to make a frame and tinted the slotting of the sliding gate with your own hands

While the basement concrete dries, you can take for making frame frame.
It consists of an external frame and an internal frame.
The outer frame has a trapezoid form, the upper side of which is equal to the width of the opening plus 200 mm, the lower is equal to the top + 2/5 length.
Procedure for work:
- The upper and lower sides are connected by two vertical racks with a height of about 1700 mm and the diagonal. It is necessary to impart stiffness.
- All elements are welded. When welding, it is necessary to ensure the correctness of the angles and finding all parts in the same plane. After welding welds, it is necessary to clean up with the help of grinding.
- When the exterior frame is welded, you can start welding inner. To do this, use a pipe of 40 x 20 mm. It is necessary for fixing corrugated and give the entire structure of stiffness.
- Vertical pipes are installed in such a way that the joints of the sheets of the professional flooring accounted for a pipe.
- The latter step to the bottom tube frame is welded a guide from the kit of fittings. Weld it with tips for 20-30 mm in 300 mm increments.
- After welding the inner frame, it can be shattered, and produce painting.
Setting the gate mechanism

When the gate frame is ready, and the foundation has completely surrendered, you can start the installation of the mechanism.
Roller carriages are mounted on the channel. You need to place them as far as possible from each other. However, it is worth considering the fact that the size of the lower end roller is 150 mm, and if the carriage is too close to the way, the sash will not be completely closed. The back carriage must be installed in such a way that when closing the sash it does not knocked out the plug.
Roller carriages are installed in two ways:
- On adjusting plates.
- On tacks.
In the first case, an adjusting plate is welded to the chaserler, which is screwed up the bolts. It is the carriage attached to them. This method is more expensive, however, allows you to more accurately set the carriages.
In the second case, the carriage is grabbed to the rank, and, if necessary, cut off with a grinder, adjust and grab again. If the sash closes without problems, it is finally brewed. This method is rapid and cheap, however, the carriage replacement in this case is problematic.
As soon as the carriages are installed, the gate is set by level. The upper support roller is welded to the neighbor. He will hold the sash from falling.
Nizhny and upper catchelors are welded to the far nachel. At the same time, the site of the lower catcher is set in such a way that the end (lower support) roller drips on it and slightly delivered the sash.
The end roller is installed in the front end of the goal sash.

Installation and checking the work of the sliding gate
When all the elements of the cantilever gate are collected, you can install the sash and check its performance:
- The sash on the carriages should walk freely without much effort and extraneous noise.
- The end roller should enter the lower catcher so that the gap between the upper catcher and the sash was minimal.
- The sash should not be lit. In the closed, it should not be fused. The backlash can cause the failure of the top supporting roller.
- If there are problems with the above, the system must be re-adjusted.
- Repair or purchase of details of the retractable gate will cost much more spent on time adjustment.
Selection and installation of the electric drive

Special drives are used to automate the opening of the door sash. They are an electric motor with a complex of automation and an implanted drive gear. Rotating, the gear moves to the sash toothed rack.
In addition to the drive, the automation of the gate includes:
- Optical sensors. They will not give the gate to close, if there will be a hindrance in the opening.
- Signal lamp. She will warn the user about the movement of the sash.
- Antenna. Necessary for remote control of the gate.
- Cabinet control.
Installation of automation should be made exclusively by experts, since the cost of the entire system is quite high, and the incorrect drive of the drive or its connection to the chain can lead to failure.


