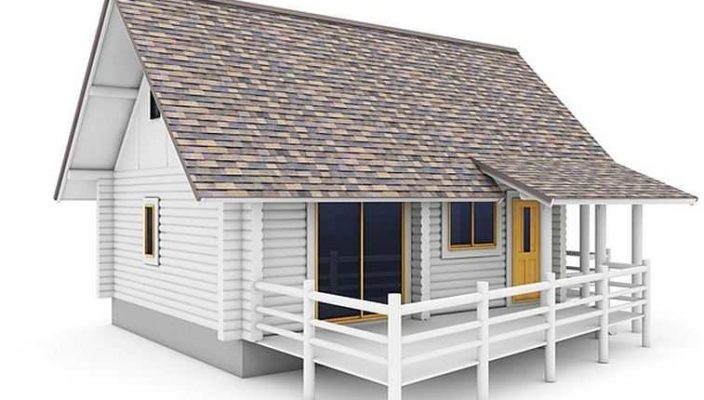
The construction of the veranda of the hosts of cottages is conceived immediately after the construction of the main structure. There may be several reasons: the need to expand the useful area, a recreation area, an architectural supplement at home. Since the veranda is a closed room with a roof and walls, it can be used as an entrance hall or winter garden. The veranda can be constructed independently. But, before starting to build, you should familiarize yourself with the technology of each stage.
Content
- Designing the veranda with your own hands
- Wooden veranda construction technology
- Tools and materials for the veranda do it yourself
- Procedure for the construction of a wooden veranda with their own hands: a base device
- Montage of framework veranda with their own hands
- How to make a roof on the veranda do it yourself
- How to make a draft floor on the veranda do it yourself
- How to separate the walls of the veranda with their own hands
- Construction of a brick veranda with their own hands
- Interior design veranda with their own hands
Designing the veranda with your own hands
Floor selection
By type of location relative to the house, the veranda may be:
- the corner is its dignity in the fact that in the field of adjuncing the walls of the house and the veranda is formed by the wind-closed platform;
- facade - this position allows you to use the veranda as an entrance hall;
- the end - an extension can be used as a gazebo or even arrange a pool in it.
Important: To add the veranda is better to Western or to the eastern wall, so that the straight sunlights do not make discomfort in the microclimate of the room. It is necessary to take into account the direction of winds at different times of the year.
Options for foundation, advantages and disadvantages of veranda options
The veranda can be designed as a single integer with the main structure. In this case, she will have a common foundation and roofing system with him. A bundled veranda is constructed on its own foundation, not connected to the main one.

For the construction of the veranda use the following options for foundations.
- Ribbon finely brewed.
- Ribbon deep downstream.
- Columnar.
The first type of foundation is suitable for lightweight brick buildings, foam concrete blocks. The disadvantage of such a base is the impossibility of the basement device. The basement under the entire area of \u200b\u200bthe veranda can be built during the fill of the ribbon foundation of deep down.
A less expensive way to a base device for a light extension to the house is a column foundation. Its disadvantage - in the complexity of the trim of the base of the veranda: to cover the gaps between the supports, the installation of a special frame structure is required.
Construction form for veranda
The veranda can be:
- rectangular with a bantal or single-sided roof;
- polygonal with hemisproof roofing;
- semicircular.
In the event that the assignment of the veranda is the architectural addition of the main building, the polygonal or semicircular design should be preferred. A rectangular extension is more practical, it is easier to arrange furniture in it. In addition, its glazing and installation of the roof will be easier to do with their own hands.
The veranda can be open (without side walls and glazing), and closed. There are transforming structures: with sliding glass elements or with removable window frames.
Nuances design veranda
By drawing up a working draft veranda, it is necessary to consider the following.
- The entrance to the room may be opposite the entrance to the house or be located aside if the veranda serves as a hallway.
- The location of the doors opposite each other can cause drafts.
- The sizes of the veranda should be such that the whole house in the complex look harmoniously. The length corresponds to the length of the adjacent wall, the width is not less than 2.5 m.
- It is necessary to follow the dimensions specified in the project: it will facilitate the registration of the construction.
Wooden veranda construction technology
The veranda can be constructed either along with the main structure, or after its full shrinkage. For wooden houses, this period is 2-3 years. The deviation from this rule threatens disturbing walls. It is also important to combine the construction of an extension with the house so that the soil movements do not have a significant effect.
Tools and materials for the veranda do it yourself
Installation of wooden veranda design elements is performed using the next set of tools and devices:
- circular Saw;
- hacksaw;
- hammer;
- axe;
- screwdriver;
- electric drill;
- level, plumb;
- sledgehammer;
- roulette;
- scrap (used as a lever for reducing geoshroups);
- cord;
- bulgarian;
- welding machine.
In addition, it is necessary to have a marker at your disposal, a set of drills, hardware, brackets, workwear, stepladers, stairs, construction forests.
Necessary materials for the wooden veranda:
- timing segment 150 × 150, 100 × 100, 100 × 50 mm,
- boards;
- crushed stone;
- agrofiber;
- ruberoid;
- bitumen;
- roofing material;
- falchbus;
- window and door box;
- windows, doors;
- insulation (mineral wool).
IMPORTANT: It is necessary to examine the wood for the absence of marriage ("sinushes", rot, insect damage, cracks and bitch). All wood materials need to be treated with antiseptic.
Procedure for the construction of a wooden veranda with their own hands: a base device
Work starts with the construction of the foundation. When choosing a columnar base, we act as follows.
- We perform markup: in the size of the extension in the corners we drive pegs, stretch the cord between them. We check and correct the lengths of the sides and diagonally: the discrepancy should not exceed 2-3 cm.
- We prepare the plot for construction: ruby \u200b\u200btrees, Korchi PNI, clean the territory, remove the turne. We are placed agriched and fall asleep its sand and rubble layer.
- For the support device, we use geoshuraupes (screw piles) with a diameter of at least 89 mm. We screw them into specially prepared wells to a depth of at least 1.5 m (the deeper - the better). The distance between the pile should not be less than 3 m with a mandatory condition: the supports must be located in each corner of the design.
- Piles are cut into one level, which is determined taking into account the floor level of the premises of the 1st floor of the building and the size of the material of the floor.
- The tips are welded to the tops of the piles - the steel plates, which will later be attached to the bars of the bottom strapping.
In addition to geoshroups, concrete blocks, bricks, bricks, asbestos cement pipes, logs can be used to create a column foundation. In this case, it is necessary to dug holes in the places of installation of the depth of the ground below the level of the soil freezing (approximately 1.3 m), arrange a submissure from sand and rubble.
The fill of concrete supports are performed after mounting the formwork from boards, bars, plywood with a device frame of reinforcement.
IMPORTANT: construction of the veranda must be started immediately after the end of the installation of column supports. If the performance is postponed to the next season, unloaded supports will have to be aligned due to the spring "friction" of the soil.
Montage of framework veranda with their own hands
Features a wooden veranda is the need for rack mounting by using lightweight materials for building walls. Log veranda (as well as brick and block) requires construction of a belt-type foundation.
Step by step instructions for the construction of the porch with his hands.
- Strapping choose oak lumber section 150 × 150 mm. Compound lengthwise perform "in dovetail" corners perform vpoldereva gashes. Nageli use, which are driven in specially drilled holes. Allowed use of steel roofing staples.
- Mounted vertical supports at the corners and after every 0.6 -. 1.0 m used for this purpose beam section 100 × 100 mm. Methods for attaching to the beam sill: using steel angles, complete or incomplete punching. For temporary and permanent fixing and ensuring rigidity of the struts used planks and boards. Distance between supports depends on the width of window and door openings. The height of the poles corresponds to the height of the roof veranda with a view of the slope.
- For fixing window frames between the vertical supports are mounted horizontal bars.
- The upper rail of the timber-section 100 × 100 mm. Collect it and similar bottom plate to the rack as described above.
Important: adjacent to the wall of the house bars top and bottom trim are attached to a vertical surface with screws.
How to make a roof on the porch with his hands
porch roof can be:
- pent;
- gable;
- tent.
The most popular due to the ease of self-assembly uses pent roof. Its installation can be divided into several stages.
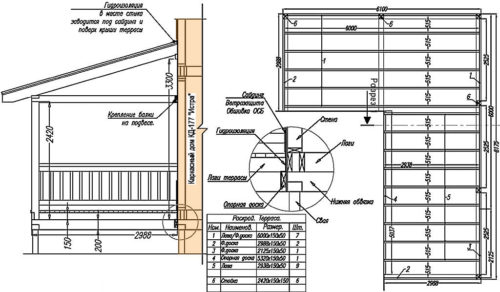
- In place of abutment of the roof to the wall anchor screws attached houses beams (run) section 100 × 80 mm.
- At a distance of 0.5-0.6 m from each other are set rafters: the upper part of them is based on the run, the lower - the far bar top trim. The length of the rafters must be such that the formed overhang -. At least 0.4 m Fixing is performed by means of nails. To reliably perform gashes in the relevant parts of the parts. If necessary on top of the binding rod set mauerlat.
- Mount lathing: used for metal bar section 50 × 50 mm, for shingles - USB sheets or water-resistant plywood.
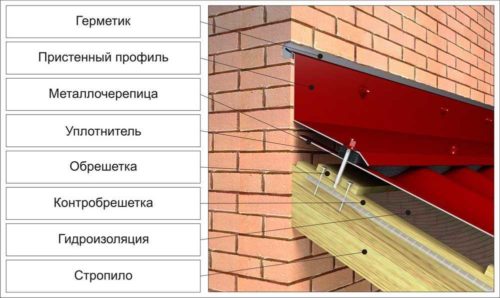
- Place the roofing material. It can be ondulin, soft bituminous tile, metal tile. The junction between the wall of the house and the roof of the veranda is protected from rain and melting snow using a special profile (bar) from galvanized or coated metal enamel, part of which is attached to a vertical surface.

Laying the waterproofing material over a solid cage is taken from the bottom up with the admission of 10 cm
How to make a draft floor on the veranda do it yourself
Algorithm of action when installing gender on the veranda is next.
- Lags are mounted on top of the lower strapping. For this, a cross section of 50 × 100 mm is taken across the direction of laying of draft floor boards. The method of fastening - with the help of metal profile elements or method of roascing BRUSEV in Poledev. The distance between the lags is 0.6 m. It is important that they are fixed by level.
- Across the lag stacked black boards. At the edges, the compensation clearance is left - about 5 mm. Boards with a thickness of 40 mm are tightly adjusted to each other using temporary brackets (they are driven into lags) and wedges. Boards are fixed with self-drawers or nails. If the veranda is open - it is recommended to make the floor with a slight bias and providing the possibility of draining the rainwater.
- As a clean floor, it is necessary to use materials capable of "breathing". Such are the thickened boards that are fixed with self-drawing straight to the rough floor. For an open veranda, you can use linoleum.
Important: Floor boards must be treated with an antiseptic agent and covered with paint for external work with low abrasion and good resistance to ultraviolet (for example, epoxy yacht-varnish).
How to separate the walls of the veranda with their own hands
Wooden veranda walls are recommended to be separated using a false timber or imitation of logs - blockchaus. Such material you can climb the walls from the inside and outside. The angles are also decorated with a falsebrus (block key), which is fixed from two sides vertically.
In order for the building to be blocked by the wind, the mineral wool slabs and a polyethylene film are laid between the outer and inner hoop. This will also allow the heat and sound insulation of the room.
The cheaper way to finish the walls is the use of metallic and PVC siding, metal profile.
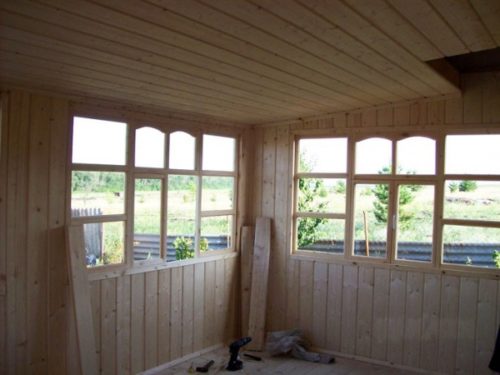
Tip: For the veranda, glazing windows with monosites instead of double-glazed windows, as it is a unheated room. Such glazing reliably protect the veranda from the rain and wind. It is recommended to use sliding systems.
Construction of a brick veranda with their own hands
Applications of other materials and technologies require the features of the brick veranda. Do with your own hands you need to do the following.
- The base can be a belt monolithic foundation. For the building without a basement room, it is enough to build a finely breed foundation. The depth of the trench is below the ground freezing level. At the bottom there is a subflink from compacted sand (about 100 mm). After mounting the reinforcement frame and formwork, concrete fill is performed. It is necessary to leave "derogatory" in two walls located opposite each other walls of the basement of the foundation - for ventilation of the underground space. To do this, at the installation stage of the formwork in the corresponding places, the sleeves from the pipes with a diameter of 100 mm are installed.
- A few days later, the formwork should be dismantled. Further construction can be guided 28 days after complete secretion of concrete.
- The waterproofing material is placed on top of the foundation - two rows of rubberoid.
- Brick and cement-sandy solution are basic materials for construction. The veranda is erected with the walls thick in Polkirpich. To do this, use the face brick of high quality: walls from such a material can not be separated from the inside.
- The base part of the base of the extension is facing by wild stone, sandstone, ceramic tiles. In order for the facing material better to hold, on top of concrete fill the metal plaster mesh is fixed.
- For glazing, it includes openings with overlapping from reinforced concrete jumper. In the same way it is satisfied with the doorway.
- On top of the walls of the brick is laid waterproofing and then - Maurylalat.
- The rafter system is mounted from a bar with a cross section of 100 × 80 mm (the technology is described above), after which there comes the queue and roofing material.
Tip: When using metal tile, it should be provided with laying of mineral wool plates with a layer of 150-200 mm. Plates are stacked by anverter between the rafter feet. This is necessary for thermo- and sound insulation. In addition, laying of the hyproolation film on top and vapor barrier from the bottom side of the roof is necessary.
Interior design veranda with their own hands
To improve the room, the veranda should use furniture created from the material resistant to the temperature and humidity of materials. Such may be chairs and rattan tables (from the vine). They are placed along the inner walls.
Aesthetic interior design is performed using decorative colors and plants. Pots and suspended porridge can be placed on a wide windowsill along the glazing, and the floor vases arrange in the corners. Gardening will make a veranda with a cozy corner of the whole family.
At the end of the article on how the veranda is built with their own hands - video with comments by a specialist of some nuances arising during work.


