The first thing they see guests who come to the house are, of course, an entrance hall. It can be safely called the "calling card" of the apartment. Therefore, the hallway in the house should be not only beautiful, but also comfortable. To do this, there are various furniture. In particular, there is often a wardrobe, a hanger, a mirror, a couch for shoes and a chest. In addition, it will not be superfluous here to put furniture for seating. It can be a bench, a sofa, an ottoman. In general, how the entrance hall will be equipped, it depends not only on the size of the room, but also from the owner itself. Next, we will tell how to make a hallway with your own hands.
Content
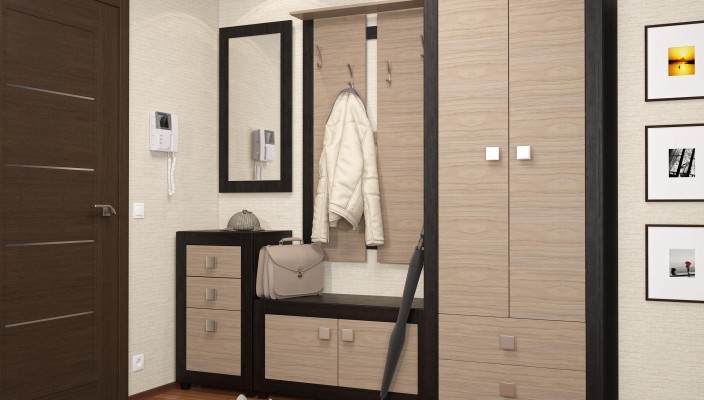
Choose furniture for the hallway

With a small number of hallway, it will be more convenient to choose several small items. It can be a shelf for hats, a bedside table, a small mirror and hanger. In a small square-shaped corridor, a set of cabinet furniture will look good, which consists of a couch for shoes, a chest with a mirror and a cabinet. In large rooms you can accommodate almost any furniture. In general, there are weight options.
As a cabinet for an entrance hall, probably the wardrobe is best suited, which is characterized by functionality and capacity. It can be put even in a small room. It can be stored not only the upper clothes, but also hats, shoes and various accessories. For very small rooms, it is best to install built-in wardrobes. With the help of them you can save space and fit in one place all the necessary shelves and hangers.
You can use cabinets with the door, but they need more space indoors. They can have one or two sash. By the way, the flaps are usually equipped with various useful devices. It can be a glove storage compartment, stand for umbrellas, small shelves. In any entrance hall, often put a mirror. And most often it is quite large enough for a person to consider himself in full growth. In addition, this subject of the interior allows you to visually make the space wider. There are three main design of the mirror for an entrance hall. So, it can simply hang on the wall, framing the frame or embedded in the cabinet sash.

In any entrance hall, you need a shoe stand. As it, you can use a plant with built-in or open shelves or a simple tumb. It is usually equipped with swing, folding or sliding doors. Height is both high and low. The most convenient option can be called a bedside table, which consists of several sections located above each other. Stand for shoes in it is located inside the doors.
The following requirements are presented to the cabinet in the hallway:
- Compact sizes.
- The presence of a rod for the shoulders.
- Special shelf for caps.
- The presence of a hook hanger with which it is convenient to take casual clothes.
- Availability Stoves for shoes.
- Mirror in full growth.
We draw a hallway with your own hands
Singlestone Tumba


Procedure for work:
- Start the manufacture of such an element of furniture follows from the fact that on shields of 1700x400x18 the markup is made and the sidewall is fixed. Then the shelf for a niche and bottom is cut. After that, the facial bar should be made, which is further fixed under the bottom.
- When the blanks are cut, the holes should be made in each of them. It will be fixed with furniture waders. Places for fastening, choose yourself. By the way, if there is a plinth in your hallway, then the cabinet does not rest in it, on the side of its sides, it should be cut off part, which in size coincides with the dimensions of these plinths. Thus, the bedside table will rise close to the wall.
- Now you can cut the door. To do this, it is best to take the same board that was used for the scene itself. Then it is necessary to make holes to fasten the loops. It is better to choose those that allow the doors to close in one level with a frame. The loops that will shift the door when closing aside, it is better not to take.
- Next should be woven the sewing and holes for them with glue. After that, you can install them in place and start assembling the frame. When it is done, secure it with self-draws. Then you can install the door.
- Now you can proceed to the manufacture of polozov, on which retractable boxes will be installed. They will occupy the entire width of the side. For the manufacture of polozov, take the sheet of plywood and cut two pieces of about 16 mm wide. After that, they should be fixed inside the side of the stands in the place where the bottom of the drawer will be located.
- When the polls are installed in place, you can start making the box itself. Start recommended from the construction of the bottom, which is cut from plywood.
- Then you should make two side and one rear wall from the boards. When they are drinking, they are screwed to the bottom with the help of self-tapping screws. To avoid the appearance of cracks in the plywood, before screwing the screws, the holes should be drilled in it. It remains to make the front part of the box, which is installed at the very end of work.
- Finally, drink the bed lid and attach it with the help of Kants for furniture.
Double-sided Tumba

The manufacture of such a bedside table is largely similar to the process of making a single-holder standby. The framework of the frame is also placed in the same time. On the sides of the sides, there should be slots that will allow the end of the stand close to the wall. Next you need to make a bar from plywood and shelves. In size, they are the same as in a single end.
Two compartments are usually made in the bedside table. One of them in the width occupies about a quarter of the size of the design, and in height it is the same as the height of the entire couch. The second branch takes the remaining part. At the same time, it is divided into two parts with a horizontal shelf.
Now the nightstand can be collected, sicking and installing pre-wades. After that, it must be copped with the help of self-tapping screws. It remains to cut and install the door.
Wall for hanger

For the manufacture of this item of furniture, you will need several boards. The following describes the manufacturer with two blocks:
- First, the boards are located on the plane, while between them should be a small distance. From above, they should be copped with the help of a rail placed on top of which it is expected to fix the hooks.
- After that, you can start making the shelves for hats, the dimensions of which depend on the obtained wall dimensions.
- The finished shelf is attached by self-drawing. In addition, with each of the two sides, the ribs should be placed.
- Finally, the finished wall lean to the place on the wall, where it was planned to consolidate. At the same time, note how much the boards need to be cut, so that the design is in one level with the cabinet. It remains to shorten the wall to the desired size, and it is ready for use.
Pencil pencils

Make such a piece of furniture is easy. This will require a furniture shield from which the wall should be cut, the bottom, the front bar, the lid and the two rear walls (as necessary, part of the plinth is fixed). It is necessary so that the wardrobe stood close to the wall.
Procedure for work:
- When all parts are ready, you can collect the framework. For this, as in the previous cases, you first need to wrap the seals and holes for them with special furniture glue. After that, they are recommended to install in place and assemble the frame, consolidating it with self-tapping screws.
- Now you need to cut two sash, each of which needs to make holes for fastening the three loops.
- Next, you should decide how much the shelves will be in the closet. On the sidewalls inside the product, install fasteners at the appropriate level.
- When the shelves are drinking, they can be placed in the right place. Finally, you can install sash.
Cabinet for a small hallway

Below will be an example of a closet assembly, which can be put even in the hallway of a small "Khrushchev". The bottom of the design will be a gap that is obtained due to the installation of furniture legs with a height of 55 mm. They will be attached to the cabinet on the screw of 4 × 16. This is all worth saying about these supports. Next, the assembly of the cabinet hull itself will be considered. To begin with, we present the size of the details.
When making a cabinet for an entrance hall, you can use as a material:
- Laminated chipboard 18 mm thick.
- Painted organitis.
- The melamine edge with the adhesive base of 0.6 mm thick.
The process of manufacturing the facade here will not be considered. It is envisaged that a custom version will be used consisting of an aluminum frame with a sample under three loops, and a mirror is inserted into this frame.
By the way, you can make a simpler version, which also costs cheaper. So, a mirror is pasted on a sheet of chipboard using a special glue. It turns out the facade, which will be massive and harder the previous option. At the same time, it will be required at least 4 loops. In addition, the closet itself will need to attach to the wall for reliability. Otherwise, it can simply collapse when opening the doors. Therefore, decide which facade is preferable for you.
The following sheets of chipboard for assembling the design are needed:
- For the top cover of the bedside table: 1 pc. 390x460 mm size.
- For top and bottom of the whole design: 2 pcs. 990x480 mm size.
- For the shelf open part: 1 pc. 380x390 mm size.
- Backdock open part: 1 pc. The size of 2110x390 mm.
- For the sidewall design: 2 pcs. The size of 2110x460 mm.
- Side beds: 1 pc. 400x440 mm size.
- For shelves in the closet. 1 PC. 570х430 mm.
- Tube door: 1 pc. 400x365 mm in size.
- For the manufacture of the rear wall of the design, 1 pcs will be needed. 2030x600 mm.
Before making a wardrobe for an entrance hall, you should make sure that when installing it in place it will not close the sockets, switches and other similar places. The design itself is easy to assemble. For this, you will need the following tools:
- Powerful screwdriver.
- Several drills on wood.
- A set of fasteners (among them there must be a hexagon for confirmates).
- Pencil.
- Rule for measurements.
- Hammer.
In addition, the following specialized fittings will be required:
- Retractable strap 410 mm long. It is attached to the shelf in the bottom design. Handers are hanging at the level of the front.
- Internal four-stroke furniture loops in the amount of 6 pieces (2 pcs. On a shoe bedside table and 4 pcs. Per large door).
- Hooks and handles. Create to create design. There are quite a few options. The choice depends only on you.
In order not to match the fasteners, the shelf inside the cabinet should be put 35 mm above the open part.
Screeds are made on confirmates. Under them you first need to fly both into the end of the part and the plane. Standard furniture fasteners have a size of 5 by 73 mm. The openings in the plane should be in diameter of 8.5 mm and at the same time through. All marking is done depending on the number of design details. They may well be the sidewalls, facades or backs of the open part.
Orolete can be fixed using self-tapping screws or nails. The first way is more suitable if you have free time. The second is worth using if the time is not so much. The most important thing is in the other case, comply with the rectangular structure. Otherwise, the facades will be externally unattractive. In addition, they will not be able to close normally. The above recommendations of how to make a hallway, are in fact no more than an example. You yourself have the right to decide what and how to construct. This applies not only to the amount and composition of materials, but also other aspects.


