Interior doors are not only one of the most important interior items, they play a large role in the functionality of the room. Thanks to the interior doors, it is possible to create its space in a separate room, where it can be returned at any time. And although recently the interior in the style of Open Space becomes more popular, it is hardly possible to refuse interior doors. Bathrooms, storage rooms - this is not a complete list of rooms that need to be hidden from prying eyes. That is why in any apartment or house requires the installation of interroom doors. This work is nothing complicated. If there is a minimum set of tools and installation experience, you can do it yourself, while saving enough money. About how to mount interroom doors with your own hands, let's tell me further.
Content
Types of interior doors and door boxes

The times of the universal deficit and disposal of goods have long been sunk in the fly, and now the sellers of building materials can offer their customers a large number of different models. They differ in form, texture, size, color, manufacturing material, and, of course, price. Simple "Canada", which can afford almost any buyer, to exclusive models from expensive wood species made to order - all this variety leaves a place for "maneuver".
All doors can be divided into several signs:
- The size. For ease of installation and manufacture, door canvases produce, as a rule, standard sizes. The height of the doors is 1900 and 2000 mm, and the width is 550,600, 700, 800, and 900 mm. With the width of the opening, more than 900 mm, the double door is installed or lay part of the opening.
- Structure. Mostly interior doors make deaf. Especially, it concerns models from a natural tree. However, the doors overlooking the corridor, try to install with inserted windows. In this case, natural lighting will penetrate the room where there are no windows, which will allow to significantly save on electricity.
- Production material. By material manufacturing material, interior doors are:
- from dvp. These are the cheapest models. They are a frame of a wooden bar, with plates installed on it from the fiberboard. The cheapest doors of the doors from the fiberboard are sold in a dirty form for painting, more expensive - with lining of laminated Fiberboard with color and drawing "under the tree". The advantage of such cloth is their price. However, they are not too durable, often the edge is taken away from them, and they also carry high humidity very poorly;

- from MDF. This material is more expensive, but has much better performance. Of all the available doors from MDF are a golden middle in price-quality ratio. They are not afraid of moisture, they have excellent noise insulation, more resistant to mechanical damage;
- from a natural tree. This is the most expensive material. The doors made of natural wood are distinguished by an excellent appearance, a long service life, and excellent noise and thermal insulation. The disadvantage of such doors is their price. Such models are much more expensive than the canvas from MDF, and, of course, from the fiberboard. In addition, the doors made of natural wood have a greater weight, which requires the installation of more powerful fittings.

Also, when choosing doors, you should thoroughly pick up the door frame. As a rule, the set of the door frame consists of two racks height 230 - 250 cm, the crossbar with a length of 100 - 120 cm and the threshold of the same length. Made them from the following materials:
- Pressed paper.
- Unproyed tree.
- Veneered tree.
The first option is the cheapest. Such a box is already fully ready for installation. It is covered with a decorative layer, so no further processing requires. Due to its soft structure, the details of such a box are very easily processed, so with the insertion of the landing sockets under the hinge there will be no problems. The disadvantage of such a box is that it is very afraid of moisture from which she can wake.
Unprocessed wood - average option. Has excellent performance characteristics. However, after installation, it requires painting to the door or coating with a mourn and varnish.
Veneered tree. Such boxes are made from wood inexpensive rocks, and then covered with a layer of beautiful veneer. This option is the most optimal. The box after installation does not require additional processing and serves for a very long time.
Special attention should be paid to the selection of the width of the box. It must fit the width of the doorway. If the opening is very wide, you will have to use good.
Preparation of materials for installing interroom doors

For the process of mounting and installing interroom doors, you will need hand:
- Door handle with built-in lock. If you plan to install the door in the nursery, the lock should not be installed.
- Couple loop. The loops are selected depending on the weight of the door canvase. It is not worth saving on these details, to shoot and install them several times - the pleasure below average.
- Set of screws and anchor bolts. Self-tapping screws will be needed to build a door frame, and installation of fittings. And anchor bolts - for mounting the box in the doorway. Self-tapping screws are better to buy stainless steel.
- Small bottle of mounting foam.
- Cashbar and special nails for fasteners.
- Door cloth and door box details.

From the tools for step by step installation doors, you will need hands:
- Building level.
- Chisel.
- Screwdriver.
- Drill or perforator.
- Hammer.
- Mill. This power tool will greatly facilitate work on the cutting of locks and cutting the seats under the loop. If there is no one, then you have to work by the chisel.

Some vendors of the door accessories provide services for the preparation and assembly of the door frame and the canvas. In this case, it will be necessary to simply put it in the doorway. If there is no such possibility, you will have to do everything yourself.
Installation of loops and castle on the canvas interior door

Procedure for work:
- Self-assembly and the installation of interior doors step by step begins with a liner and door lock. This work is the most difficult and painstaking in the process of installing doors and requires skill and care. One careless movement of the chisel can turn over all efforts.
- Planting places under the loop are located at a distance of 20 cm from each edge of the door. Noting this distance, the loop is applied to the door to the door and the pencil is guided its contour. Then the contour of the chisel or sharp knife is made incision. Do it then so that when removing the layers of wood, it is randomly not to go out for the designated outline.
- As soon as the contour is ready, you can make a sample. The movements of the chisels must be smooth and in the direction of the fibers of the tree. After removing a few words, you can make a loop. It should go flush the door to the door. The same is done with the second loop.
- After the space under the loop is cut, they can be screwed using self-tapping screws.
- Next cuts out the place under the lock. For this, with the help of a roulette or caliper, the dimensions of the lock are measured. The landing place is cut under it. Here you have to work hard, because its depth is much more than for loops. After the lock is installed on the seat, it is necessary to gently drill the hole for the installation of the handle and the holes for the installation of tie spills.
On this, the preparation of the door canvase is over, and you can start assembling the box.
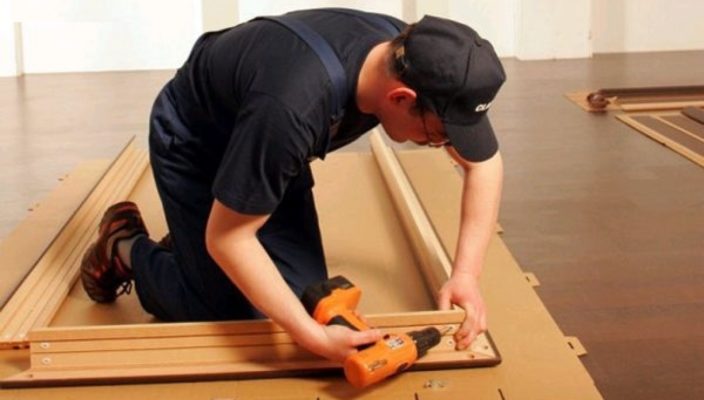
Assembly and installation of interroom doors do it yourself

At this stage, installation work should be performed in such a sequence:
- Door box is assembled on a flat floor surface. Racks and crossages are installed on the floor, and the door canvas fit on them. Between the web and details of the box, it is necessary to withstand the clearance of 2-3 mm so that the door can open freely. For this, the pieces of fiberboard or cardboard of the corresponding thickness are laid between them.
- After that, the length of each box detail is noted to cut off the excess. The wood is cut off with an electric bike or hacksaw. In one of the racks there are places of location of the loop, after which they are sampled in them is similar to how it was performed on the canvas itself.
- Next, special wastes are made in places of connection of the rack and crossbar, after which the parts are connected using self-samples.
- Important: If the box is not installed on the box, it is necessary to secure the mounting bar in its lower part. When installing the box in the opening, it will not give the stands to disperse, which will save the diagonal.

- Before starting the installation of the door with your own hands from zero, you must prepare the doorway. All chips and influx of plaster, mortgage bolts and remnants from dismantling the old door are removed from it. After this surface of the doorway should be projected. So it will be better to pester mounting foam.
- After that, the box is installed in the opening and its position is adjusted by vertical and horizontal.
- You must also set the box exactly in relation to the wall. In order to fix the box in the desired position, use wooden wedges. Squeezing the design, you can put it easy blows on it perfectly. After that, mounting screws or anchor bolts are installed.
- Next, an assembly foam is applied between the surfaces of the doorway and the box. When applied, it should be borne in mind that it expands several times, so it is not worth using it too much. As soon as the foam is freezing, it is necessary to clamp anchor or self-tapping screws, as well as remove its remnants.
- Now you can hang the door leaf. If everything is done correctly, it will rise without difficulty.
- Recent tricks are installed platbands. With the help of a stouch, they cut at an angle of 45 ° and are nailed with special nails without hats.


