A gazebo is needed for relaxing in the garden. It can get together the whole family and guests over a cup of tea, hide from hot sunlight. Arbor is easy to build yourself, without inviting specialists. But, before you begin to work, you should choose materials, decide which arbor's design it is better to stop and explore the advice of specialists in the construction of the arbor do it yourself.
Content
Types and designs Arbors
Depending on the manufacturing material, the arbors are the following types:
- Brick (stone) are built on slab or monolithic finely swallowed waist grounds.
- Wooden logs - constructed on monolithic belt fundament; Wooden, collected from bars - are installed on a bar base.
- Metal - welded structures from profile pipes, chawls and corners.

Example of design and design arbor
There are arbors in the form of the structure. They are:
- rectangular;
- polygonal (tents);
- round.
Tip: Rectangular Arbor to build easier, in addition, in such a structure there is a simpler roof design (single and duct).
By type of roof:
- with single-sided roof;
- binary;
- with four-tight;
- with tent.

Brick gazebo with a four-tie roof
In addition, the arbors can be constructed in a complex with street mangal, smoking and without them.
How to choose a place for gazebo
Place for relaxation must comply with the following requirements.
- The construction site should be smooth.
- Distance from the main structure: it is better to have a gazebo in such a way that the smells of food and the smoke of the fire did not penetrate the house. Need to take into account the wind directions. At the same time, it is important that it is convenient to deliver the dishes from the house and to the house.
- The gazebo should be as covered as much as possible from prying views.
Construction of a gazebo of brick and stone with their own hands
A gazebo from such materials is a capital structure and its construction requires compliance with the following technology. Your attention is a description of the first stage at the stage of preparation and fill the foundation.

Formwork for the base
- The project is drawn up. The sizes of the gazebo are applied after determining the dimensions of the garden furniture. You need to know the length of the table and benches, take into account ergonomic requirements. A zone for mangal is distinguished (if provided).
- The correct marking of the future gazebo is performed. With their own hands on the construction site, pegs in the corners are driven. It is necessary to check all distances, compare the opposite sides and diagonally. If necessary, the position of the pegs is adjusted and the cord is stretched between them.
- Preparation of pitted under the arbor: the stumps are roaming with their own hands, trees and bushes are cut down, the turf is removed. Around the perimeter, limited marking, the trench for the slab basement is rotated. At the same time, the depth in the central part should be about 200 mm, along the edges (for finely swallowed foundation) - 0.5-0.7 m.
- The playground is aligned, the soil is rambling. Sand plump layer is satisfied with a layer of 100 mm and a sloping from rubble (also layer 100 mm thick). Bulk materials are tamped.
- Mounted formwork. The external perimeter collects a frame from the boards. The structure strength is achieved using the backups that are installed through each meter. In the corners of the formwork fastens with horizontal overlays.
- The height of the formwork above the ground must be installed in terms of the ground - 100 mm. It will be more convenient to perform concrete fill. The inner surfaces are lined with waterproofing material - rubberoid or polyethylene film from 50 microns of thickness. It is necessary to prevent the solution to the outside.
- Reinforcement is performed. Special attention should be paid to the external perimeter (more in-depth zone) to which the greatest load will have. It is mounted a three-tiered grille from the rod with a diameter of 10-12 mm. Connections in nodes are performed by knitting wire.

Concrete base structure for brick gazebo
Note: The central part of the base is mounted separately, during the fill. A small elevation of the base above the ground level will prevent the penetration of rainwater in the arbor.
How to fill the foundation under the arbor do it yourself
- Concrete Pouring is performed in one reception: this is an important condition for the base to be monolithic. During the fill, breaks for no more than two hours are allowed. In the middle layer of concrete fill of the central part of the slab basement, a welded mesh with a cell of 50 × 50 mm is stacked.
- After the fill, the concrete mass is rambling with a special vibrator. In the absence of such a device, the concrete is repeatedly sainted with pin from the reinforcement. It is necessary that the pouring is homogeneous, without air bubbles.
- After filling, the concrete should be covered with a plastic film. This will prevent uneven drying and, as a result, cracking the base.

Finished slab foundation
Tip: In the future, the ceramic tiles with an anti-slip surface or sidewalk concrete tiles are placed on top of the concrete pouring. Only frost-resistant material should be applied.
Features of brick masonry
The brick laying is beginning after complete pouring and hardened concrete - after 28 days. On the perimeter of the masonry under the first row is laid a layer of rubberoid.
The masonry is performed by facial bricks, under the launch. The wall thickness is "in a brick" and places - "in Polkirpich", leaving openings for the entrance and for glazing. Overlapping the openings with concrete jumpers or metal chapels.

How to make a roof of the arbor do it yourself
The technology of the device of the bartal roof provides such a sequence of actions.
- On top of the brickwork with anchors, the strapping bar is attached - Mauerlat. The cross section of the bar is 100 × 100 mm.
- On the ground, farms consisting of two rafters connecting at the upper point, and screeds between them. The width of the farms should be such that the sinks on both edges were at least 0.5 m. The distance between the farms is a maximum of 1.5 m. At the top of the rafter, it is fastened with an additional screed of a bar or steel bracket.
- Farms rise and installed on Mauerlat. For a stable connection in the appropriate places of the lower screed, wood sections are cut. As long as the lamp will not be mounted, the rafter legs are connected by temporary jumpers from two sides.
- Install the skate bar.
- Mounted doom. Its type and step is selected depending on the type of roofing material: for flexible tile - solid (from USB plates), for metal tiles - from bars or boards with a step of 25 - 35 cm (depends on the wave profile).
- Waterproofing rolled material is laid. Parosolation for open arbors can be neglected. If the roof is insulated either mounted sound insulation using mineral wool slabs - from the inside there should be a vapor barrier film. It is fixed to the rafter legs of the brackets, after which the decorating fusion is performed.
- The roofing material is mounted, the skate profiles are fastened, lowers are installed.

Roof Arbor: View from the inside
Construction of a wooden arbor do it yourself
Required tools for the construction of the arbor do it yourself:
- circular Saw;
- electrolake;
- axe;
- hammer;
- screwdriver;
- electric drill with a set of drills;
- roulette;
- construction level;
- corolnic;
- plumb;
- sander;
- painting brush;
- shovel bayonet;
- sledgehammer.
Arbors from wood are of two types:
- with log walls;
- frame.
Installation of log walls requires the use of special skills and tools. A frame gazebo can be built yourself. However, there is no need for a monolithic concrete base device. Features of the frame installation with their own hands - in the phased description of the process.

Wooden gazebo on a column foundation
- A project is drawn up (working circuit indicating the main dimensions of the design).
- The material is harvested. Wood should be chosen without cracks, without large bitch, without signs of rot, "Sonyushnia", injury to insects. It is important that the boards and bars are dried in accordance with technology.
- Plot is prepared (as described above), markup is performed. The installation sites of the base foundation supports. To install the base, screw piles are used or support from brick or concrete blocks. Reinforced concrete monolithic supports, metal pipes or wooden poles treated with an antiseptic agent can be applied.
- In places for supporting recesses: To screw the piles, the wells is sufficient to be a depth of 25-30 cm, for logs, as well as columnar concrete monolithic supports or struck from stone (bricks) - a depth of at least 1.2 m. It is necessary to take into account the level of soil freezing in winter time.
- Foundation columns. The distance between the supports should not exceed 1.5 m. All supports must be at the same level.
- Lower strapping is mounted, for which the timber is used from solid wood. Section of timber - 150 × 150 mm. Fasten it to the headings of the columns supports using anchor screws. Corner compounds - "in drapery" or the "Lastochny Tail" method.
- From the timber of coniferous species of trees, vertical racks in the corners and intermediate are installed - above the supports of the foundation. The mount is performed using metal corners. In the central part, a deaf hole for spikes is dried. Before the racks are installed stationary, they are temporarily fixed with pins and struts.
- Mounted Bar of the upper strapping with a cross section of 100 × 100 mm. The connection of the elements is similar to the bottom strapping.
- Between the racks (except input) on the same level, they are attached to, for which in the racks cut down the recesses. The resulting lower openings decorated with a lattice from the rivers or vertical balusters. The upper openings (if provided for by the project) are closed with glazing frames.
- All wooden elements should be across and ground with finely abrasive emery paper.

Installation of the lower strapping of the arbor on the support of the columnar brick foundation
Important: All wood should be carefully processed by an antiseptic agent. Particular attention should be paid to the wooden supports of the columnar base: to protect against rot, they are coated in a fire and covered with bitumen composition.

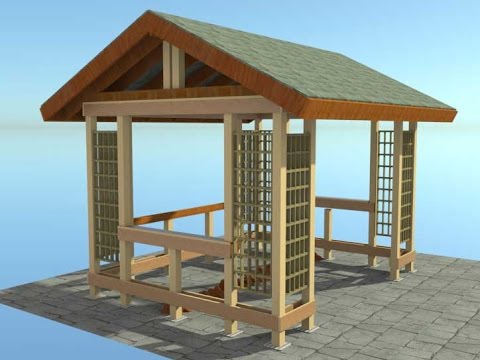
Installation of a single wooden arbor roofing
Diva roofing system of wooden gazebo is mounted in the manner described above. Find out how to build a one-handed gazebo with your own hands. To do this, you need to use the following recommendations.

Wooden frame gazebo with single-sided roof
- It is important to determine the direction of the slope of the crown, it is necessary to take into account, which side will be lit by the gazebo with sunlight. To ensure comfortable leisure conditions, the lower part of the roof must be facing east or west.
- In order to provide the desired angle of the slope, additional supports are installed at the upper point of the design, the height of which is determined by the estimated method. Distance between supports - 1.5 m.
- Mashed rafters. To do this, the profiles of such a form are cut into them so that the bar is in engagement with the rack and the upper strapping. The length of the rafters should be greater than the width of the arbor, to ensure the Svet (not less than 0.5 m) on both sides of the structure.
- On top of the rafted lags, waterproofing and roofing material are stacked.
Wooden Arbor Floor Installation
For the floor of the gazebos, it is recommended to choose moisture-resistant and wear-resistant materials: bars and oak boards, grab, alder. Practical is the deck board - composite material from plastic and wood. The algorithm of action is as follows:
- On top of the bars of the lower strapping, lags from bars with a cross section of 100 × 50 mm are mounted. Their edges are drowned by hardwood. Lags should be located at one level, the distance between them is 0.5-0.6 m.
- On top of the lag, floorboards are stacked (per perpendicular direction). In order to ensure the flow of water, there are gaps between the boards, but not more than 3-4 mm. Board thickness - not less than 40 mm.
- Floor boards are attached to lags by self-drawing at every point of fit. All boards must be pre-acruming and ground.
- Around the perimeter, between floorboards and walls, a gap of 5 mm is left, which is subsequently closed by a plinth.
Important: In order for rainwater to be effectively assigned to the arbor, it is necessary to provide a drainage system under the floor and along the perimeter of the structure.

Laying deck board
Construction of metal arbor do it yourself: Highlights
For the construction of a metal gazebo framework, the following tools and devices are needed:
- bulgarian;
- welding machine;
- roulette;
- hammer;
- shovel;
- bur for holes in the ground with a diameter of 200 mm;
- painting brush;
- paint container.
The frame of the gazebo is welded from profile pipes. For vertical racks, we need a pipe with a cross section 100 × 100 mm, for horizontal frame elements - 50 × 50 mm.
All elements are connected by welding, after which the burgogs are cleaned with the help of a grinder.

Metal frame gazebo
Between vertical racks weld the elements of the lower, intermediate and upper strapping. The roof frame and the doom can also be made of profile pipes. In this case, the roofing material is fastened with the help of metal screws with a rubber seal.
IMPORTANT: All parts of the frame of metal arbors after installation must be treated with an anti-corrosion agent, primer and twice painted paint for outdoor work.
Some nuances of ergonomics gazebo
At the design and construction stage, it is necessary to take into account the necessary parameters of the furniture, as well as the distance between benches and a gazebo table.
- Height from the floor to the seating of the shop - 400-450 mm.
- Back height - 720-750 mm.
- Seat depth - 430-450 mm.
- Table height - 750-800 mm.

Dimensions of details of the shop
The distance between the benches and the table should be so that it is convenient to use furniture. It is necessary to leave the passage between the walls of the gazebo and a bench, so that the vacationers can freely take and leave their places at the table.
At the end of the article - the demonstration material on how the construction of a single-handed arbor is performed with their own hands (video allowance).


Cheaper, and most often better entrust the construction of professionals. I have been a great gazebo on the foundation for a week. She is already 3 years old.