
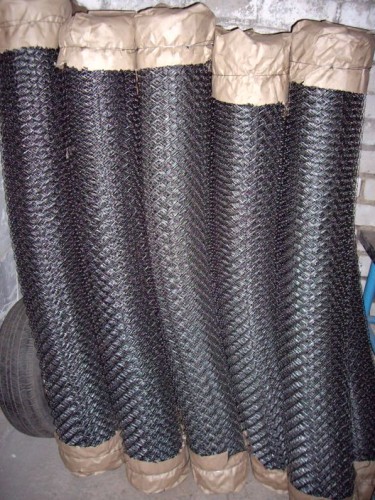
The fence from the grid of Rabitsa can be found literally everywhere, ranging from private possessions and country cooperatives, ending with children's gardens and school stadiums. Such popularity is quite explained - the material is quite durable, durable, convenient in operation, it costs relatively cheaply and even unprofessional can cope with installation. The transportation of the grid to the construction site also does not cause problems, since the material is sold by rolls and in the rolled state is very compact. Such a fence is not only perfectly copes with its main task - not to let outsiders in the territory - but also does not prevent the passage of sunlight, and therefore often becomes an excellent basis for creating beautiful alive hedges. In this article, you will get acquainted with the technology of building a fence from the chalk grid with their own hands.
Content
Choosing materials for the fence from the grid of the Rabit
First of all, it is necessary to study the material with which it is necessary to deal. Since the chain can not stand independently, it is necessary for her support pillars. They can be made of wood or metal. The grid itself also has several species that differ in price, appearance and deadlines. After you decide on the materials, you need to make accurate calculations and calculate how many poles and mesh meters will need.
Support Poles: Wood or Metal?
Although the slave is quite durable and durable material, it does not have stability, and therefore it needs to be fixed on support. Poles for the fence from the grid Rabitsa can be made of wood or metal. In this case, it should be repeated from financial capabilities or the availability of relevant resources. So, if there is a forest or woodworking plant near the site, it means wooden poles can get cheaply or free. However, it should be taken into account that the timber is much less than the metal, and also needs to be protected from moisture and insects of the Olds. To extend the life of wooden pillars, it will be necessary to handle poles annually with an antiseptic column and update the paint layer. This option will be suitable if there is a raw material base or there is a need for tough economy.

A couple of words about how to prepare wooden poles for installing a slaughter from a challenge. First of all, they need to remove the bark with them, since insects or their larva live in 99% of cases. If there is no special equipment to remove the bark in the farm, it can be done by hand in a conventional ax. After that, the pillars need to be treated with antiseptic solution or verses. The simultaneous simultaneously serve as a disinfection, and toning, staining wood in a darker color. After drying, the antiseptic poles should be covered with weatherproof paint or wood varnish. With this work, the yacht varnish or PF-170 on an alkyd basis perfectly cope. The part that will be immersed in the ground must be squeezed and wrapped with rubberoid to provide high-quality waterproofing. Do not neglect this moment, because if the underground part of the support rotates, it will break and collapse part of the fence. Special attention is paid to the end parts, because it is from them to rot.

So, with wooden pillars, it is more and more understandable - they are cheaper, but they require more time to process. With the metal, everything is exactly the opposite - you will have to spend money on the purchase, but the preparation does not take much time and effort, and with due care, the service life is calculated by decades. In most cases, profile pipes with a rectangular or round cross section are used to set the fence from the chain grid. Such can be bought at any large construction store or on metal bond. You can also immediately buy special finished pillars with hooks to fix the grid. Such pillars are already fitted under the desired dimensions and are painted by weather-resistant anti-corrosion compositions. This will save a lot of strength, but the purchase will cost somewhat more expensive.

Useful advice: If you set out to save, you can choose the pipes of the desired length and diameter at the items of receiving scrap metal. Completely, there are also completely new pipes that are not suitable for laying pipelines due to impaired tightness. It is not so important for intricate supports, and therefore it will be the perfect and cheap option for economical owners.
To cut pipes on the segments of equal length, you must get a corner machine or a grinder. If you are attached to the grid with hooks, you will need a welding machine and these are the most hooks. Metal also needs to protect against moisture, but before covering its paint, it is necessary to clean the surface with a metal brush and degrease. For degreasing, the cheapest solvent is suitable. Part of the pillar that will be immersed in the ground is necessary, as in the case of wood, to deceive with waterproofing mastic.

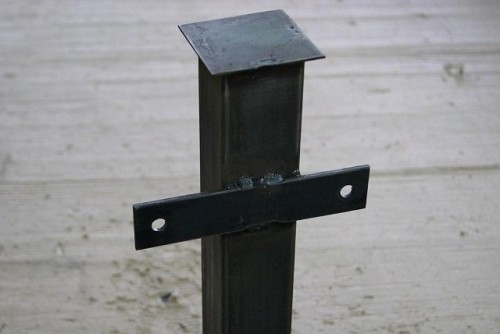
Important moment: Be sure to close the upper ends of metal pipes, otherwise rainwater will fall inside, and the pillars will start rust from the inside. Rubber or plastic plugs with the desired section can be purchased or made with their own hands.
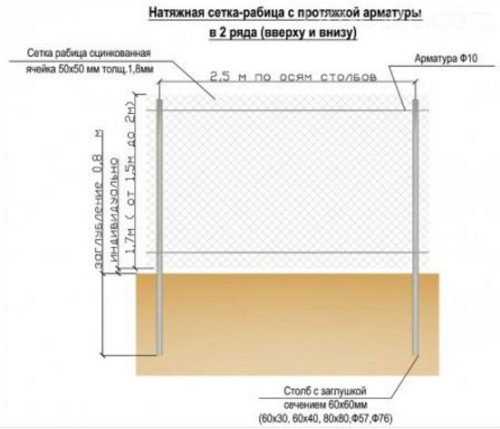
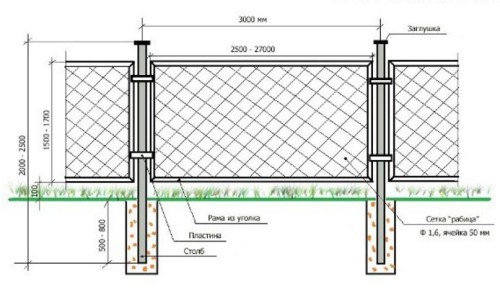
The optimal distance between the columns is 2.5 m. Based on this, you can calculate how many supports will be required for the fence of your territory and how many mesh meters need to fill the space between them. Sometimes concrete poles are used as supports, but this option is already considered obsolete, because it requires large physical and time costs.
What challenge to choose?
When dealt with the pillars, you can proceed to the selection of the grid itself for the fence. The market presents a wide range of products with a different nomenclature, so everyone can choose the appropriate option. When buying a grid, it is necessary to repel from the desired height of the future fence.

The chain chain is different in the form of cells and their size, as well as the material from which it is made. And if the form of a rectangle, rhombus, square) often does not play a special role, then the size of the cells is very important. For example, if you will graze chicken or another bird on your site, it is better not to take a large-scale grid, through the holes of which can easily drink chickens. If you put a fence and plan to put your maiden grapes, hops, ivy, or other rising plant, you can purchase a grid with large cells.

The smaller the cells, the more expensive the grid is, because it took more material on its manufacture and it is much stronger. For the fence of a private area, a mesh is approaching a width of 1.5 m (the height of the fence) with cells of 40-50 mm.
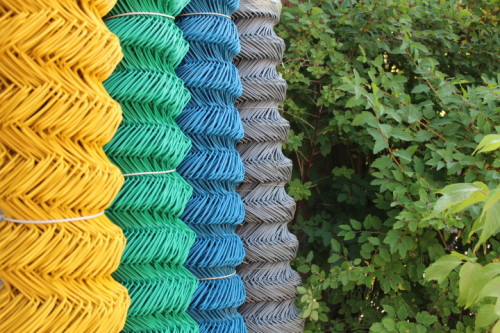
As for the materials, the following types will be offered to the store:
- Neokinated - the cheapest chain, however, for the construction of a durable and neat fence, it does not suit, because it rushes after a couple of months.
- Galvanized - more expensive option. This is a non-scattered grid, covering the weather-resistant anti-corrosion composition, reliably protecting material from destruction. The fence from the galvanized grid Rabita enjoys the most popular compared to all the others.
- Plasticized - the basis of such a material is a metal mesh, which is covered with a polymer substance. It protects the metal from destruction and at the same time stains it in different colors. This is the most expensive option, but the plastic grid of a challenge for a fence will last longer and will look very carefully.


How to set a fence from the chain grid
When the choice of materials is completed, you can finally begin the construction of the very fence. But before that another important point. There are two installation options for mesh fencing: stretch and sectional. In the first case, the mesh is stretched between the supports, gradually turning the roll, the second is taken from individual segments consisting of two supports and the grid between them. Consider the features of both methods in more detail.
Tension fence
Make a tension fence from the Rabita is easier and faster, so we suggest starting with it.

How to make a fence from the grid Rabitsa:
- Calculate the height of the poles. It should be remembered that part of the support will be located underground, and it is 50-80 cm. Also between the surface of the Earth and the bottom line of the grid must be left a lumen at 5 cm. So, if you want to make a fence of 1.5 m high, to It is necessary to add about 60 cm to this, which means the length of the pillars should be 2.1 m. A large load will be provided on the angular pillars, so they need to be 20 cm deep.
- Make markings on the ground around the perimeter of the site and with the help of a garden drill, do the holes at the plotting points at a distance of 2.5 m from each other. Maximum poles can be put in 3 m, but then the stability of the fence falls. The depth of the wells should be about 70 cm.
- At the bottom of each wells, pour 20 cm of large river sand and how you follow it. It will perform the function of the drainage pillow and remove the water from the underground part of the columns.
- Take the cutteroid sections or thick construction polyethylene, roll into the tube and lower it in the hole so that the material disposes their side walls.
- Install the poles strictly vertically, fixing them in the desired position with wooden backups or stretch marks. Do not forget to squeeze the bottom of the lasty for waterproofing!
- Check the verticality of each post with a construction plumb, and then fill the space between the post and the walls of the well concrete. Ruberoid or construction film, ripping the walls of the hole, will not allow the solution to absorb them into the ground.
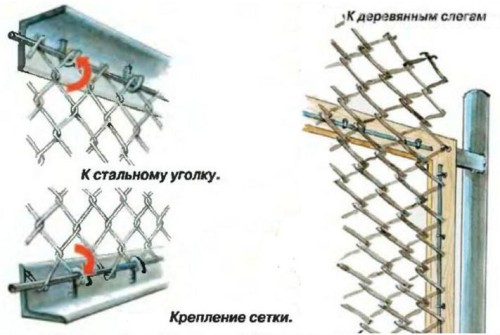
- Leave the concrete to harden for 3-5 days. Only after the petition can be processed to the installation of hooks for fixing the chapter. To wooden supports, they can be killed or fasten to metal - to privar. The hooks themselves can be made from any metal elements: nails, screws, rods, wire, in general, everything that can be beaten in the hook.
- Put the chain roll vertically near the starting corner post, straighten and drive the grid on the hooks.
- Gradually discharge the roll until the next pillar and where the grid will be connected to the support, similarly to the grove of the metal rod. Clash behind it with both hands and pull the grid on the hooks. The rod is needed here for uniform tension, because if you work only with your hands, the probability is great to tighten the chalk. And to cope with the work faster, it is better to work together - one pulls the upper end, the second is lower.
- Then, the reinforcement is then horizontally, retreating from both edges about 5-6 cm - it will be holding elements that will not give the grid to deform from wind or mechanical loads. Weld the ends of the rod to the poles
- Repeat this procedure with the rest of the columns and protect the territory of the grid. Then replace the hooks on all columns and cover the paint supports.
- Wires "Warms" Soak pliers down to accidentally not cling and not scattering. It is best to turn the wire through the last top range of cells and carefully wrap the edges around it.

Sectional fence
Mount the sectional fence from the chain grid more difficult than the tension, but if you deal with uneven landscape and drops in height, you can make a fence in this way. To pull the grid in the inclined position will not work in any way, so you will need to put separate sections at different heights.
Features of the installation of a sectional fence from the Rabita:
- Make markup and set the poles as described in the instructions above. The only difference is that the height of the supports will be different due to the landscape drops.
- To make the framework of sections, you will need steel corner 40x5. To calculate the frame length, take away from the distance between the supports of 10-15 cm and take the same from the "clean" pole height (ground part).
- Swarge corners to get rectangular frames. The size of the sections can be correlated with a mesh size of 1.5-2 m, unwind the roll and, if necessary, trim the chain brotank.
- To each post, weld horizontal metal strips with a length of 15-25 cm, a thickness of 5 mm and a width of about 5 cm. Rate from above and below 20 cm.
- Install the section between the columns and breed it to horizontal strips.
- Color an anti-corrosion-resistant paint posts.


Anyone who owns at least the initial skills of the welder is capable of building such a fence. Finally, we suggest familiarizing yourself with the informative video about the fence from the chain grid, which shows an alternative method for fastening the mesh to metal supports:
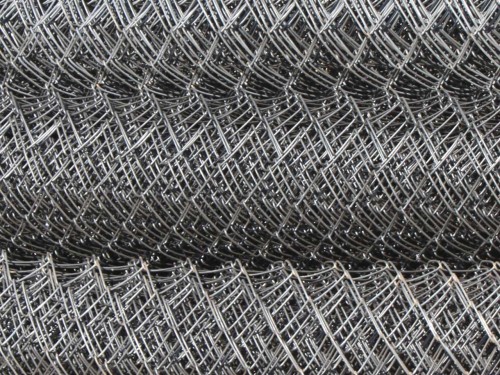
Fence from grid Rabits: photo


The chain grid is one of the cheapest materials for the fence and mounted easy, install the pillars and pull. It remains only to buy a chain grid and pillars. I buy here https://steel-pr.ru/setka/setka-rabitsa/ . Everything suits: and the price, and the delivery time.