Sandbox - a tank filled with sand, equipped with a variety of elements that contribute to a comfortable kid game. The size of the finished design depend on the number of children who will use it, age and individual host preferences.
Content
Types of sandboxes

- Sandbox table.
In such a building, a child can deal with the construction of turrets and sand castles at its workplace.
- Sandbox-sailboat (mushroom).

In the center of this design usually have a wooden pillar with a roof.
- Mobile sandbox.
This sandbox can be dismantled and if necessary to rearrange.
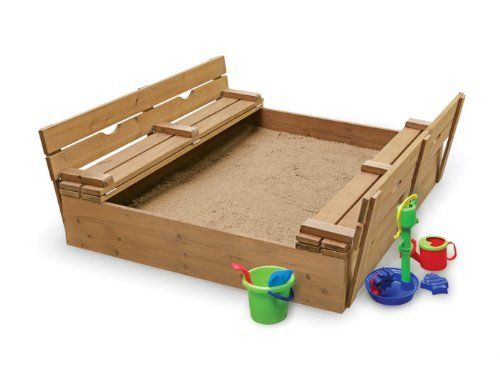
- Sandbox with lid.

Sand in such a design will always be clean.
In addition to the above types of sandboxes, there are other types of structures, including the presence of a slide, swing, etc., as well as the material of the manufacture.
Rules for the construction of children's sandboxes
Children's sandboxes with a lid: choose a place

Sandbox location rules:
- the design should be in the field of vision of adults;
- it is important to place the sandbox in one part in the sun, the other in the shade;
- install the design on the playground next to the children's swings and other buildings;
- when installing the sandbox, take care of the presence of the lid, which "will lock" the sand from the cluster of leaves, garbage, stray and pets.
Principles of building children's sandboxes

- use environmentally friendly building materials;
- the perfect option for this design is plastic, wood;
- children's sandbox should be bright;
- take care of the absence of "burrs" and sharp corners;
- the sandbox must match the surrounding landscape;
- to facilitate assembly work - use a screwdriver and an electrolovka;
- to fix the boards, use screws and nails;
- after installing the design, process it with a special antiseptic impregnation, cover with varnish, paint;
- during construction, use planed boards.
Sandbox with a lid do it yourself
Wooden sandbox construction

1. The first thing you need to do is determine with the size of the design. So the sandbox area must correspond to the number of children who will play in it. For 2-3 kids, it is recommended to highlight the territory of 1.7x1.7 m in size, if the child is one - 1.0x1.0 m.
2. We make marking on the site with the help of a cord and peg. Inside the future design, it is replete with a depth of 25 cm.
3. Prepare the base of the sandbox.
Notes:
If the base of the sandbox is left earthen, it will be faster to pollute. That is why experts recommend to use geotextiles or agrovolok. These building materials are perfectly missed moisture, provide a mechanical barrier. Also, on the bottom of the design, you can place the paneur or polyethylene film, having done the hole for drainage.
Progress:
- on the bottom of the pit smeared sand, trambam and equal the surface;
- next, lay the selected building material.
4. Establishment of walls:
- we prepare 4 bar with dimensions of 45x5x5 cm;
- the base of the pegs is processed by bitumen (it will not allow the rotation of the material);
- each element is driven into the ground to a depth of 15 cm (at the corners);
- nailed to the bars 4 of the board size 150h30h2,5 cm (this structure will wall);
- laid along the perimeter of the sandbox 4 board (this will skirting-shops).

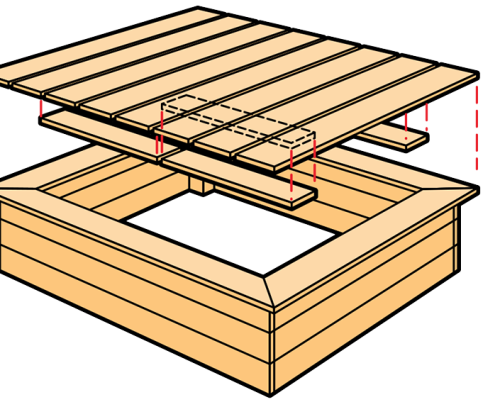
5. The construction of the cover.
Notes:
- cover part sandbox can perform tilt spanned by construction perimeter dense film. However, the most practical one is a wooden board, made of boards;
- another good one is a cover-door. It consists of 2 sheets. They are mounted on hinges and equipped with handles.
Progress:
- we make sandbox measurements;
- cut out of plywood (or knock off from several boards) rectangle;
- we do in the corners of the attachment cover on 2-3 bars.
6. Processing design.
So that the sandbox served as much time as possible, it is necessary to process it with an antiseptic agent, and then cover with varnish (or paint).
7. Design decor.

You can decorate a sandbox with various paintings: letters, animals, flowers, fabulous characters.
8. Filling the design.
The perfect material for filling the sandbox is river sand, career and sea. It does not contain extraneous impurities, is considered the most pure. In addition, a special quartz sand can be purchased in a construction store, which is designed for children's structures.
Notes:
Today there are quartz sands with clay content and special aromatic additives that scare animals.
Progress:
- after the purchase of sand should be sifted;
- then pour on the bottom of the design does not catch up.
Plastic sandbox with lid

This type of sandbox can be bought in a specialized store. Features of the location and installation of the design are similar to the wooden structure.
Advantages of plastic sandboxes:

- attract the attention of children with bright decoration;
- do not have sharp corners, "burrs";
- represent a ready-made design;
- are environmentally friendly;
- it will be about the same way as the wooden structure created by their own hands.
Sandbox with lid: photo


