For the personnel structures, shelves in the bath will need a solid preparation for construction. It is important to choose the right materials, perform the development of the work plan and choose the shape for the shelves. Such an approach will allow only a few days to finish the manufacture of shelves and already use them for its intended purpose.
Content
- How to make the shelves for the steam room in the bath do it yourself
- Building shelves for a steam room in a bath do it yourself: step-by-step guide
- Shelves for a pair with their own hands: Features
- Installation of shelves in the bath do-it-yourself: Production of a frame system
- Bath shelves do it yourself: photo
- Installing shelves in a bath with your own hands: Video
How to make the shelves for the steam room in the bath do it yourself

- The most common fastener for wood shelves is screws. Nails in this business are better not to use. They will not be able to provide the necessary level of strength, and if necessary in the analysis of the shelves, difficulties will appear. Without damage, remove structures on nails will not work. Screws also allow us to disassemble the design easily, without any difficulties and catching fasteners.
- Boards must be attached from the inside of the shelves. This approach to installation allows you to hide screws and helps reduce the risk of getting a burning metal. If it is impossible to create such an attachment, special hats are used, which are then covered with bare screws.
- After the installation is completed, the screw is necessarily closed with a wooden pin and rubs off with the help of an abrasive skirt.
Building shelves for a steam room in a bath do it yourself: step-by-step guide

Installation occurs according to the next phased scheme.
- Creating markup for a rack standing with the edge. All racks are placed, and then strips from rubber are strengthened.
- Conducting the installation of the first 2 beams, located on top. They are attached to the wall and drain on mandatory.
- They are placed on both sides of the construction, attach to beams and racks.
- Front and standing vertically support boards are put and constantly stick. They need to attach side beams located along the edges.
- The closing bars located ahead and creating the similarity of the frame are established by fastening with the most close, vertically standing, located next door, beams.
- Smooth orientation of the frame during installation should be constantly monitored by roulette and level.
- The lower frame must be collected by the same principle as the top. At the same time all the time keeps under the control of the location of BRUSEV.
- During the installation period, it is important all the time to check the conformity of the design by preliminary measurements. It is necessarily examined by each of the corners using a level on the subject of evenness. After a complete belief in properly performed work, jumpers are attached. They are made of thin beams or skimps.
- Before the stop, each mount must be securely tighten with a screw.
The correct installation of the regiments is important not only for the subsequent convenient harvest, but also for the complete, proper care of the room of the steam.
In the case of closing the trim not only by side, but also face, cleaning the room will become much more difficult due to the fact that access to the floor will be limited. Therefore, it is best to do only a partial wool's stitching. This will make it possible to comply with the norms of hygiene and maintain purity in the bath.
Each item before installation is required to be damaged. The defective elements must be immediately postponed and not even try to fix. All components of the steam room are attached exclusively from the inside, so the most difficult will be the installation of horizontally spaced boards.
If you or workers, constructive shelves in a steam room, can fix most of the elements from the inside, it will make it possible to make as little fasteners as possible using pin short-range plugs.
Sometimes it can be a convenient option of the original covering of the horizontal part of the room, and then fixing the remaining part of the facing boards.
Shelves for a pair with their own hands: Features

- Bath shelves are sometimes called more simply - bench. This name went from the nature of the design, having a view of the flooring of the boards in a horizontal form. They differ in each other. Each type of regiment design includes two main details - this is a frame and flooring.
- The frame is needed to implement the correct attachment of the boards for the base of the non-removable design. Sometimes it is used when creating support for collapsible flooring. In this case, the support racks will be needed for fastening the skeleton. In the form and structure, they are something like the bearing legs.
- Racks must be attached to large boards that perform the function of the jumpers. They are needed for even and properly location. In rare cases, they are constructed by the same technology as the basis for the march of the stairs. When using Finnish technology, the creation of support for the frame is not mandatory. In such a situation, the design can be attached to the walls of the steam.
- Flooring can be built using thin planks. They are manufactured in advance, have a strict geometric shape and a smooth surface, which is achieved by grinding. The thickness of each of them should be approximately equal to 2 cm. It is best to produce them from aspen or linden, since these breeds are well transferred to high temperature and humidity. When stinging wood, a small distance is necessarily abdicated. Trapping trap in the hotel and are installed on the floor surface. And then the flooring is attached to them.
- A fully practical option for the flooring can be removable its design. In this case, when installing it is rigidly not fixed, so in the hot period it can be removed and ventilated on the street.
- Also the original option will be the creation of a back and sidewalls with devices for layout at different heights.
- To make it convenient to climb the shelves, special stairs are being constructed. Usually there are 3-steps, but quite wide for the comfort of holidaymakers.
- If the bath is initially assigned too small room, the manufacture of the lower shelf according to the general parameters does not always work. In such a situation, the construction of a construction in the form of an isced triangle is possible. Thus, one of the cathets is attached directly to the surface of the wall, and the second is connected to the next regiment.
- The designs of the shelves for Parims are always multi-stage. The system of their structures is based on the physical laws of the propagation of warm air in a closed room.
- Therefore, during the manufacture, you need to adhere to the configuration, which is developed on the basis of the staircase.
- At the same time, the lower shelves have an individual importance, in contact with the floor.
- When the shelf below is not used as a retaining part, it must be placed at a height of at least 30 cm from the floor.
- The shelves can be installed not only on the one hand, but during the pair planning with 2 or more sides, it is important to take into account the possibility of movement on the room. While staying in the bath more than 2 people, the risk of injury should be minimized.
- Also in the bath you can install angular shelves. Most often, they are manufactured by the connection of blocks from pairs or more.
- In large areas of steam room, the angular elements can be placed in parallel to each other. Between them often install another lower shelf, which is fastened with nearby arranged and is actually part of each corner design. Such an element can perform a bench or stand function, shelves for storing different items or just a decorative lamp. Often this element is located opposite the door.
Installation of shelves in the bath do-it-yourself: Production of a frame system

Such a system is going pretty simple. Each of the sun beds need to be collected based on the framework. The best option will be the following construction.
- We take a wide shelf of 60 - 80 cm and another one, which will be located at a height of about 100 cm from the ceiling.
- Next, set the steps in the descendant order, the average width of which can be equal to 40 cm. The difference between the levels is made the same and is based on the calculation that the lowest tier should not be below 55 cm from the floor level.
- First we form the framework of the rectangular shape of each of the bases. Ends need to be trimmed about half of the total width and leaf from the end with the help of the chisel.
- After the frames are ready, we begin to install them on the legs in a strictly vertical position. Keep a height of 20 cm.
- Then the arrogance of 15 cm we flash 2 bars on the center. Next, the frame is tightened with legs and result in 8 fixes.
- In case of exceeding the spans of horizontal crossbar, the values \u200b\u200bof 85 cm must necessarily add intermediate rails into the frame frame.
- The resulting frame is located on the ground, on the sides we make grooves for the walls and begin the installation. When mounting the vertical location, we use a lining material from a cluster of 6 cm wide, which is fed to the appropriate wall.
- In the middle of the floor to the frame, the polyethylene film in 2 layers of 200 mm should be paved. Her edges are important to turn and shoot to the tree stapler.
- Next, we carry out the regulation with a slight bias. To do this, we use remote plates or conventional fane. The material first put under the legs, and then with the help of the thread align the diagonal. For the subsequent strengthening of the frame on top, screw the screws and sew bars on the chamber.
Shelves in the bath do it yourself: dimensions

- The minimum height of the shelves is about 50 cm. This value allows you to accommodate one person in a lying position and bend legs.
- Many people will suit the length of the length of 180 cm. This placement of the shelf enables the location on it lying with straight legs. It is important to provide for a comfortable stay in such steam people higher. Therefore, an additional, longer place at the bottom, will never be superfluous.
- The minimum width of the bath shelf is 40 cm. However, such a shop is not entirely convenient for the guy. More often the width is selected with a value of 60 cm. Most of the people will be able to accommodate normally, but still such dimensions are far from the ideal.
- The optimal width of the shelf width for a private pair can be considered 1 m. Even people with excess weight will be convenient to get on it.
Install the shelf in a bath with your own hands: Materials

For the construction of the shelves, you can use boards from different material.
- Aspen options will be well transferred to temperature fluctuations and its high marks. In addition, they have excellent moisture resistance. Such boards are not covered with cracks, and their color does not become darker with time. This material is cheapest and is available for most people. However, it also has a disadvantage - this is a high probability of rotting from the inside.
- Alder boards resistant to mechanical type damage. They have a high level of moisture resistance and low thermal conductivity. Olha, perhaps, is one of the best options for making bath shelves.
- Lipa shows itself in active operation, such boards are not cracking and do not dry. In addition, it is the linden array that has minimal roughness. The shape of such boards are very good.
- A great replacement of the lipa will become Maple. It has a solid structure and is not deformed.
- Poplar wood is very soft. Therefore, it is mainly used to decorate the room of pairs.
- African oak has low thermal conductivity and is very resistant to temperature and humidity changes. Its wood is durable and easy to handle.
A tree in the bath even at low thermal conductivity can cause the appearance on the skin of traces of burns. In order to prevent such an effect, you can use proven types of coatings that have the property of rapid absorption and do not affect the appearance of the room.
Make the shelf for the bath do it yourself: covers

- You can use special oil to cover bath shelves. Before it uses wood, wood must be carefully sucked and cleaned. Apply oil with brushes and most likely in several layers. Each time the oil is left on the boards about the knocks, and then thoroughly wiping into a dry cloth.
- A qualitatively made coating will become not only good protection against overheating, it will be able to prevent absorbing in the wood of different stains. In this case, it will not be necessary to clean the surface using a brush with a solid bristle. The correct approach allows you to maintain the original form and structure of the array.
- When creating the shelves, you will need to choose the correctly choose high-quality materials and perform a sequence of work. At each stage, the quality of installation of construction should be inspected.
- You will also need to treat the wood of horizontal areas using a grinding machine. Corners and adjacent surfaces to the walls will conveniently align the deltoid machine. After that, it is important to carry out the clarification of the tree using the skirts of the emery type, the base of which is made of foam rubber.
- A similar type of finish will eliminate all minor manifestations of fungus and dispute. For the "moxibustion" of the wood surface, it is necessary to wipe it with a tampon of cotton materials, pre-mixed in linen-based oil.
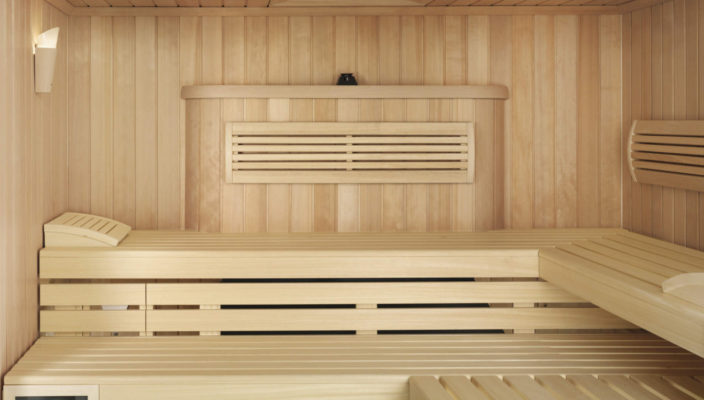
Bath shelves do it yourself: photo


Today we can find a variety of photos with shelves for porchs. If you try, then you can create a pair of steam yourself no worse. When they are manufactured, photography will become an excellent visual example.
Installing shelves in a bath with your own hands: Video
To help home crafts, who decided to independently take up the manufacture of shelves in the bath, not only a photo can go. On how to make one or a few shelves in a bath with your own hands will tell and show the video.


