Anyone who lives in a private house or in the country, dreams of having their own reservoirs. The pool, located on your site, will play not only a designer role in the arrangement of the landscape, but will save you from the exhausting heat in the summer. In addition, if you set the heating system with a water, you can use it year-round. To save on the building of the pool, all the work can be performed by itself.
Content
The pool is made of concrete with your own hands. Step-by-step instruction
Construction of a concrete pool is a delicate matter because it requires certain skill and knowledge. All installation work will be faster if using auxiliary tool. In addition, to equip the basis of your reservoir, it is better to take care of one, and better - two assistants. This not only accelerate the workflow, but also helps you to agree on some difficult solutions with a person who may have had a certain experience in this area.

Methods for creating walls of the pool bowl
The creation of a concrete pool involves the use of several options for the arrangement of the bowl. We want to immediately note that we advise a popular monolithic option that will be reliable and durable, but we do not exclude other ways to create a bowl.
To create the walls of the concrete bowl of the pool, use the following methods:
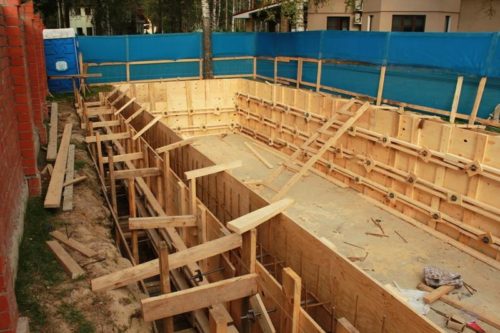
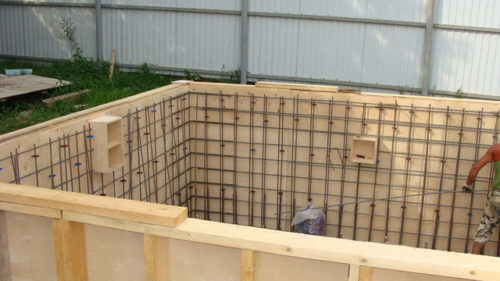
- Removable wooden formwork. This option is the most popular because it is not necessary to spend much to spend money on the material for formwork. Often it will be suitable for it, which is always available in the country or plot. After arrangement of formwork, they begin to mount the frame of the pool. Moving around the perimeter, set the reinforcement, which is tied with a certain step, it all depends on the alleged loads. After the frame is assembled, they begin to pour concrete. When the mixture completely turned out, the formwork is removed and continue to work.
- Valid polystyrene foam formwork. To equip the walls of the bowl in this way, you need to disturb the formwork in advance. For this, you need to present the plan for your pool to a special firm, which based on your sketches will create a formwork. The polystyrene variant of the formwork is a kind of constructor from which the "skeleton" is collected. Subsequently, concrete is poured into the formwork. This method differs from the previous one by the fact that the polystyrene foam blocks remain and are not dismantled. Thus, an additional layer of insulation is obtained, but note that this option is more expensive, although no less qualitative.

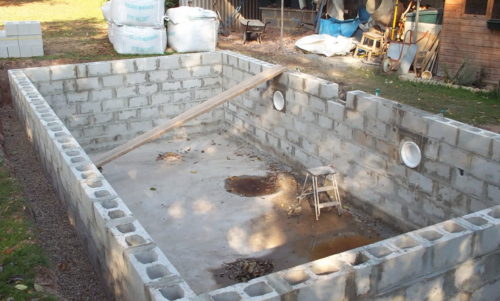
- Formwork from blocks. To create walls, use ready-made monolithic blocks that are consistently installed. Inter-block joints are labeled with a special solution, after which the frame is subjected to waterproofing. This method is not bad, however requires expensive delivery, since each block weighs quite expensive.


The choice of the proper method for you is entirely dependent on the project budget. If you are going to do everything yourself, we advise you to use the usual wooden formwork. This method is the cheapest, and the result will not be worse than others.
Tools and materials
To lay the site layout, and install the pool bowl correctly, it is better to get in advance to everyone necessary. Building the pool requires compliance with the accuracy of calculations that are impossible without a special tool. In addition, be sure to get around with all construction materials, then you will not have to go once again in the store, spending your precious time.

To build a pool with your own hands, we advise you to purchase the next set of tools and materials:
- concrete mixer, screwdriver, perforator, deep vibrator, tamping;
- platekoreauz, jackhammer, Bulgarian, welding machine;
- hammer, construction knife, wrench set, knitting hook, stapler;
- construction Rule, level of water, square, roulette;
- shovels Soviet and bayonet, vest, bucket, trowel, spatula, bath;
- maclithus brush, flusted brush, Kapron thread;
- gloves, protective mask of the welder;
- boers on concrete, discs on the grinder, hairpins, fasteners, replaceable blades, pencil;
- board 20-25 mm, timber 40-50 mm, nails, tree screws, PVC film;
- armature 10-12 mm, knitting wire 1.8-3 mm, 5 mm rod;
- crushed stone, sand, cement, plasticizer;
- waterproofing materials, cornering tape, primer, tile glue.
As you can see, the list of all the necessary is quite large, besides, it can change, depending on the material and method of arranging the recovery. Do not forget that earthmoving works can be quite complicated, then you will have to resort to the help of heavy construction equipment.
Cuttlery arrangement for bowls
Getting Started to create your own reservoir, it is important to prepare correctly. The further "destiny" of your construction will depend on the correctness and accuracy of the initial actions. Construction of a concrete basin is a time-consuming process, as it requires strong physical strength and excerpt. But this work on the shoulder of anyone who will act consistently perform all the processes with extreme accuracy and attention.

To equip a pit for the future pool, act as follows:
- Choose a place for future reservoir. The pool should not interfere with car arrival at the site. In addition, keep in mind that it is better to position it in a place where the sunshine is most often happening, then water in the summer will always be comfortable.
- Mouse over the local geodesists about the presence of nearby groundwater. It is better to do this in advance how to learn about them by the middle of the workflow. Sometimes it is easier to move the entire design for some distance, then you will not have to spend money on additional materials that can protect the pool from the course.
- Start with the markup of the pit. Use wedges or metal bars to designate the corners of the structure. Tensioning between them a kapron thread, plan the future sizes of the pool, taking into account the plan-scheme of the structure.

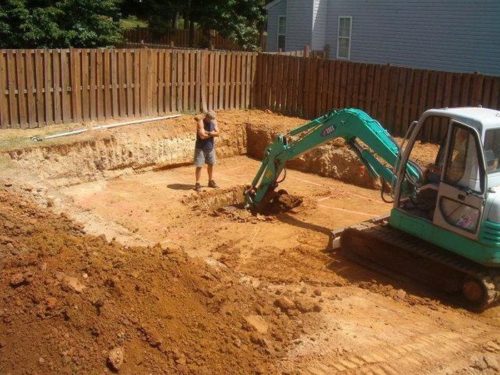
- Now you can proceed to the roar of the pit. In case the breed in your site is solid, it is better to use the services of heavy construction equipment, such as a hydraulic hammer. Sometimes it's easier once to spend money on special equipment that will make all the difficult work during the day than strain and sweat, breaking the dense rocks of the rock with a perforator for a month. In any case, the recovery should be dug on the necessary width, length and depth, taking into account the thickness of the bowl.
- At this stage we advise you to carry out complete waterproofing of the bowl. For this, the rubberoid is suitable, which is mounted for 15-20 cm. This may require a large amount of material, but note that such actions will only increase the service life of your pool. In this case, one very well-known saying will be appropriate: "I pay the miser twice." If you do everything yourself, then save on the wages of builders, so it is better to purchase high-quality material, thereby protecting the bowl of the course.


Pay special attention to the creation of pit. Be sure to consider all the features of your site, consult with experts on the nature of the earthen breed. This will help identify problem areas or other communications that are possible in the place of the future installation. If you did everything correctly, you can start to the next step.
Communication wiring
Set all the necessary communications is better immediately after the arrangement of the pit. If you start doing this in the already installed box, then difficulty and trouble do not avoid. In this case, you will have to try to equip the filtering system, plum and other elements that serve for the benefit of your pool. At this stage, it is necessary to decide on the presence of heating and lighting systems. It is also important to take care of drainage and water intake systems. It is possible to better not save at this stage, but to entrust the layout of all communications systems to narrow specialists. Select the desired scheme for yourself to select the desired option.

Arrangement of the bottom of the Bowl
Since a large amount of water is constantly in the pool, the bowl must withstand huge loads. If you want the pool to serve you, allocated for it, it is better to start with the creation of the bottom. Without this stage, it is simply impossible to carry out further actions.

To equip the bottom of the bowl of the pool from concrete, they come as follows, acting in this way:
- Put a layer of 10 cm in the sandbox, then challenge it. Top with the same layer, plunge the crushed stone of the middle fraction and steady again.
- With the help of a trash, the bottom of the bottom of the kittle.
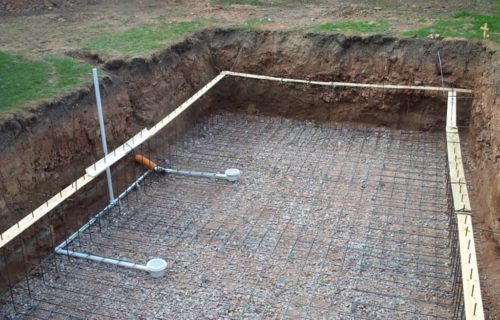
- Now you can begin to reinforce the future monolithic base. Since the future frame should be in the middle of the concrete, it must be raised to a height of 50-70 mm. First place on the gravel-sand pillow pieces of bricks (the thickness of the blocks is just 60 mm, which is the perfect option for us).
- Now you can knit grille. Use the ribbed reinforcement with a thickness of 10-12 mm. Cells in 200h200 mm will be enough. Take the frame with a hook and knitting wire. Note that the lattice should be fully located on bricks.
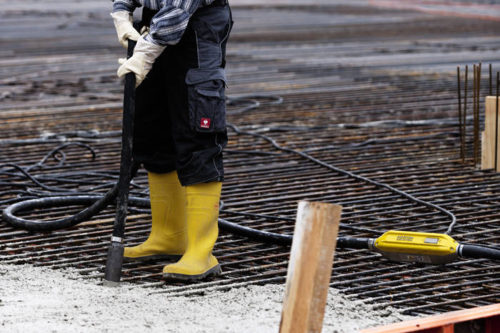
- We knead the solution in the concrete mixer, each time adding a plasticizer - it will protect the monolithic design from frosts in winter. Moving from one edge to another, uniformly distribute the mixture using the rule.
- When the bottom is flooded, you can easily walk the vibrator to remove bubbles. Give the concrete to dry.


Falling the bottom of the bowl concrete, be sure to use special rubber boots. In case the pool has large dimensions, a concrete pump can be caused to this process, having previously calculated the cubature of the required solution. By ordering concrete, specify that it is needed to improve the bottom of the pool.
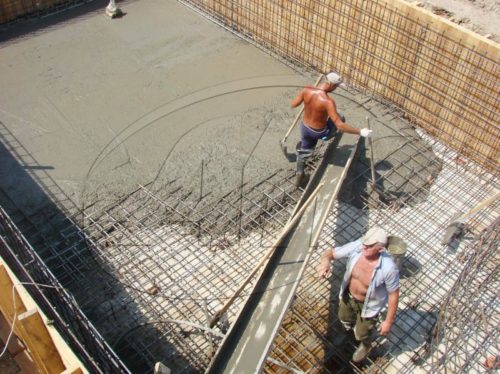
Arrangement of walls of the pool
This stage of construction provides for the creation of the future form of your reservoir. In case you decide to make a budget version of a rectangular or square form, then significantly speed up the process. Creating radius walls, you will have to additionally enhance the frame and formwork. If you are going to do everything with your own hands, then the bowl with straight corners will be fine for the first time.

To create the form of the future pool, begin to equip the walls as follows, acting in stages:
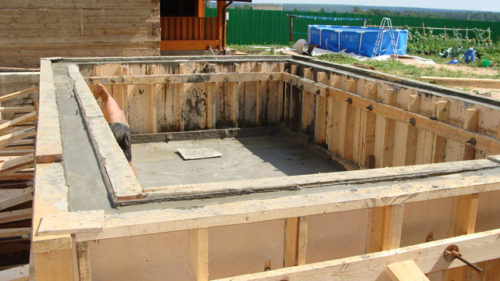
- First, the external part of the formwork is collected, sequentially pinning shields. They are installed so that they have a common plane. From the inside, they are additionally squeezed by PVC film to avoid seeping the raw solution through the boards.
- Now, armature by reinforcement, rod and knitting wire, start creating a frame. A rod with a thickness of 10-14 mm is suitable as horizontal and vertical guides. For a low pool, a step is enough at 30-40 cm, for the design is higher - 15-25 cm.
- Start setting the inside of the formwork, not forgetting to fix PVC film. Observe the parallelism of the walls and dimensions, in accordance with the plan of the structure. So that in the process of filling concrete, the design is not deformed, additionally set the struts. They will fix the formwork properly.
- Now you can pour concrete. Move around the perimeter, pour the wall to a maximum of 70 cm. Give the solution to open, then continue the fill with the layer layer. Work in a pair with a deep vibrator, it will help to avoid hollow formations in the raw solution. Do not forget about the frost-resistant additive. It will protect the finished design from temperature drops, besides, give a solid with large plasticity.
- Leave the box to harden. This may be required from 2-3 weeks, depending on weather conditions. Note that if you work on a dry time, then concrete is better moistened until it dries. If you constantly pour rains, close the surface of the film. Do not forget to remove the formwork.


As you can see, the process of wall formation is quite long, moreover, it requires a sequence of actions, without which the box will not receive the necessary rigidity. Act step by step, withstanding all the necessary sizes in accordance with the plan-scheme, then the concrete structure will serve you not one dozen years.
To better understand the question associated with self-building of the pool from concrete, we advise you to see the following video:
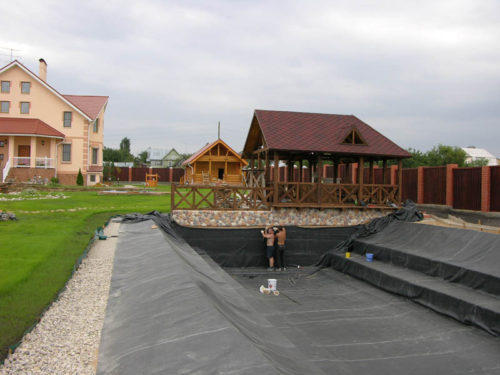
Processing and finishing surface
The final stage of construction is finishing floor and walls. However, before you begin to give your pool to your pool, please note that you first need to prepare the basis. From how you do this will depend on the further service life of the finishing material.
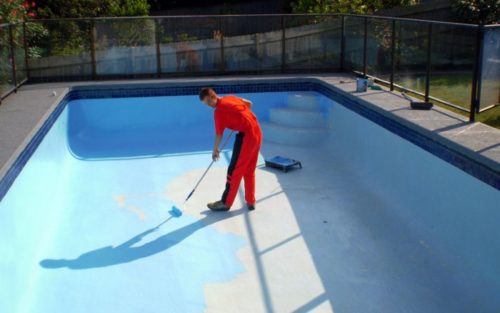
To prepare a concrete bowl to finish, use the following tips:
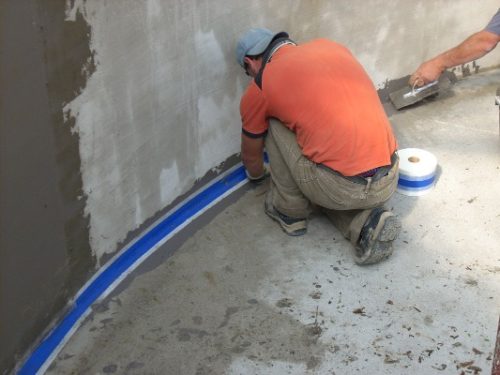
- after removing the formwork, carry out the root waterproofing. Armed with bitumen mastic and a mahow brush, wake the base, protecting it to the penetration of unwanted moisture. If you have chosen a piece waterproofing material, then you must note that it must be mounted in a mustache, while the joints of the joint are sealed. This is done with a gas burner or liquid bitumen;
- for angular parts of the design, use a specialized tape. Do not confuse it with a bitumen ribbon for the roof and other parts of the structure. It will additionally protect the corners of the course;
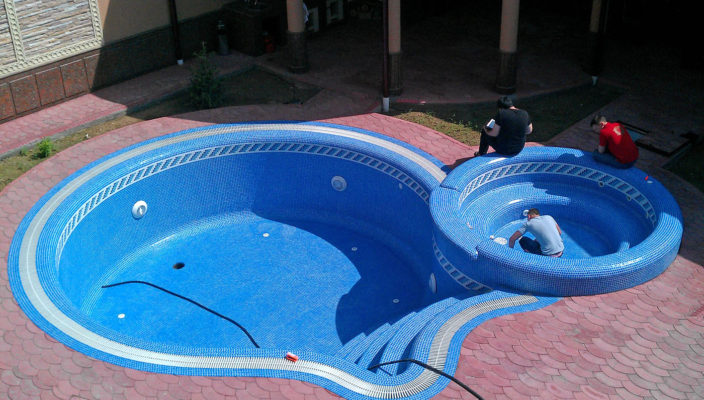
- if you are going to separate the bowl of a mosaic, a porcelain book or artificial stone, use specialized glue. Since the finishing material has a different weight and structure, it is better to use a special solution for each type;
- before starting finishing work, leak up the surface, it will increase adhesion.

To check the pool for performance, fill it with water for several days. This is done before starting finishing work, after which the water is descended, and the pool is dried. Do not forget to always handle a concrete surface, it will help maintain the base in dueum, thereby increasing its service life.
Pool do it yourself, photo


