After the external walls of the building are erected, measures must be taken to protect against the devastating effects of atmospheric phenomena and groundwater. To the greatest extent, it concerns the base - the wall site from the ground level to the first floor. In this article - answers to questions about what materials and technologies can be performed such work.
Content
Why do you need trim
We estimate the advantages and disadvantages of the trim of the house of the house with their own hands. Reasons to start finishing, several:
- protection against rain, soil and melting waters, destroying walls;
- protection from cold penetrating the ground;
- protection against chemically aggressive medium (salt, organic, toxic precipitation);
- waterproofing and insulation of the bottom of the building;
- decorating the wall surface.
The shortcomings in the decoration of the base is not noticed, with the exception of poor quality of work. In this case, the moisture will be collected under the cladding and continue to have a negative impact.

Preparatory stages of trim
Features of the trim of the base of the house with their own hands consist of mandatory compliance with the sequence of performance. The order is as follows:
- On the perimeter of the base, the trench is rotated, a depth of 0.3 to o, 5 m (depending on the need to lay the insulation).
- In the separated trench, the sand layer (about 10 cm) and a gravel layer (also 10 cm) are added. Rocking is moisturized and tamped.
- The insulation is placed (if provided): plates of extruded polystyrene foam of the highest density (45 kg / m³) are used.
- The cement-sandy mixture is aligned the lower part of the base.
- Formwork is mounted from boards and plywood. To give the strength of the structure, the soot and stops from BRUSEV are used.
- Concrete breakfast poured. The width of the scene is not less than 0.5 m.
- The trim of the base is decorative and protective materials.
Important: At the design and construction stage, it is recommended to provide for the construction of the "West" basement (the wall stands forward, hanging over the basement). Otherwise, installation of stainless steel or propylene is required. Another option is a hypersed brick cornice device.

The device of the cornice of the base from the hyperpressed brick
Preparation of the surface of the socle
Before you begin the decoration of the base, it is necessary to prepare its surface. This is followed for this.
- The base is purified from mold and moss using metal brushes and spatula. Remove the sprinkled fragments, cut off protruding reinforcement and defects of concrete fill.
- Processing the walls by an antiseptic agent and primer deep penetration.
- A reinforcing grid is mounted around the perimeter dowel-nail.
- Cement-sand plaster of thick consistency is applied so that the entire grid is covered. You can also use tile glue. In order for the mixture to acquire hydrophobic properties, it is recommended to add bustide or PVA glue.
- Halfurome, the non-frozen plaster mixture is aligned until the surface quality respond: irregularities should not exceed 3 mm on the temporon meter anywhere in the application rules or verification rail.

Alignment plaster on the reinforcing grid
After the plaster on the base is completely dry, it is necessary to embed small cracks after shrinkage. Next, you should explore the main options for finishing the base of the house with your own hands and choose the appropriate material.
Selection of finishing technology and soccer material
Either the materials for finishing the base are the same requirements: they must be resistant to chemical impacts, to moisture, moss and mold fungi should not develop on their surface. In addition, the finish should be a solid and appropriate overall design of the facade of the house.
We list the main materials for finishing the base of the house with their own hands.

- Moisture-proof plaster with the addition of dye is the cheapest type of finish. In this way, it is recommended to draw up low socles. The disadvantage - in the difficulty of repair: for the restoration of the creaked plaster, it is difficult to choose a mixture of the same color.
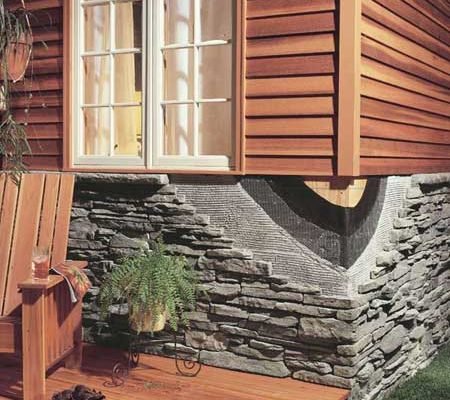
- Artificial stone for finishing the base. Features of working with such material - in light laying and repair. A stone is convenient to sneak the angles: defects will not be noticeable.
- Natural stone: the material is stining a well-fortified base. When compliance with the cladding technology, the base will remain aesthetic appeal for a long time.
- Facing brick: The technology of surface design using this material is practically no different from working with natural stone.
- Flexible Stone: The material is advantageously distinguished by the possibility of facing complex surfaces with rounded shapes. Damaged polymer-sand tiles are easy to replace.
- Siding for finishing the base of the house with their own hands: attached to the metal profile (to the guides). The material does not require an alignment of the base surface. Based siding has increased resistance to mechanical effects.
- The base panels for finishing the base of the house with their own hands as well as siding can be fixed on the wall after its insulation of mineral wool or plates of extruded polystyrene foam.
- The trim of the base of the house with a tile with its own hands is the greatest complexity and complexity of the process. At the same time, the tile guarantees the safety of the base and its aesthetic appeal. For work use polished stone, clinker tiles or porcelain stoneware.

Clinker tiled cladding
Tip: When choosing a material, you should pay attention to the service life, the complexity of the installation technology for self-use, combination with other finishing materials and cost.
Technology trim base various materials
In order to select the material for finishing the base, you need to evaluate the availability of technology for self-execution. Beginner masters are offered the following.
Finishing the base by applying plaster "under the stone"
The finishing of the prepared surface of the base can be carried out using the finish decorative plaster, with the help of alkyd or yacht enamels. The last option is preferable from the point of view of saving and duration of service life.
The decoration of the base according to the "under the stone" technology is performed using silicone stamps that are manufactured according to the following technology.

Finishing the foundation by plaster imitating natural stone
- Select the samples of a flat medium-sized natural stone, a thickness of about 15-20 mm.
- From dense cardboard, the shape of the contour of the stone is fused along the contour and the edges are connected. Frames must rise over a stone by 2-3 cm.
- The cardboard blank is impregnated with waste motor oil, and after 2-3 days (after drying) lubricated with vaseline.
- Capacity is poured with silicone and leave to dry.
- Remove cardboard and remove silicone from stone.
- The finished stamp is filled with dense cement-sandy solution and applied to the surface of the surface. Frozen coating color.

Staining of the imitation of the stone creates the illusion of natural material
Finishing the base by cladding with stone and tiles
To work, you must have a tool and devices:
- platecores or Bulgarian with a circle around a stone;
- toothed spatula;
- capacity for kneading the adhesive solution;
- drill with a mixer for mixing the solution;
- level;
- marking cord;
- plastic crosses (at least 5 mm);
- stretch (Kelm).
The gluing of the facing material is performed using tile glue, mixed according to the instructions indicated on the package. During the work, the following rules are followed:
- The lining starts from the corner.
- The tile or stone is glued, calculating in such a way that it was necessary to cut the lower row. The top must remain as much: so the base will look better. An exception is a variant with a wide scope covering the uneven edge.
- The glue is applied by a trowel on the wall and on the tile (stone) and leveled with a toothed spatula.
- Tile pressed against the wall.
- If the facing are starting not from the ground, to the base at a certain level temporarily fasten the rail. So you can prevent the fading of the stone (tiles).
- Between the tiles and stones of the correct geometric shape set remote plastic crosses.
- For docking in the corners, the tile (stone) is cut under 45 degrees.
- Checking the quality of the facing and respect for horizontally controls the level.
- The seams are filled with the same solution. The residues of the solution (until he frozen) is removed by the rag.

Finishing base with natural stone sandstone
IMPORTANT: Cerambulanits or clinker tiles can be used to finish the base. With glazed enamel, the tile is not used: its face layer will not withstand the temperature drop.
Finishing base Siding and base panels
Congue siding and panels can imitate brick masonry or natural stone. This is a solid material that can withstand moderate mechanical loads. The base siding is the plates equipped with puzzle joints to connect snaps.

Social panel with stone imitation
The main stages of work on the trim of the base with their own hands using propylene or PVC panels:
- A horizontal crate of wooden plates treated with antiseptic, or a metal profile is fixed to the wall. The cheek must lie in one, strictly vertical plane. The distance between the elements of the crates is not more than 0.6 m.
- Plates are attached to the crate of self-drawing on top of the laid insulation and vapor barrier membrane.
- If necessary, pruning the slabs in size is performed by a jigsaw or a grinder. The connecting joint is closed by a challenge.
- Corner connections are decorated with a special profile.
- From above, the base, lined with plates, is closed with a metal or plastic sampling.

Fastening panels to a metallic profile crate
IMPORTANT: Mounting the base plates can only after installing concrete swells. At the same time at the bottom (near the sings) and on the line of the joint with the wall facing, the compensation gap should remain - 10 mm. It is fought or covered with a challenge.

The base panels allow you to arrange a column foundation.
Completes the article on how it is fulfilled with the minimum cost finish the base of the house with their own hands, video with a specialist comments.


If you already demolish at home in the country area, it is better to make it the hands of professionals - to remove responsibility for possible damage to neighbors, dust and export and utilization of garbage. Contact cottage comfort plus
https: //xn--80ahqp0afz7a3a.xn--p1ai/demontazh-i-snos/snos-domov-na-uchastkax-moskovskoj-oblasti/