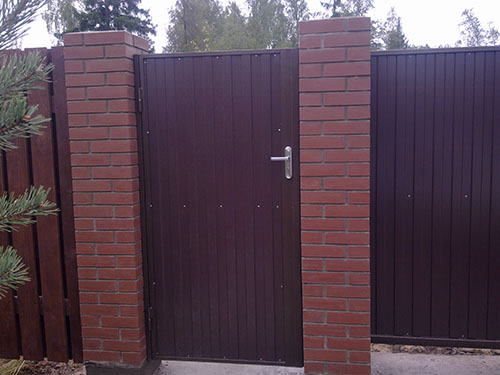
Each theater, as is known, begins with hangers, and every country house - from the wicket. In appearance and condition of the wicket, any guest or passerby can make the first impression of the tenants of the house. If the entrance is decorated neatly and beautiful, it means that household residents live inside, who care for their property. Material for the manufacture of gate can be anything: wood, sheet metal, forged bars, etc. Recently, professional flooring is very popular in this regard. This is a metal leaf with bends, which is mainly used as roofing material and for outer decoration. In this article we will talk about how to make a gate from the corrugated hand.
Content
Why precisely professional flooring?
Professor is widely used in the construction industry, and especially love its home-grown self-taught builders. It is easy to work with this material, and in a short time it allows you to close the large area. It is a metal sheet of profiled shape, that is, with wavy bends. The bends can be of different heights, widths and frequencies, depending on the construction needs. The height and form of "waves" defines the rigidity of the professional flooring, as well as its scope. So, for the manufacture of vertical structures, products with marking C8, 10 or 20 are needed. The letter "C" in this case means "wall", and the figure indicates how many millimeters is the height of the wave. It is it that is used to install the wicket from the professional flooring.
There are two varieties of professional flooring - painted and galvanized. Both first, and the second possess anti-corrosion characteristics, however, the painted is still better opposed with rust. This is explained by the fact that it is made with two protective layers - zinc for the anode protection of iron and the actual paint. The cost at the same time does not differ at all from galvanized, so if you know this small secret, you can build a very reliable and durable gate. Of course, you can buy an ordinary galvanized professional flooring, but then it is recommended to be coated with an anti-corrosion powder dye.

So, we found out that professional flooring is well opposed to corrosion and is distinguished by enviable durability. In addition, it also weighs quite a little - approximately 5 kg / m². With the installation of sheets, even an inexperienced master will perfectly cope. Fastener should be attached with the help of special screws with washers that do not allow metal fasteners and leaf rubbed each other. Cut sheets are also easy, and for this use conventional metal scissors.
Useful advice: To cut the professional flooring, it is better not to use the Bulgarian, because in this case the protective layer of paint will burn, and the risk of corrosion will increase.
The main advantages of the professional flooring:
- high anti-corrosion properties;
- ease of installation;
- easy to cut;
- durability (from 20 years and above);
- low cost;
- low weight;
- aesthetic appearance;
- a large selection of colors (there is even a profile with imitation of wood, natural stone, brick).
However, as with any other building material, the professional flooring has its drawbacks. So, due to a small thickness, sheets may suffer from mechanical damage. If a stone accidentally fall into the gate, or you hook it with a machine, then an unsightly dent will remain on the surface. A layer of paint, by the way, will also suffer, and in this case the appearance of rust. Thin metal wicket is rather a decorative entrance than reliable protection of the house. With a special desire, it can be brought or cut down.

Also, professional flooring is completely deprived of sound insulation abilities. If you make a wicket with a visor, prepare for the fact that during the rain you will hear the noise of falling droplets. The wicket from the professional flooring requires a careful circulation, and then she will serve as faithfully for many years.
How to make a wicket
Make a gate from the professional flooring with your own hands is not so difficult. However, in order to fulfill all the work, it is necessary to have at least the initial skills of working with the welding machine and other metal tools. Otherwise, everything is simple - elementary calculations, minimum of earthworks and a quick building assembly.
To begin with, we offer to list all the basic parameters that can be useful in the manufacture of wicket and fence. By the way, if you make a gate from the professional flooring, then the fence is better to do from the same material so that everything watches harmoniously. Also, professional flooring is well combined with brick or stone. So, what width will your future wicket? The width should be such that they can safely go through 2 people with a side, well, or at least one and a half. And seriously, the optimal width of the wicket is considered to be 1 m. Through this opening, you can freely carry large-sized furniture or go through with bags in your hands.

The height of the wicket can be any, but, as a rule, it is limited to the height of the fencing itself. There are special prescriptions to SNiP, according to which, from the street or road part, the height of the wicket and the fence should not exceed 2.2 m.
It is useful: The wicket poles usually roll into the ground for 1 m. Accordingly, the height of the columns should take into account the height of the gate plus 1 m. But since the professional flooring is quite light, then the meter will be too much. You can restrict 50-70 cm. If your site is on a buncinister or weak soil, the pillars are better to bury deeper. Ideally, the end of the post must be located below the level of the soil freezing so that the spring wicket does not pushed out of the ground.
If you have pets who love to walk freely outside the site, it makes sense to make a small door in the gate from the professional flooring. However, in this case, there is a risk that neighbor dogs and cats will be tested to the courtyard. Between the lower part of the wicket and the earth should be leaving the lumen of at least 4-5 cm so that its move does not blocked small stones and plants.
Tools and materials
For the manufacture of wickets from the professional flooring, there will be not so many building materials. In addition to the sheets themselves you need to make pillars. For this purpose, it is best to use metal pipes with a cross section from 20 to 25 mm. It is recommended to choose square pipes - it is easier to mount the loops. The width of the support pipe should be about 100 mm, and how to count the length we have already told above.

Materials for the frame should be selected based on the form of a future design. To calculate everything, make the drawing of the wicket from the professional flooring. For a frame, you can use the same metal pipes, only with a smaller diameter. As for fasteners, for professional flooring it is necessary to choose special screws with a washer. You will also need a mortise lock, handle and loops that you suspend the wicket. All elements must be made of stainless material or processed by a special protective composition.

What instruments and materials besides metal parts and accessories will be needed for mounting the wicket from the professional flooring:
- bulgarian;
- welding machine;
- schlifmashinka;
- sandpaper;
- drill;
- screwdriver;
- building level;
- roulette;
- cement M400;
- river sand;
- crushed stone;
- bitumen mastic;
- ruberoid or polyethylene film 200 microns;
- anti-corrosion primer;
- metal paint.
Useful advice: the most convenient to get paint for metal surfaces in the aerosol. If you bought painted professional flooring, then immediately buy paint of the same color to mask random scratches.
Installation of professional flooring
When you already have a drawing and purchased all the necessary materials, you can proceed to assembling and installing the wicket from the professional flooring. Below we generally describe the specifics of the work, but the steps may differ depending on the shape and size of your wicket.
How to make a gate from the profession yourself:
- Starting work with the installation of the supports. Drop the pits to the depth below the ground freezing level. Prepare rubbank, cement and sand. Spread the pit is the most convenient to the brown, but if there is no such, you can use a shovel.
- When the pits are ready, cut the thick metal tube on the segments of the required length. Remember that the length of the support pillar is the height of the wicket plus part that will be underground. If necessary, clean the surface from the scale and cover the anti-corrosion primer. Wait for the full drying of the primer.
- At the bottom of the pit Pie a piece of rubberoid and pour a layer of rubble with a thickness of 25-30 cm. Thoroughly sneak crushed stone, watering it with a small amount of water.
- The lower part of the pipe that will be underground, dear bitumen mastic and stuck in the rubble. Be sure to set the poles strictly vertically, checking the position by the construction level or plumb.
- Prepare a classic cement-sandy solution in the proportion of 2: 3. For greater strength, you can also add 2 pieces of rubble, but since the professional flooring is not so heavy, you can not do that. Fill the space remaining between the post and walls of the pit and check the verticality of the support once again.
- After that, leave the pillars alone until the concrete is completely frozen. Usually, with clear and dry weather, it takes about 7-10 days. In general, concrete acquires full performance after 1-4 weeks, but, again, since the professional flooring weighs little, work can be continued in a week.
- Cut pipes for the frame in accordance with the drawing. To do this, you can also use square items - they are easier to fasten each other. Put the items on a flat surface and measure the dimensions, thoroughly checking the fatness of all angles. If you have done everything right, then from both sides of the support pillars to the frame, the distance of about 1 cm should remain. This is the minimum required clearance for stable wicket operation. If you build a rectangular gate for a fence of a professional flooring, it will not hurt to measure the skeleton diagonal - they must be identical.
- Cook pipes and how to clean the place of welding with a grinding machine. Inaccessible places will have to sew the sandpaper manually.
- Cover all metal parts anti-corrosion primer.
- Give the location to install the lock. It is better to quickly welcome the auxiliary altitude and fix the lock on them, and not on the frame itself.
- Wait for the full drying of the primer and weld to the support pillars of the loop. Sample the wicket in height and tick the point of attachment of the retarding parts of the loops on the frame, after which they brew them.
- Reinstate the skill again and cover these places in the primer.
- Take a wicket on the loop. If it is thrown, we weld a few more stiffeners and make the corners with steel corners.
- Apply protective paint on the frame and posts.
- Attach profiled sheet to the frame. Do not forget to control it horizontal and vertical position by the construction level. First screw in 2 chalks at the top and bottom, and then check how the cloth behaves when opening and closing. If it is not thrown, you can screw the remaining screws. Install them in the recess, and not the waves themselves. On 1 m² there must be a minimum of 6 screws.
- Cover the support pillars with paint again and, if necessary, disguise scratches on the professional flooring.
- Attach the lock to the frame, make the markup for the lock well on the professional flooring and for the opposite part in the support. Put the hole with a grinder with a small circular nozzle, and edges cover with a file and cover the paint.
- Attach the castle's response to the support.
- Cut the hole in the professional floor with scissors for metal or drill his drill.
Make a gate at the gate from the professional flooring, as practice shows, not so difficult. The main thing is to do everything without a rush and before installing each element to check the level of position level. Qualitatively performed work will serve you 20 and more years, demanding only in rare cases of cosmetic repair. If you handle a straightener carefully, it will last a very long time. If necessary, you can easily replace the wicket sheet, simply removing it from the frame and screwing the other - a newer or excellent color.
Finally, we suggest you watch a video about how to make a gate from a professional flooring:
Customer wickets: Photo


