
The development of bird germs in its essence is a unique phenomenon, because it can be observed at all stages. Moreover, the process can be monitored, preventing the development of pathologies and fetal death. So that all this has become possible, eggs are subjected to orosquing or, simply speaking, translucent. To do this, use a special alloscope device. A orsososcope can be purchased in a specialized store, but with the same success you can construct it yourself from healthy materials, saving money. In this article we will talk about the benefits of using this technique and tell a few ways to make an Ovioscope at home.
Content
Why do you need an ovoskop
The end of the spring and the beginning of summer for many bird farms owners or small farms marked the growing of the new livestock. Some prefer the traditional method with poultry poultry, others are gained by supporting technology and get incubators. If you belong to the second type of farmers, you can not do without a ovoskop.
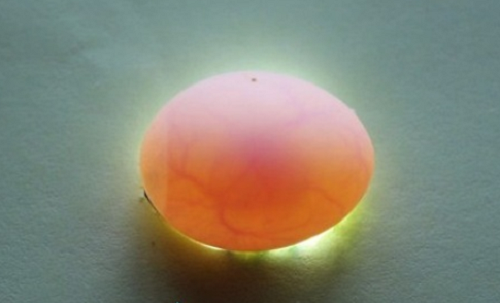
A ososcope is a special device invented to determine the quality of eggs by flashing them. Its device to a funny simple - to see how the embryo is developing inside the shell, it is necessary to send a powerful stream of light to an egg. At the same time, the light should not pass around the egg so as not to blindly look at the other side. The shell must completely overlap the light stream, so the light source (lamp) is usually located inside the closed housing with a hole above the shape of an egg.

How to use an Ovoscope
Experts are not advised to shine Eggs with an Ovoscope daily, not to risk harvesting the embryo and create a stressful situation for nesting individuals. The optimal option will be the conduct of hacks every 3-5 days. Before starting the procedure, be sure to wash your hands or open medical latex gloves. Otherwise, the risk of bringing bacteria to the surface of the shell is arising, which can lead to the disease and death of the embryo.
To view the eggs on the oskopope, it is enough just to put an egg on the hole, turn on the lamp and turn it in different directions to carefully examine on all sides. It is important not so much to be able to carefully turn eggs as to understand what they mean certain signs of the development of the embryo. In the process of inspection, there is a drop in temperature, which can cause a certain harm to the future chick. For this reason, the ovososcopy is recommended to be carried out in a warm room and shine no longer than 5 minutes. A long-term drop in the temperature in the early stages of the egg incubation are especially dangerous, so the frequent inspection is undesirable (can lead to the death of the embryo).

For a normally developing fresh egg, a homogeneous structure of the shell, yolk has fuzzy boundaries and is located in the middle or slightly shifted to the stupid end of the egg. The airbag is very small and is in the stupid end. If you brighten the egg, the yolk will move with a noticeable slowdown. There should be no extraneous inclusions inside. If such are observed, it may talk about development deflectivity.
What defects can be observed, translucent eggs with an oxus:
- The light strips on the shell mean that the egg was damaged in the ovidel, but the crack was torn to the auxiliary substances.
- If the shell is inhomogeneous, spotted and resembles marble, then calcium has been unevenly distributed.
- The airbag has been moving or in the sharp side of the egg tests the bundle of shells under the shell.
- If you do not see the yolk, and all the inner space is painted in a reddish tint, which means the yolk ripped and stirred with a protein, and the egg is spoiled.
- If the yolk can move freely through the egg, then the grades cut off.
- If the yolk when turning the egg does not move at all, then it strokes to the inner surface of the shell.
- Blood clots mean hemorrhage in the eggs.
- If there are any items (grazites, feather eggs, eggs, feathers, etc.) in the poultry ovitel, etc.), then they will be in the very egg.
- If you saw dark formations, or the egg completely darkened and does not shine, it means that it is affected by mold.

Before placing an egg to the device, carefully inspect it outside. It should not have cracks, suspicious spots, anomalous form. Even if the crack is completely tiny, bacteria can get into it, which will lead to rotting, the death of the embryo, and this egg can become a hearth epidemic.
For hawkopy, the eggs should be chosen, which was fulfilled at least 4-5 days, because in younger to see anything simply impossible. The reason for this is not time to form a balloon, and the yolk fabric is still too mobile and colorless. In addition, only 4-5 days it will be possible to distinguish the shadow of the fruit shells or the embryo itself.
With the first transmission, you can easily distinguish non-advocated eggs and discard them from those in which embryos are already clearly visible:
- The image below shows a non-secretive egg, lored on the 5th day of incubation.
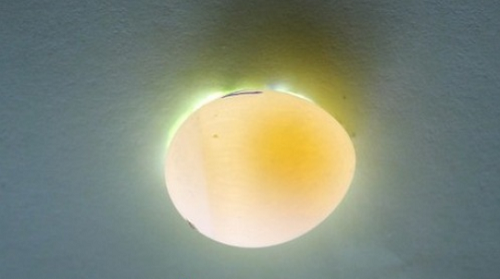
- On the 4th day of incubation, you can clearly observe the heartbeat of the embryo.
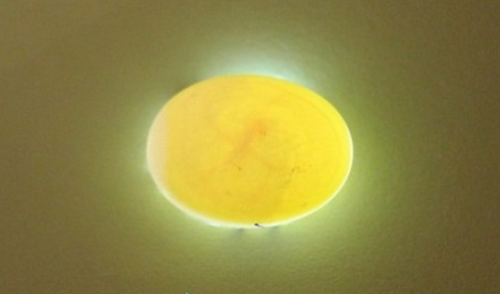
- This looks like a fertilized egg for 3 days. In this image, it can be seen that the ovososcopy can not yet show, it is fertilized or not, but only 12-48 hours will change.
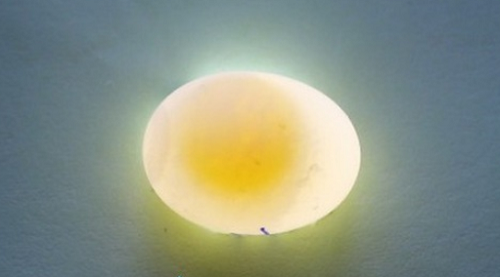
- In the image below the fertilized egg on the 5th day of incubation.
- For 6 days, you can clearly see the first movements of the embryo.


Here is how the development of the bird's embryo is from the inside:

On an oskopope at the location of the embryo, you can clearly see the field, which is sometimes tightened with a shallow mesh of blood vessels. Inside this field is distinguishable a shadow that becomes more noticeable when the future chick makes movement, or you shake the egg. Having dropped a little lower, you can see larger blood vessels on the yolk. If the embryo is growing bad, it will be quite tiny, not immersed in the yolk and located very close to the shell, so it can be well seen.
The following view can be carried out 3-5 days after the first, that is, on the 7-8 day of incubation. Envelopes will already be more developed, you can see how Allantois flooded the entire inner side of the shell, captured the protein and closed in the sharp part of the egg. Sometimes between the edges of Allantois, you can see a small lumen, which ultimately will also delay. If the growth of Allantois slowed down or stopped, then the embryo is lagging behind in growth.
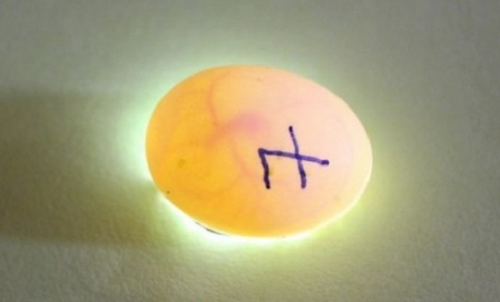
This looks like an egg wavy parrot after week incubation:

On the day 11, you can already clearly see the eye:

The third transmission is carried out at the end of the incubation period to reject the eggs with the died after the second rich nuts, as well as determine the dynamics of the development of embryos. A healthy and well-developed embryo at this stage will occupy almost all the inner space of the egg. When translucent, you will observe its clear contours and even movement. If the future chick is alive, but for some reason he will be nervous, on the sharp side of the egg you will see a bright transparent spot, devoid of blood vessels. If the embryo is dead, when you see, you will see only a formless fixed substance.
The image below shows a healthy germ for the 15th day of incubation:

Dead embryos: causes and signs
To understand that the embryo in the egg died, you need to know the signs for which this can be determined. In such cases, eggs are divided into several categories: with "blood rings", "frozen" and "grooves".
The so-called blood rings can be found at the stage when the yolk is becoming blast organ. This is noticeable already at the first sinking session.

"Blood rings" can be divided into three subcategories:
- Embryos that died during the first two days of incubation, that is, even before the blood formation process began. In this case, the yolk will be especially moving and deprived of the form.
- Embryos that died on 2-4 days of incubation. In such eggs, the blood ring or a band, which originated as a result of a blood flow in the vascular field, after the heartbeat ceased.
- Embryos who died on 4-6 days of the incubation period. Inside the egg you will see a darkened body, which often sticks to the inner wall. At this period of development, the gusty bag with a circulatory system will occupy a small part of the yolk surface. When the heartbeat stops, blood due to gravity accumulates at the edges of the yolk vascular grid, and when you shine an egg with an oxcope, then you observe a red blood ring, anterior yolk.
"Frozen" call embryos that died a little later - by 7-14 days of the incubation period. When translucent embryos look like dark inclusions of various sizes without distinguishable blood vessels.

And finally, the "groces" are the embryos who died at the final stages of development. They look in the form of quite formed chicks.
Why do embryos die?
If during oxuscoping you found a large percentage of eggs with underdeveloped embryos, it is necessary to identify the cause of the inhibited development and take measures to prevent the death of the livestock. Since the reasons may be many, the first thing should be compared the number of dead embryos in the incubation stages. Diseases and deaths may be due to unfavorable conditions of content, low egg quality and incorrect oscillating mode. The moment of death directly depends on the age of the embryo, the nature of the defective development and the degree of negative impact. These factors make it possible to judge the state of the embryo at a certain point in time, as well as the quality of the components of the egg. For this reason, the classification of mortality of embryos in incubation periods allows to reflect the specifics of development defects and use them to diagnose low results.

What are the most frequent causes of death of embryos in the incubation period:
- Too long storage of egg leads to its aging and almost 100% of mortality in the initial stages of incubation. Embryos are dying in the process of formation of spinal bodies. In this case, you can note the chaotic growth of blastoderms on the yolk and the complete or partial absence of blood vessels in it. Often in the central part of the yolk can be observed a foamy substance.
- Bacterial or fungal nature infections lead to blurry of protein, the appearance of dark formations on the yolk, a rotten rotten smell. When hacking on the embryo organs, it is possible to see grayish nodes - these are dead fabric places. In some cases, the "zadokhlikov" and even hatched daily chickens can inflame the umbilical ring.
- Heredity can also cause the defective development and the death of the embryo. Such cases include some types of injections, for example, the absence of a fluff, too short legs, incorrect location of the jaws, which led to the constantly open beak or its underdevelopment. The paired development of two embryos in one egg may be observed, which can also be attributed to hereditary anomalies.
- Embryonic dystrophy arises in most cases due to the impaired feeding of parental individuals. The embryo develops very slowly, it cannot fully absorb nutrients from the egg. Such individuals are shortened, curved or too thin legs. The neck can also be twisted. Because of the swelling of the brain shells, the skull is often expanded, the lower jaw is completely formed, the beak bent down like a parrot. At the age of 10-14 days, the embryos with embryonic dystrophy is observed a strong swelling of the skin, and a little later - the underdevelopment of the feathers. It looks in the form of hubbones of feathers along the entire surface of the skin. Yolk is mostly very thick. The stickiness of "zadokhlyakov" indicates a large number of unspent protein. There is also a liver change - it becomes tough, acquires brown or gray-green color. Salt sediments can be in the kidneys. In hatched chickens may occur paralysis. There are several forms of the disease, depending on the missing vitamin.
- Overheating of eggs can provoke hyperemia of the skin, heart and brain. A non-essential, but regular increase in temperature at the initial period of development leads to the oversaturation of blood organs. Often, the skull remains underdeveloped, the brain is open, the eyes and bones of the front of the head are not formed. In this case, the abdominal part also remains open, and the insides are literally hanging. The derived young out of overheated eggs is very small, weak, with sticky down, a lot of "zadokhlyakov".
- Non-heated also leads to deposits. In this case, the development of embryos slows down from the very beginning of the incubation period, and the young man is glorified very late. Chickens are born in low-propelled, it is cut on the legs, covered with a dirty plumage. The birds have too big and disgasic stomachs, frequent cases of broken. After removing the shell, it remains moist with blood flows and lumps of unspent protein.
- The lack of humidity leads to severe weight loss of eggs and an increase in airbag sizes. With insufficient humidity, almost the same changes occur at the initial incubation stage as in the case of overheating. The young man is glorifying and excreted early, the egg shell is too brushed and dried with solid superal shells, many "zadokhlyakov".
- Increased humidity leads to an increase in the weight of the eggs. Often Allantois late crosses the protein. At the finishing stages of incubation during rieving in many eggs, there are smooth levels of air bags and liquid in germ shells. Chicks are crying late, their plumage sticky and dirty. Unlucky chickens are often dying precisely in the process of sprinkling, since they are chopped in an unspent spicy fluid. There are also cases of death of young people due to the beak and body to the shell.
- In case of violation of gas exchange in embryos at the initial incubation stage, injury is often observed in the form of all sorts of defects, including heart defects. The lack of oxygen in the average stages of development leads to similar effects from overheating. In the second incubation period, the embryo can turn the head towards the sharp side of the egg.
- If the eggs do not turn the eggs for a long time or do it incorrectly, the yolk can cuddle to the shell that provokes the incorrect development of the embryo or its death. If the eggs are located vertically, and the angle of inclination is less than 45 ° to one of the sides, in the sharp side of the egg, the protein sticks with sucks. As a result, the protein is consumed defective, and the embryo does not receive a sufficient amount of nutrition.
With a bad result, the conditions in which the eggs were, as well as their actions should be analyzed. Perhaps the reason is the unstable thermostat, low quality eggs or unsuccessful construction of the incubator itself.

Here are some more signs that will help you avoid mistakes in the future:
- If the chicks have brought the deadline later, it means that the development of embryos took place at low temperatures, or the eggs were old.
- If the chicks hatched too early, then a high temperature was observed in the second incubation period.
- If the output was difficult, then humidity regime was broken by incubation.
- If the chicks hatched weak or died in the first day, then the eggs were infallible.
- If, after the first transmission, you discarded a lot of uncomfortable eggs, then the parent couple has received insufficient or incorrect vitaminating nutrition.
Useful advice: When the bird demolished the egg and did not start right away to his survival, the temperature inside the shell decreases sharply, and the development of the embryo is braked. Biological material can remain in such a state up to 5 days, but every day the likelihood that a healthy person will develop out of it, decreases. Store fresh eggs to incubation should be at 13-18 ° C.
Manufacture of Ovoskopa
There are too many methods for making a mat, because branded materials are mainly in the course. Below we present a few simplest and most successful options for the self-made mat.
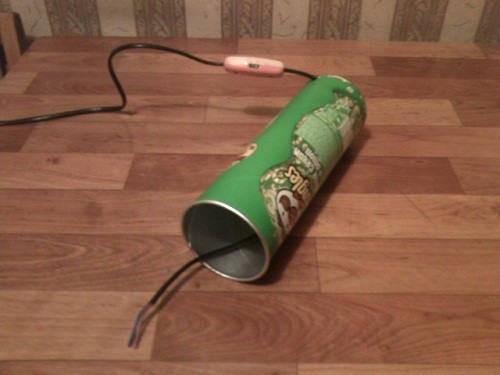
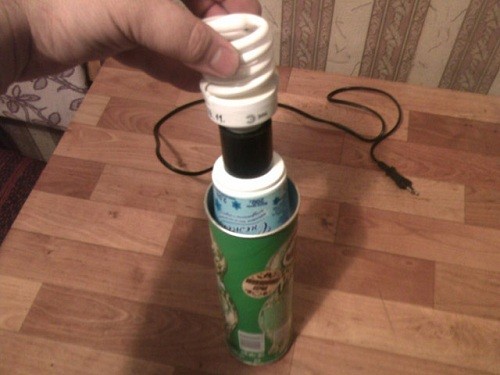
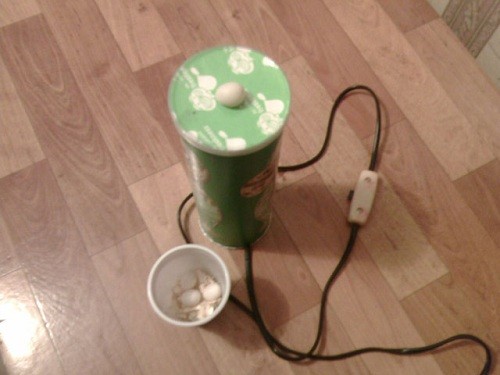
Below in the photo is an eggs for checking eggs, made of a conventional tin cans, a cartridge with a light bulb and a segment of a wire with a plug for connecting to a socket:


For the manufacture of the next model of the Evioscope, it took:
- bank from under chips or segment of a plastic pipe of a suitable diameter;
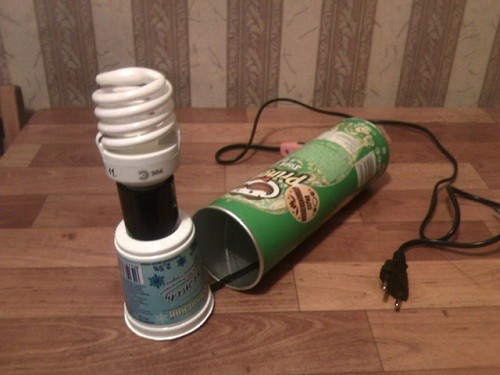
- energy saving light by 15-20 W (do not use the incandescent lamp, because it gives too high temperatures when heated and can harm the egg and melted the design);
- wire with switch;
- cartridge;
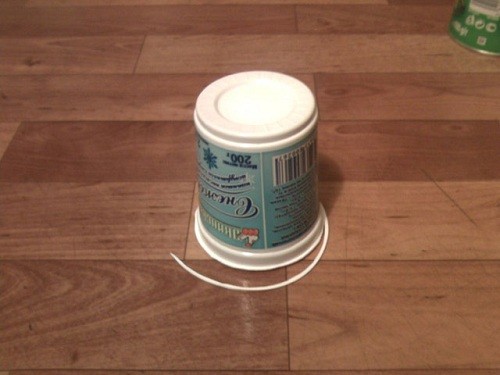
- plastic bank from under sour cream or yogurt.
Instructions for the manufacture of the Eggs for eggs:
- Cut the top of a plastic jar about 1-2 mm.
- Attach the Cartridge banks to the bottom, circle the marker and cut out.
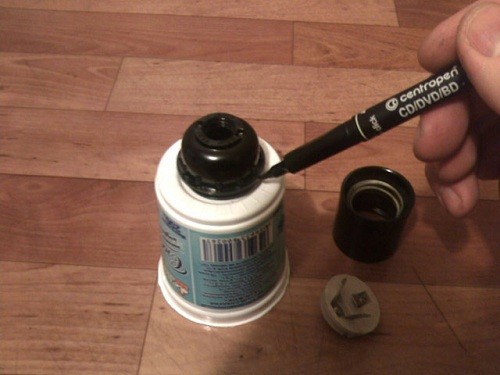
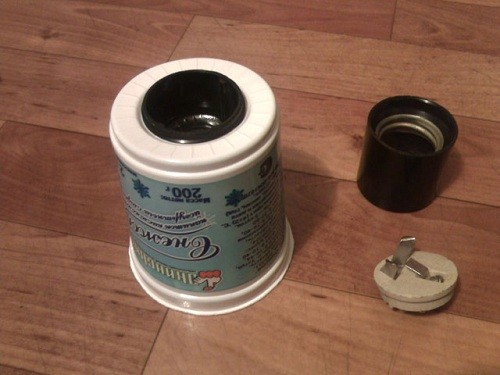
- Insert the lower part of the cartridge in the hole done.
- Using sewing, make a hole at the bottom of the plastic pipe or banks from the chips.
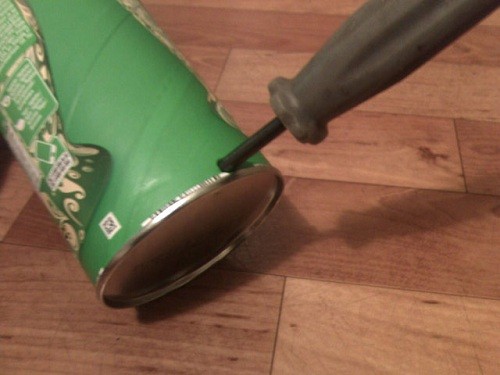
- Get inside the network wire.
- Clean and connect the wire to the cartridge.
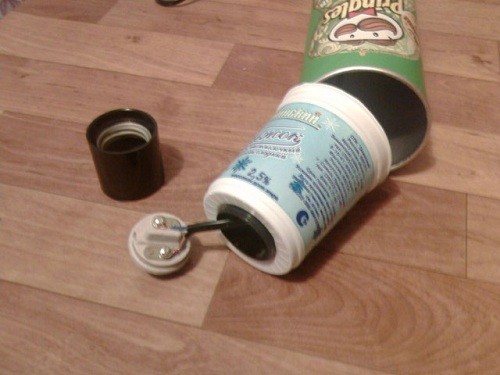
- Collect the cartridge and make an incision as in the photo at the bottom of the plastic jar.

- Screw the light bulb and insert an improvised lamp in the jar.

- Take the cover from the chips and get a foil on it to get an opaque partition.
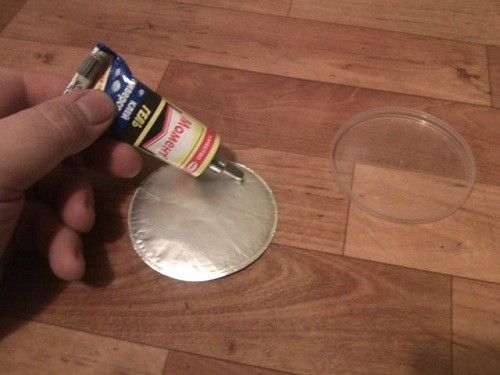
- With the help of a marker, you will mark the size of a little less than the eggs that you are going to shine, and cut it out.
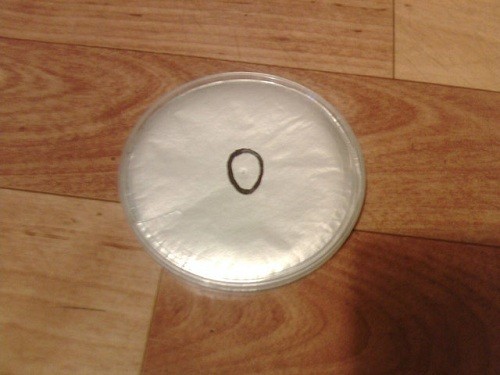
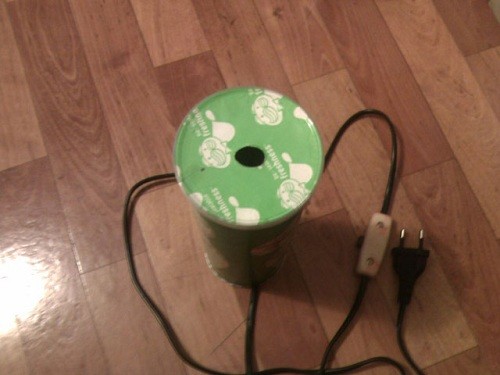
- Put on the lid on the jar from the chips and spend the test test of the self-made mat.


And the last option is an ovoscope made from the plastic water supply adapter with 100 pipes by 50, as in the photo below. Inside the adapter is a base with a light bulb and wire. To reduce the light reader, it is possible to close the bottom of the bottom of such an ocopop.


Let us summarize the above information several useful video about the manufacture of the ERBOCKOP:


