Installation of a new wiring or repair of the house power grid involves the installation or replacement of sockets. At this stage, it is impossible to make mistakes: the violation of the rules threatens the failure of electrical appliances and is dangerous for life. Before starting work, it is recommended to familiarize yourself with the information on how to install an outdoor and inner socket, how to install it in plasterboard, how to make a rosette in the tile with your own hands.
Content
- Types of sockets used in installing household power supply
- Construction of electrical outlet
- Mounting technology sockets
- Installation of outdoor outlet
- Installation of built-in solitary power outlet
- How to make a double rosette with your own hands
- How to make grounding under the outlet with your own hands
- How to make a power outlet with your own hands
- How to make a triple outlet with your own hands
- How to make a socket in the bathroom with your own hands
Types of sockets used in installing household power supply
From the entire variety of electrical sockets, it is necessary to highlight types installed in apartments and cottages. We are talking about equipment for a single-phase alternating current power supply voltage of 220 volts.
- Sockets without grounding (standard with 1a). Such are used to connect low-power electrical appliances (with the maximum value of the operating current 10 A) and does not require a mandatory connection to the protective ground. Withstand voltage up to 250 V.
- Outlets with side grounding contacts (standard with 2a). They are equipped with an additional terminal for connecting grounding cable grounding cable. Powerful household electrical appliances are connected to the outlets of this type (current is up to 16 A), the design of which requires grounding of metal enclosures to ensure user security.
- Rosettes with pin grounding contact (standard with 3a). A feature is the design of grounding contact. Installed depending on the type of fork attached.

Rosettes with grounding contacts
IMPORTANT: For connecting sockets without grounding, a two-tier electric cable is used, and for the rosettes with a ground, a three-cable cable is needed. Additional lived in isolation of yellow or yellow-green color is used to connect grounding sockets with a protective grounding circuit.
In addition, all outlets are divided into two categories:
- built: are used for installation in brick, concrete, foam concrete walls and plasterboard partitions;
- overhead: installed on the walls of log cabins and houses from a wooden bar at the request of fire safety.

Outdoor sockets
By the method of attaching the wire of the sockets there are two types.
- With a screw clamp: In this case, the exemplated area of \u200b\u200bthe wire is entered between two plates clamping the cushion through the screw tightening.
- With spring terminals: the stripped wire is introduced into a special hole and fixed between plates compressing under the influence of springs. In order to disconnect the wire, you must click on the special outlet key.
To install in the bathroom and other rooms with high humidity, it is recommended to choose outlets with a protective lid.
Construction of electrical outlet
In order to set the outlet, you need to disassemble it. Only so you can access the fastening screws and terminals. The main details of which the built-in socket is (the most popular category):
- facial panel: removed after unscrewing the central screw;
- frame: attached on latches;
- mechanism housing;
- phase, zero and grounding (if available) contacts;
- sliding clamps (paws).

Some models can be equipped with protective covers and protective curtains. The latter shifted and open access to current-conducting contacts only after connecting the plug.
Tip: Choosing a socket, you should give preference to models with a ceramic case and conductive elements made of tinned brass. Spring terminals provide reliable contact throughout the life.
Mounting technology sockets
It is required to have at your disposal the following tool to install the outlet with your own hands:
- perforator with crown, chisel and a bromide diameter of 6 mm;
- sideboards or a special device for removing insulation lived;
- flat and curly screwdriver;
- dishes for kneading alabaster;
- putty knife;
- roulette and marker for marking;
- stroboresis or Bulgarian with a diamond circle.
From the entire listed set, the tool required for installation of a particular outlet is selected.
There are two ways to install outlets:
- outdoor installation;
- installation of built-in sockets.
Installation of outdoor outlet
Outdoor installation is necessary in rooms of houses with wooden walls where hidden wiring is prohibited by the rules of fire safety and is technically impossible. In this case, the socket is fastened with self-drawing to dielectric conversion - a plate of plywood or fiberglass. Installation is performed in the following order.
- A cable is supplied to the place of installation of the socket (the gasket is possible in the box or with the help of insulators) and is trimmed with regard to the installation of the installation.
- The wall is attached to the wall of the appropriate size and shape.
- Removed cover-panel socket.
- Cable veins are connected to the terminals. The polarity for the operation of electrical appliances does not matter, but still it is recommended to stick to the labeling near the terminals: the symbol "N" is neutral (zero wire), "L" - phase.
- Through the special "ears" the case of the socket is attached by self-drawing to the opposite.
- In order for the housing of the socket does not pinch the cable, the window is taken out in the appropriate place.
- The panel cover is installed in place and fastened with a screw.

Placement of outlet layout
Installation of built-in solitary power outlet
First you need to find out how to prepare a hole for a socket with your own hands. At this stage, it is recommended to perform the following.

Carbide crown for drilling the nest of peavercraft
- In accordance with the power circuit, the location of the outlet is determined and markup is performed. As a rule, to connect outdoor and desktop electrical appliances, the height of the sockets above the floor level is 150-200 mm. But for connecting a boiler, air conditioning, etc. Outlets are mounted in close proximity to the consumer.
- Given that the diameter of plastic peavercraft is 65 mm, to prepare the nest to it, you should use the perforator and a carbide crown with a diameter of 68 mm.
- By installing the corona corridge in the center of space for the socket, we plan the contour of the socket, making several turns of the tool.
- We set into the cartridge of the perforator burner with a diameter of 6 or 8 mm, drill along the outlined loop contour. They must be placed as close to each other. A few more holes are made in the center.
- With the help of the nozzle-chisel, the perforator knock out the wall fragments, after which the crown align the edges of the nest for the peavern. In this way, you can save an expensive carbide crown, extend its service life. This is especially important when drilling a concrete reinforced wall.
- Through the submersibly window, we enter the cable, which was connected via a stroke or cable channel. Its lengths should be enough for mounting plus a small margin.
- Fix the peaver in the nest using an alabastra aqueous solution. It will take no more than 20 minutes.
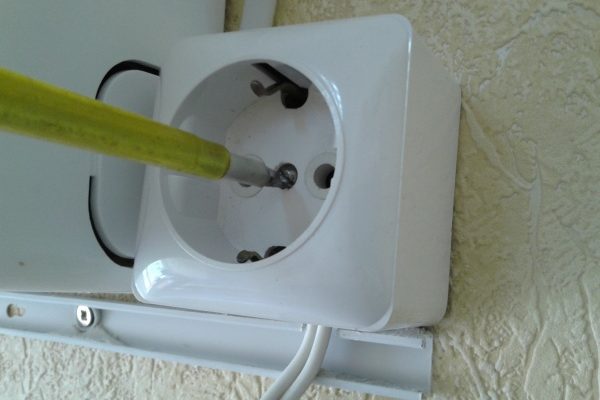
- We prepare cable veins for installation (removing isolation from its edges by about 10 mm) and connect the outlet to the terminals. At the same time, we observe the rule: to the phase terminal - a core with an insulation of brown or red (depends on the cable manufacturer), to the zero terminal - blue or white, to the ground terminal - yellow-green or yellow.
- We establish a socket into the peavern, and fix it with sliding legs in the desired position. Sliding paws are powered by screws. Additionally, fasten the housing of the socket to the edges of the conversion screws through special holes.
- Install the frame and front panel outlet.

Connection Cable cable to terminals
To install the rosette in drywall, use superer with special clamping clamps. For peavercraft, a hole is cut off by a regular drill and a crown for drywall.
How to make a double rosette with your own hands
The double socket from the single is different only by the number of contacts for attaching a fork and, accordingly, the appearance of the front panel. Connecting the cable and installation in the opposition is performed similarly.

Double Outlet Connection Scheme
How to make grounding under the outlet with your own hands
The protective ground for connecting to the outlet is mounted according to the following rules.

- From the overall electrical panel in the apartment distribution shield, a three-core cable is laid. The cross section of copper monolithic lived - at least 2.5 mm².
- A terminal bar is fastened on a DIN rail to which the grounding cable entry cable and ground cores of the household cables are connected.
- From the apartment shield, the cables are laid for distribution boxes in which grounding veins are connected by crimping sleeve or soldering with subsequent insulation. The color of insulation lived grounding is yellow-green or yellow.
- From the junction boxes, the cables are packed to the installation places of sockets.
- After mounting, the entry of the grounding veins join the terminals of the spray, designated by a special symbol ⏚.

Connection diagram live cables in distribution boxe.
How to make a power outlet with your own hands
A socket near the switch (using its contacts to connect) can be made as follows.
- From the switch, the cable to which is laid in the cable channel, stroke the wall to the place of installation of the socket.
- Mounted conversion.
- A zero single-core wire is laid from the distribution box to the opposition. If the outlet should be grounded - a two-housing wire is paved, one of the veins of which is connected in the distribution unit with the overall "earth".
- From the "arrival" terminal of the switch to the outlet, a single-core phase wire is laid.
- All wires are connected to the terminals of the socket in the indicated order.
It should be noted that this installation allows you to save on the wiring, but is not considered correct and can only be used in an exceptional case.
How to make a triple outlet with your own hands
The installation of a triple outlet is distinguished by the complexity of the preparation of the nest for the group of conversion. It is important that they are located on the same line. For this, the following is performed.

- Using the level and roulette, we apply markup (horizontal axial line) on the wall.
- We indicate the centers of nests, given the distance between them, equal to 72 mm.
- Using a perforator with a brown, chisel and a crown with a diameter of 73 mm, prepare the nests for the peasants. The diameter of the crown is increased to ensure that the group of approaching was easier to determine correctly.
- In the extreme subseater of the group of peavernits (from any side) we enter an electric cable. Outmers are connected to each other with special fixtures, in the center of which windows are closed for laying cable loop.
- The group of submersionists is installed in the nest, is aligned and fixed with alabaster solution. Instead of a group of conversion, a special unit can be used - a plastic monolithic case for several outlets.
- An electrocable connection is performed to all sockets by the loop (as shown in the diagram below).
- The outlets are attached in the submersests in such a way that side hooks are properly docked.
- Frame is installed in place (it must be common to the group) and the front panels.

Connection Scheme Plug Sockets Metold
Tip: Similarly, the installation of a group of four and five sockets is made, but it is important to correctly calculate the maximum total power of the connected instruments in order not to exceed the permissible load for the cable.
A group of sockets located at some distance from each other can also be connected to the power supply by the plume method. To do this, between the built-in sockets, the wall is strobally, a plastic box is fixed between outdoor outlets.

Connection of the conversion for a group of three sockets
How to make a socket in the bathroom with your own hands
The feature of the installation of the outlet in the bathroom lies in the complexity of the preparation of the nest for peavern. To your attention some tips on how to make a hole in the tile under the outlet with your own hands.

Ballerinet tile drilling
- With the help of a carbide crown. This method is used if you need to drill a hole in the already glued tile. Initially, it is necessary to drill ceramic tiles in the drilling mode "without impact", otherwise the tile will crack. So that the crown does not slide on the glossy surface, we stick the greasy tape. After the ceramics is drilled, work is allowed in the perforator mode with a blow.
- With the help of a ballerina. With the help of a drill running on low revs, this tool can make a hole in the tile, then stick it onto the wall, aligning with a pre-prepared nest for conversion. Drilling is recommended from the back side of the tile: there is no glossy coating on it.
- With a string with abrasive spraying. Initially, it is necessary to apply the contour of the future hole on the back of the tile. Then - drill through a hole on the contour line with a carbide tip. After that, with the help of a jigsaw with a string, the desired diameter of the hole is cut and stick the tile on the wall with the socket for the opposite.
Important: After completing the installation, it is necessary to check the availability of voltage in the outlet using the tester, and then make a trial switching on. In case of error detection - fix after power outage.
At the end of the article on how to make a socket with your own hands - video with supplements and explanations of the specialist.


