The kitchen is an important room in the house, because it is here for a dinner table, a quiet cozy evenings are going to the whole family on the meal and shares experienced impressions per day in a family circle. Therefore, the kitchen should be not only multifunctional and practical, but also cozy, so that both the hostess at home and its guests was comfortable here. You can provide additional possibilities with kitchen room using multifunctional kitchen heads. Especially if the room has a small area or is pulled out by a large number of household appliances. On the modern construction market there are various models of this object of furniture. In order to save most of the family budget, you can make the assembly and installation of the kitchen with your own hands, without the attraction of extraneous help of specialists. Further in the article Consider a detailed order of assembling kitchen headset.
Content
Assembling the kitchen with your own hands: where to start

It is possible to significantly reduce the estimate of the cost of repairs in the event that you collect modular kitchen with your own hands. But it is important to remember that these works are quite complex and will require certain knowledge and skills. In addition, some tools and materials should be purchased, make accurate measurements, as well as thoroughly prepare the kitchen room.
At the initial stage, room measurements are performed. It is important to take into account the following:
- It is not enough to simply measure the length, width and height of the kitchen walls, as various communications are often placed in the kitchen. Therefore, by checking the room measurements, divide it into small segments, for example, "from the wall to a gas pipe is 1.5 m, the size of the pipe itself is 20 cm, and the distance from the pipe to the parallel wall - 2 m.
- Also, remember the rules of safety, you cannot accommodate kitchen furniture very close to gas speakers, stoves, etc.


Next, the following works are carried out at the preparatory stage:
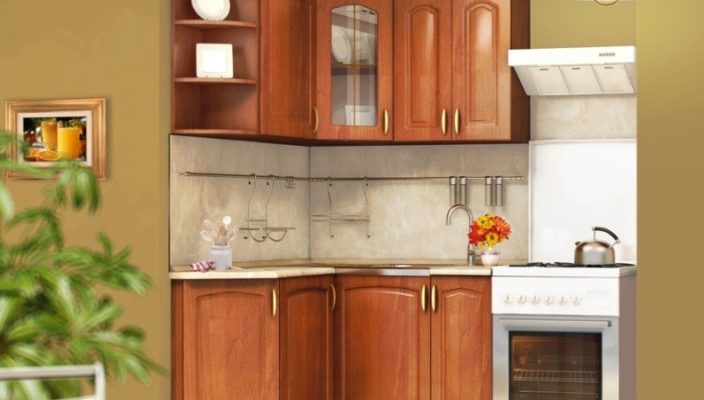
- A sketch of the kitchen room is compiled, taking into account all measurements. Based on a schematic plan, you can make a decision, which type of furniture you will need may need to install an angular kitchen with your own hands.
- Before installing the headset, it is necessary to put the kitchen room in order - perform starting and finishing wall alignment, ceiling and floor. For this we need construction facing mixtures - putty, primer, etc.
- Next, all wires are placed, kitchen sockets are installed.
- After that, the "kitchen apron" should be bred by ceramic tiles.
Kitchen Collection Instructions
Tools and materials for assembly and mounting kitchen

Regardless of whether the built-in kitchen is installed with their own hands or a stationary set of furniture, for installation works you will need the following list of tools and materials:
- Screwdriver. To install a small kitchen headset, a universal screwdriver will be required. It will not only facilitate the installation process, but it will accelerate significantly.
- Perforator. It will be needed for drilling deep holes in a concrete wall, if you plan to install mounted cabinets.
- In order to cut the wooden kitchen elements on the desired segments or cut out the sequence, you will need a jigsaw or saw.
- Roulette. Need to carry out measurements.
- Building level. Need to control the correctness of the step-by-step assembly of kitchen cabinets.
- Hammer, screwdriver, hacksaw, pliers.
- Drill, electrolovik.
- Corolnic
Saws, dowel.
Kitchen headset assembly order

Independent assembly of the kitchen headset does not constitute anything complicated. If all of its details are made high quality, and do not have to customize them at the place, then no more than half of the day will take this operation.

Installation order:
- Start the assembly of the kitchen headset is necessarily with the installation of the couch under the sink. As a rule, it is in this place that there is a communication node that will not move. In this outdoor cabinet, you will have to make holes for the supply of pipes and sewage pipes, think over the location under the sequence of the filtration plant for water purification. If water heaters are installed in the kitchen (boiler, column), then the sink is better to put it directly under them. In this case, it will not need a long wiring of hot water.
- When the installation of the cabinet under the sink is finished, you can start the installation of the other elements of the headset. Modern furniture models are usually equipped with legs that can be adjusted in height. Thanks to this, they can be easily aligned in the level even on a not quite smooth surface.
- To keep the kitchen set as a whole, all his cabinets are tightened with each other. You can do this both with the help of special furniture screeds and using conventional screws. The first option is considered more preferable, since if the headsets are able to understand, the screws can damage the panels.

- The next step in the mounting of the kitchen headset is the installation of the table top. However, before this in that part of it, which will be under the sink, cut the hole. To accurately repeat the outline of the sink, it is necessary to use the last as a template. It turns over the bottom up, install on the worktop and will be burned with the help of a marker. Next, the width of the side is measured. Then the most difficult stage comes. It is necessary inside the drawn contour to repeat exactly the same, only less on the width of the side. Make it is quite difficult, because the tabletop is no cheaper thing.

- According to the drawn inner line, the place is cut into the sink. This is done with the help of an electric bike. First, an opening of 8-10 mm with a diameter of 8-10 mm is made inside the line, then cut from it along the line. Since the countertop is pretty heavy, it is necessary to cut it with an assistant who will have to keep it from the inside. Otherwise, it can fall and under its weight broke the part of the surface, which will not be unpown. For the neat edge of the cut, it is necessary to use a pet with small teeth.
- The next step can be installed washing. Curling sinks have lower fasteners made in the form of hooks. From the reverse side of the side, it has a seal that will not give water to flow under the sink. On the front side of the seal, glue and tape applied. Before installing the tape is removed.
- Now you can proceed to the installation of the table top. It is installed with an allowance of about 10 mm from the frontal and back sides. Ideally, the countertop should be located in the ceramic apron of the kitchen. However, if there is a small gap between them, do not be upset. It closes with a special plinth.

- A tabletop is adjusted for the size of the kitchen headset with a jigsaw with small cloths.
- When installing an angular kitchen, 2 table tops have to be allowed. To make it more aesthetically, and also to the joints between the countertops did not get water and trash, a metal plank is installed between them. It is not necessarily insulating the bare places of the countertops, where heating devices will be located. Raw ends countertops can eventually spoil and cause its partial destruction. That is why their processing with edge or metal plank is mandatory. Hidden ends can be treated with silicone.
- Table tops are attached from the inside of the couch or cabinet to ordinary self-tapping screws.
- After installing outdoor Tumb, even small, slots need to be treated with a clear silicone.
Fastening mounted cabinets with their own hands

When assembling mounted cabinets, you must adhere to the following recommendations:
- Collecting details of wall closets, carefully notice the place where the holes under the fasteners should be drilled. It depends on the correctness of the markup, how much the flaps between themselves will be fastened.
- Wall cabinets are collected only after the floor elements are assembled and installed.
- Make marking on the wall so that the lower part of the finished wall headset accumulate exactly at the level of the kitchen "apron" from the ceramic tile.
- The distance from the mounted cabinet to the countertops should be about 55-60 cm.
- Most often, a mounting rail is used to create a reliable mounting of the wall cabinet on the kitchen wall. One part of it is located on the wall, and the second is on the inside of the cabinet.

Installation of mounted cabinets is more complicated than installing outdoor Tumb and make it without helper will be problematic:
- First of all, it is necessary to note the level of installation of cabinets. To do this, the height of the cabinet is measured, it adds to it the height of its installation above the table top level (usually it is 500 mm), and a mark is made on the wall. Then from her all over the wall with the level of the level draws the line.
- The next step on line is installed on the plank for fastening adjustable suspensions. These suspensions are installed in the upper corners at the back wall of the cabinet. Thanks to this bar, all cabinets will hang evenly on the same line. It is attached to the wall with the help of dowels or anchor bolts.
- The cabinet hooks of the suspension is attached to the bar, and its position is regulated by special adjusting screws. Thanks to this, you can achieve the most accurate location of the cabinets.
- Start the installation of mounted cabinets is necessary from the corner. If there is a gap between the corner wall and the first cabinet (often the walls are not quite smooth, and the kitchen does not always have strictly straight corners), it can be closed with a false panel.
- When all suspended cabinets are installed, they can be copped with furniture screeds.
Tips for mounting headset do it yourself

You can start installing a kitchen headset only after the end of the room is completed:
- The kitchen must be performed the finishing of the ceiling, walls and floor.
- All communications, including electrical layout, installation of air ducts, water supply pipelines or sewage must be finally set.
- The work surface apron must be installed before installation. It is allowed to install special panels after installing outdoor Tumb.
- At the repair stage, it is necessary to make sure of all surfaces. In this case, the installation of the headset will be simpler.


