The gypsum tile as a finishing material gained considerable popularity, which was due to the low cost of raw materials, the ease of installation and the possibility of manufacturing the tile independently. In addition, a similar type of facing allows you to perform almost any drawing and texture on the wall, because the variety of forms to create such a tile is limitless.
Content
How to make a gypsum tile do it yourself
To begin with, let's figure it out in the features of the gypsum as a building material:
- Pumping gypsum can be different: rude or small. The first option is usually used to create various building elements, while the fine-flow material is used to simulate small parts of the room decor.
- The thrusting speed of plaster is also different. For interior decoration, slowly frozen material is often used, which makes it possible to spend enough time to work.
- Gypsum panels are usually produced from gypsum with high sprouting.
- Another of the characteristics of the gypsum is its density, which is determined by the ratio in the mixture of water and dry matter. In a light suspension, this ratio is 1 to 1.25, in the middle density suspension on 1 part of the water accounts for 1.75 parts of the gypsum, the dense suspension has a ratio of 1 to 2.25.
- The gypsum solution quickly freezes, so after cooking it must be used immediately. Making a lot with a margin is inappropriate. The average duration of the solutions of the solution ranges from 6 to 10 minutes, based on this time, you can determine the desired amount of the mixture.
- Change the consistency of the finished frozen mass by adding water or gypsum it is impossible. In this case, you will get the so-called "dead gypsum" - a defective solution with poor strength and low knitting properties.
- If it is necessary to prepare a solution that will be glad to stick longer than the usual, then additives should additionally add to the mass. As such substances, some adhesive compositions (PVA, woeful and carpentry adhesive) are used (PVA, boric acid, salt, technical lignosulfonate, keratine retarder, etc. The required number of additives is most often determined by experimentally.
- You can find gypsum plates in size 60x60 cm and 30x30 cm.
- Gypsum modules are mounted on smooth and smooth surfaces.
Decorative gypsum tile can be made independently, this is relatively simple. First you need to get the forms that you can buy in the finished form or create yourself. Plus, the purchased factory forms lies in the fact that in the end you are guaranteed to get a flat and beautiful tile, besides, the process of its production will not be delayed for a long time. To create forms with your own hands, of course, you will have to spend extra time, and the finished tile may not be as high quality.
If you still decide to make forms yourself, then for their production you can use silicone or two-component polyurethane. Silicone is more accessible and easy to work, so consider the process of making forms on its example:
- Initially, you need to make a kind of matrix, which you will create a form. Such a matrix is \u200b\u200ba box made from wood or plywood, whose height of the sides of several centimeters exceeds the thickness of the future plaster tile.
- The finished box must be carefully lubricating with soap solution, after which it is filled with half the tank with silicone and dissolve. In this silicone, the finished purchased tile is stacked, it is covered with another single layer of silicone, which will fill the box to the edges. Purchased tile also need to smear with soap solution so that it does not stick to the material.
- After soaring the silicone, the finished form should be removed from the tank and pull out the tile from it. Note that the simplicity of silicone leaves quite a long time - from 1 to 1.5 weeks.
The process of producing tiles from plaster looks like this:
- To prepare a gypsum solution, water will need water, white plaster and finishing putty. 1 part of the gypsum Mix with 4 parts of the putty and spread water to the consistency of thick paste.
- The resulting composition needs to fill the containers, and it is done in several stages. Fill out the form before the middle of the side, crumple the paste and put on top of a piece of grid made of polypropylene - this will allow you to make the tile more durable.
- Place the second layer of plaster paste on top of the grid and scatter it again.
- Leave the shape to the full mass of the mass, it will take approximately 2-4 days. So that the process of production of tiles did not drag on for a long time, it is desirable to have as much ready forms as possible.
- Gypsum tile can be given any color to your discretion. In industrial production, the tile is painted with an airbrush, but at home this process can be done by hand with a brush or sprayer.
Gypsum tile, photo:


Positive and negative properties of facing material
The gypsum tile has many advantages:
- This type of material is environmentally friendly and is absolutely harmless to human health, which allows the use of such tiles to decorate the rooms from the inside.
- Low weight of plaster is another undeniable advantage. For small apartments with insufficiently thick walls, such a type of facing is considered an ideal option. When designing surfaces with plaster modules, the walls do not need additional strengthening, the tile is glued to the primed drywall. In addition, lightweight material is simpler at work, as it does not require large physical efforts when installing.
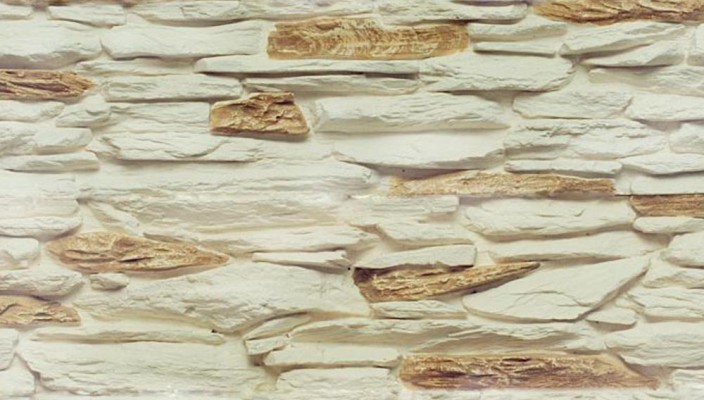
- Decorative gypsum plates have the same thickness. If you create a surface with the simulation of a natural wild stone, you will not have the need to customize individual elements under the required thickness, as in the case of working with natural material.
- Gypsum has good vapor permeability, allowing the walls to "breathe". Thanks to such a property, in the room, plaster tiles, air humidity will always be optimal. Excessive moisture from the atmosphere material absorbs into senses, and in the same way he gives moisture if the air in the room is too dry.
- Another advantage of gypsum tile is its low cost. Such facing material for pocket people of middle wealth.
- Despite the small price, the tile is not bad strength and durability. The walls are decorated do not require repair for at least a decade.
- The material does not lose color for many years, keeping your decorative look. In addition, the variety of gypsum tile options is endless, which allows you to use such a facing in any style and design of the room.
- Gypsum is completely safe in case of fire.
The disadvantages of facing material include such characteristics:
- Instability to moisture. Register with plaster plates of the wall of the bathrooms, basements, baths and other rooms with constant high humidity can not, otherwise the material will come into disrepair in a short time.
- Gypsum also does not like high temperatures - so it is quickly destroyed. Wasing the surface of the walls near the heating pipes is not recommended. It is also impossible to make a fireplace like a tile if they do not have an additional thermofrofit layer.
- The material is more suitable for interior decoration, facades of buildings and open terraces to be tinted with plaster undesirable.

Features of laying plaster tiles for different types of bases
The basis for the installation of gypsum tiles must comply with some requirements:
- be durable and solid;
- do not have noticeable irregularities and level drops;
- should not be subject to deformations.
Walls for laying tiles can be made from different materials, consider detail the rules for the preparation of surfaces for lining:
- When installing gypsum plates on a concrete surface, as a rule, no problems occur. The most important thing is to take into account the porosity of the material. High density concrete, which almost does not have pronounced pores, should be carefully treated with high-quality primer.
- The plastered wall must be checked for the strength of the coating. If the plaster does not depart from the surface and keeps firmly, it will be enough to simply cover the surface of the primer.
- Cover the plaster tiles painted concrete walls can not. To ensure the best adhesion, the surface must be scratched, making notches, then wipe and covered with plaster.
- You can bind plaster tiles and a brick wall, provided that the masonry is accurately made, the seams between the bricks are smooth and without emptiness. When a similar surface can be used to use adhesive for tile. It is also better to pre-make on the wall of the notch, and after covering the surface with the ground. In the event that the laying of brick is old, you need to clean the wall from the heighters, cover with primer and plaster.
- It is possible to mount the gypsum tile onto a wooden wall too, but only provided that the surface is dry and is not subject to deformation. Wood must first open the primer, glue the glass cholester from above and plastering. Gypsum tile can be stacked over dry plaster.
- Installation of facing material can be carried out on plywood or plasterboard base. The requirements here are the same as in the previous case: the surface should not contain moisture and deform, and should also be securely fixed. On plywood or drywall sheets, it is enough to apply a layer of primer, and after drying it can be glued with facing material.
One of the positive qualities of the material is its excellent adhesion, so the selection of glue tiles is wide enough. When installing material on the wall, an ordinary PVA, various cement mixtures or mastic, which, besides, can enhance the base during operation. Silicone sealants or glue compositions for the tile often use for fastening gypsum.

Laying gypsum tile
The process of cladding the wall with plaster tiles can be represented as a sequence of actions:
- First, you should prepare a working surface. The wall must comply with such requirements: to be dry, smooth, purified from the smallest fragments of the old coating, dust and construction trash. If there are noticeable protrusions, recesses, cracks, cracks and other irregularities, the wall must be aligned with putty. The prepared surface should be covered with a layer of soil composition, so that the tile subsequently held on it more firmly and reliably.
- When the previous work is performed, you need to make a markup on the wall. To do this, you will need a pencil, ruler and construction level - with the help of these tools, horizontal lines are applied to the surface, which will serve as a reference point when mounting plaster plates.
- You can mount the tile on the wall. The selected adhesive composition is applied to the opposite direction of the gypsum elements according to the instructions for the use of the substance. To work, it is convenient to use a spatula, the glue is applied by a layer of about 0.5 cm. Finishing work is better carried out in the warm season, with a low humidity and air temperature not lower than + 10 ° C. The gypsum tile glues quickly enough, after applying the composition, it should be attached to the surface, press and hold for a few seconds.
- Wandering the wall begins with the corner of the room, moving towards the center. Gypsum tile is mounted from top to bottom, in advance calculating the number of rows. If in some places the element does not fit entirely, you can cut off the desired fragment with the help of a grinder or hacksaws for metal. When the whole wall is saved, you need to give the surface a beautiful completed view, pinning the seams. The seams between the tiles are filled with gypsum glue. In the first 15 minutes after applying glue, the seams will need to be diagnosed with a special wooden blade. After the composition gets dry, excess can be removed with a wet cloth.
- If the tile is mounted on the cement solution, then for better adhesion, the gypsum elements and the wall need to be slightly moistened.
Gypsum trim, photo:


