MDF panels for walls is an inexpensive and easy-to-work material that allows you to bind the room in a short time and with minimal time and labor time. We will tell about the types, advantages and methods of working with MDF panels in this article.
Content
Material production technology
The main raw materials for the production of MDF panels are used in chips and other wood waste, which are mixed with certain compositions and are compressed under high pressure. All this process can be described in stages:
- With the help of the threshing mechanism, wood is split into small fragments.
- Slides are washed and sifted to get rid of garbage and large particles.
- Then the raw materials are treated with steam.
- Epoxy resin is added to the mass, mix and formulate, after which it is pressed under high pressure.
- The solid slab is cut into fragments, getting ready-made wall panels MDF.
- After pressing the plates can leave uneven, having a rough and uneven surface. To give the material of the desired type, it is thoroughly grinding and prepared to apply the decorative layer.
- Decorative finish involves covering panels with a special film, their staining or lamination. When applying a film, MDF plates give a beautiful texture, imitating tree, stone, etc. This layer not only performs a decorative function, but also protects the material from moisture and dust, therefore such MDF panels are used in the kitchen finish.

Pros and cons of facing material
The advantages of MDF panels include their features:
- Ecology. Since phenol is excreted in the process of production from raw materials, panels are obtained environmentally friendly and harmless to human health.
- Installing panels on the wall is performed quickly and easily. To carry out such repairs yourself, you do not need to have any specific knowledge and skills. In addition, in the process of cutting panels there is almost no garbage.
- The decorativeness of the material, a wide selection of textures and colors allow you to implement any designer ideas. MDF panels are used in the hallway, kitchen, office space, hall, etc.
- Thanks to the heat and sound insulation properties, MDF panels provide a comfortable stay in the room.
- Easy coating care is another plus. The smooth surface of such walls does not need difficult cleaning, any contamination is easily removed with a wet sponge or cloth.
- The price of the MDF panel is relatively low, since the material is made from inexpensive raw materials. A similar type of facing can afford a person with an average material supply.
- Before mounting the panels there is no need to align the wall to the perfect state, the material will hide all small errors.
In addition to the pros, MDF panels also have a number of negative qualities:
- Despite the fact that the MDF panels are covered with water-repellent film, they are still not prepared to the long-term effects of moisture and dampness. Finishing MDF panels of loggia, bathroom or other room with high levels of humidity and permanent temperature drops are not the best option.
- When installing the material on the walls, the framework is used, which means that the panels are "steal" a certain part of the residential space, making a room a little smaller in the area.
- It is known that wood is well lit, so MDF panels are considered fire-hazardous building material.
- It is best to use a similar type of facing in the office, hallway or in the corridor, in the residential room like a hall or living room panel will not look so appropriate.

Types of MDF panels
Depending on the method of manufacturing and features of use, 3 main types of MDF panels are distinguished:
- All-panels are manufactured by hot pressing of raw materials. As a result of this process, plates with a smooth surface and average density indicators are obtained. This type of facing material has good sound and thermal insulation properties, high ecology and affordable cost. All-refined panels are considered the cheapest material among other analogues. Many manufacturers also assure that such MDF panels have increased moisture resistance and can be used to clamp walls in high humidity rooms.
- Laminated panels are more expensive, but also a better type of facing material. Laminated panels are produced almost the same as the previous look, but their laminated surface is better repelled water, it is well tolerated by the shock loads, is not susceptible to abrasion and the effects of many chemicals. The density and strength of such material make it possible to use it not only in the interior of the walls, but also on some external surfaces of the buildings, provided that the material is not constantly exposed to water.
- Moisture-resistant panels are considered the most durable and most expensive type of MDF material. Moisture-resistant plates have high density and even with a debt of moisture exposure, they are not deformed. This type of facing perfectly transfers shock loads, resistant to mechanical damage. Like previous varieties, moisture-resistant panels have heat and soundproofing qualities. Such operational characteristics make it possible to mount such panels in the bathrooms and on the outer surfaces of the buildings.
MDF panels are also classified in appearance and type of design:
- The veneered material has a surface, in color and texture imitating natural wood. To achieve such an effect, the facial part of the panels are covered with a veneer - a thin layer of real wood. The thickness of such a layer does not exceed 2-3 mm, but by sight MDF panels are obtained almost like a natural board.
- The glossy panels have a very smooth surface, which is achieved due to the laminating layer of polymer film. This film is applied to the facial surface of the material and gives it a beautiful, shiny look. The glossy panels are resistant to moisture and rub off well from any contamination.
- Painted panels are made by applying paints to the surface of the material. The special coloring composition not only gives the panels the desired shade, but also masks irregularities and makes the material with matte or glossy, depending on the specific type of product.

Advantages of MDF panels in front of the material chipboard
Even the cheapest and simple MDF panels are considered to be more high-quality material compared to the chipboard. We give their main advantages:
- MDF density is significantly higher than the DSP density, so the first type of facing is more durable and durable. It is resistant to mechanical impacts and for a long time holds fasteners.
- The chipboard is made from wooden sawdust, while MDF is obtained by pressing the smallest wood fibers - this allows you to create a smoother surface on which the decorative layer is perfectly fixed. Unlike the chipboard, the upper film on MDF panels is kept not one dozen years.
- MDF is excellent in heating, which makes it possible to produce non-standard forms from it, mounted radial partitions and arched structures in homes.
MDF is considered an more environmentally friendly material compared to the chipboard, therefore the MDF panels in the interior can be used absolutely without fears for their health. 
Wall decoration panels MDF
Preparatory stage
To find out the desired amount of material, the width of the walls should be measured. MDF panels are made in several sizes and to calculate the required number of fragments, divide the surface width to a width of 1 element. Note that during the installation process there may be a risk of damage to the material, then it is necessary to purchase products with a small margin. Note that ready-made MDF panels should be connected to each other exactly and without gaps, since poor-quality joints are almost impossible to hide.
When finishing the walls of MDF panels, you will also have to use finish corners. These parts have the form of strips made from Feds and interconnected using a textural film. The finish corners are easily installed and fit for mounting on straight, sharp and stupid angles. Similar details will help to finish a beautiful and completed view.
MDF panels are installed on a pre-prepared framework. Such a design is performed from thin wooden widths of 4 cm wide and 2 cm thick. Making a frame of more massive and heavy materials does not make sense, since the panels themselves do not have a significant weight. Reiki designated size is considered standard and sold on any construction market and in specialized stores.
In addition to the rails and MDF panels for cladding walls, additional materials will be needed:
- nails;
- self-sample size 4-8 cm;
- pVC tubes;
- kleimers - brackets for fixing MDF panels;
- liquid Nails.

Creating a carcass
Before mounting the MDF panels on the walls, it is necessary to make a frame of wooden plates. Such work consists of these stages:
- If the surface of the wall is uneven, it is necessary to examine it carefully and find the most protruding place - it will be the starting point when determining the placement of the frame.
- After that, take a pencil and apply horizontal markup lines on the wall, the distance between them should be about 40 cm. Focusing on these lines, you will make a frame for future cladding. The rails themselves are fixed on the wall too in a horizontal position, but if you plan to mount the panels horizontally, the framework, respectively, should be vertical. There are also such masters that are fixed panels completely non-standard, for example, diagonally. Regardless of how you would like to see the end result, it is important to remember that the frame racks must be strictly perpendicular to the MDF panels.
- Wooden elements are attached to the wall quite simple. Attach the rail to the surface of the wall where the intended line passes, and then do the holes in the wood with a perforator. The step between the holes should be approximately 60 cm.
- Remove the rail and insert the plug into the wall where the holes from the perforator remained. Install the screws in the rack itself. Screw the bar first in the place that the walls are stronger from the wall. Then lock the item at other points, and use wedges for alignment and maintain plane.
- Wedges can be prepared in advance. To do this, one of the plates need to be cut into fragments of 5-6 cm and break them into small pieces. In the process of work, extra millimeters can be removed using a knife.
- In the process of installing the frame, the plane should align. To do this, from the two ends of the rail, the thread is stretched and pressed with self-draws, which are screwed into the wall to the very end. On each side under the thread inserted 1 match, during operation, the level of the rail must be treated with a strained thread.
- Mounting the frame is carried out by screwing the screws into the necessary holes and driving the wedges where it is necessary. The nailed rail should fit tightly to the wall, durable and retreat from the stretched thread by 1 mm.
- Similarly, all other wooden planks are fixed on the surface. Try to nourish the bottom element as close as possible to the floor level, otherwise the panel can be left behind the wall. In addition, the lower bar is conveniently fixed by the plinth. The same rule should be observed in the case of the upper rail, which should be as close as possible to the ceiling or to the level, where the suspension design is expected.
Tip: After fixing the frame, you can draw it a scheme on paper. In the event that you ever decide to hang pictures on the wall or lamps, you will know where you can drive nails.

Cleaning wall MDF panels
The process of cladding walls can be described in stages:
- Cut the desired MDF panel length and lock it in the angular part of the wall at a distance of about 2-3 mm from the angle. The panels are connected to each other according to the principle of "spike-groove", and the side of the spike will be just in the corner, where it will be attached to the rake with the help of self-tapping screws.
- The side of the panel on which the groove is mounted on the kleimer frame. The bracket is installed inside the groove and nailed to a wooden bar with small, suitable nails suitable. As a result, the first panel will be fixed on the wall quite reliably.
- The remaining elements no longer need to be fixed with the help of self-tapping screws, they simply connect together and are fixed by kleimers on the side of the grooves.
- The last panel is mounted on the wall similar to the first. If its width is greater or less than you need, you can use clock and fix it on the frame as well as the first panel.
After the final wall cladding, you must install the corners. In this case, you need to adhere to some recommendations:
- The angle of connecting elements between themselves should be 45 ° - so the corners are easier to install and cut off the excess. To pruning unnecessary fragments, it is convenient to use the painting knife or scissors for cutting metal.
- So that the corner is better glued to the panel, you need to apply a layer of liquid nails on its inner surface, then applied to MDF and remove. When the glue slightly "grab", the corner is finally fixed on the wall and pressed.
- Liquid nails that have chopped around the edges are better not to wash with a dry cloth and not remove with a solvent. Give glue to finally dry, then remove the excess with a painting knife.
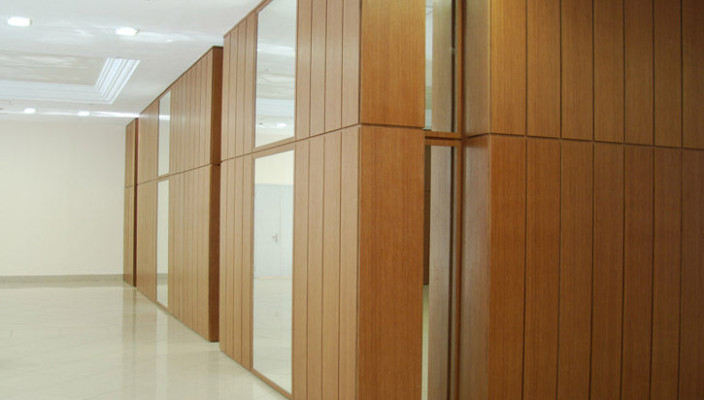
MDF panels for walls, photo:


Even the cheapest and simple MDF panels are considered to be more high-quality material compared to the chipboard ?????.
Today I was convinced about the opposite. I did off on the balcony, glued with a paper sticky ribbon, so the tape moved to the top layer coated. Everything needs to be redone, how? Mata lacks ceilings made, the panel is inserted into the groove. Full analysis!