Most standard bathrooms have a limited area. Therefore, each design solution should be rational and perform a specific functional role. Here, by the way, such an element like a niche where there will be many necessary things.
Content
What do you need niches in the bathroom
This architectural element is an excellent scenery, and in addition, they store hygiene products, bath accessories. A niches are arranged both above the washbasin, and in the wall, over the bathroom. Stylishly looks placed in these places of pots with plants, figurines, beautiful vessels, candlesticks. The mirror in the niche located opposite the doors will make the room visually wider, and the niche itself is deeper.
According to constructive execution, niches are found both horizontal and vertical. The first is better to place on the unintent wall, they will visually lengthen it. Overviews are well looking at the long wall, vertically, especially equipped with decorative light.
The configuration of the niche depends on the imagination and the capabilities of the owner, but must necessarily correspond to the overall style. So, the marine interior corresponds to round openings resembling shipproof portholes with elevated photos displaying the underwater world. In full harmony with this style there will be an aquarium installed in a niche. High-flow or modern niche correspond to a niche with strict geometric shapes. Arched deepening are suitable for classic style.
Niche in the bathroom, photo
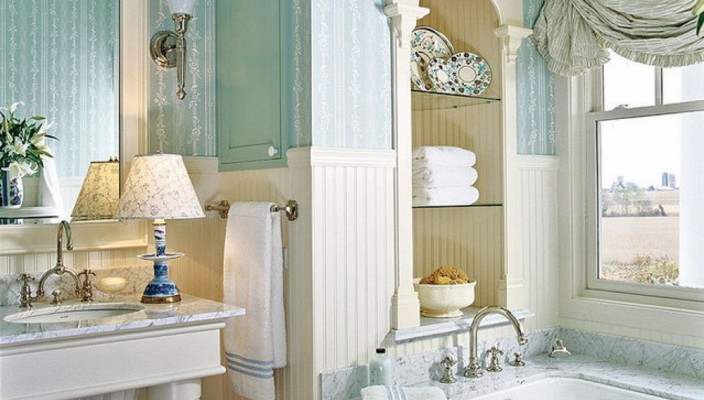
In modern interiors, niches in the bathrooms are often found, the photos of various options for this design serve that confirmation:


Bathroom with niche
In some bathrooms, niche is provided for the initial layout. In this case, it is important to use this item most rationally. In large size niche placed:
- heated towel rail;
- washing machine;
- boiler;
- locker to raise bathrobes;
- shower cabin.
Free space decorated in one style with a bathroom, top arrange shelves.

The device of a drywall niches in the bathroom
Plasterboard is just the perfect material for the niche device. It's easy to work with him, therefore, having a desire and at least small skills, you can engage in independent landscaping bathroom. The main thing is to buy correct plasterboard - moisture resistant. It is easy to distinguish it from usual - it has a blue or green shade. Consider a step-by-step example of a horizontal niche structure located along the whole wall. To perform work, it is necessary for the presence of material and construction tools:
- drywall 12.5 mm thick;
- the metal profile of the guide (UD) and the raised thickness (CD) 0.6 mm;
- drill or perforator;
- special knife;
- laser or rack-level;
- screwdriver;
- roulette, square;
- reinforcing ribbons;
- assembly glue;
- hammer
- self-dowels, dowels.
The device niche in the bathroom is starting with a sketch where we indicate all the sizes and installation of the frame, as a fundamental element responsible for the strength, the appearance and durability of the finished design.
Mount the carcass
Before proceeding with the installation, we carry out the preparation of the surface of the walls: we clean the old plaster, align. Next, the algorithm is as follows:
- We take the level and carry out the markup by building a rectangle of the desired size, constantly referring to the sketch.
- We note the depth of the niche, for which the diameters of the line on the ceiling, adjacent walls and the floor.
- We proceed to the fastening of the guide profile. First, we pierce the hole in the wall under the dowel. The complexity is that at the same time it is necessary to hold the profile strictly on the laid line, so it is desirable to prevent the assistant. Each profile is fixed by at least 4 dowels, otherwise the design will be larger enough. If the adjoining niches to the ceiling and the floor is scheduled, then they fix the guide profiles.
- We decorate the angles by connecting 2 of the guide profile between themselves strictly under 90 degrees and perform the front side, closed the 4-square with another guide profile. At the same time, we check with the help of the level so that all profiles are perfectly smoothly both on the front surface and on the sides. For a niche need 2 such designs - for bottom and top.
- We establish the rack profiles with a step of maximum 0.6 M shelves inside.
- We carry out the reinforcement of the frame, for which from the CD profile, cut the segment length equal to the distance between oppolishment guides. Break them across in the pairwise wall of each other on the other side. These elements perform another function - are a support to which we subsequently screw plasterboard.
- We form the shelves along the same technology: We carry out the plane from the guide profiles, enhance it by the carrier elements, orienting them with the shelves up and down with an interval of 0.3 m.
- We deploy the wiring and mount the transformer in case you plan to perform the LED backlight. We also provide for openings under the light bulb and arrange grounding.

We carry out the frame of plasterboard
If you managed to successfully make a framework, then consider that 80% of the work has already been completed. Plasterboard covering compared to what has already been done, a very simple operation. It remains to cut the material according to the sketch and fasten individual elements to the frame. We use for this self-tapping screw 2.5 cm long and a diameter of 0.35 cm. A good end result depends on the compliance with several rules:
- To get a flat surface, it is responsible for the fitting plates. The edges of them are treated by a special plane.
- For high-quality arrangement of angles, use metal perforated lining for this purpose, protective material from damage. The joints do in such a way that the cracks remain.
- If it is supposed to be facing the drywall with a tile or other enough heavy material, then the fastener installation step should be made to a maximum of 10 cm.
- Use fasteners with a secret head, otherwise difficulties will occur when applying a putty - the coating will be uneven.
- If the plasterboard must be bend, then first use a needle roller for perforation of the strip, and then moisturize it and give the necessary shape according to the template.
- When the backlight is provided, the final step will be the execution of the holes and the output of the wires.
Keep in mind: so that the moisture does not destroy drywall, leave the gap of at least 1 cm between the floor and the trim.

Finishing niche
Finishing works are reduced to primer, sealing recesses and seams with putty, staining or cladding design. And so that Niche is harmoniously fit into the bathroom interior, take advantage of the following tips:
- If the walls of the bathroom are blonde, then make a niche in bright colors. Dark, in this case, it will look like a hole.
- A small niche is better to arrange in the same colors as the walls, but a little lighter.

Tip: Putty Begin to apply from niche angles by pre-laid around the perimeter reinforcing tape.
Niche in the wall in the bathroom
Niche, made of drywall, takes some part of the space. Therefore, in a very small room sometimes arrange it in the wall itself. To do this, remove part of the wall, the metal corner is installed at the top, and on the opposite hand, the hole is closed with a sheet of plasterboard. Consider an example of a niche device in a non-bearing wall of a brick, laid out in 1 row:
- we perform markup on the wall;
- we climb under the top next to bricks from one and the other side of an equifiable steel corner with a shelf of 40 mm;
- we remove gently bricks at the place of the future opening;
- close up the rear wall with plasterboard and fix it with glue and dowels;
- perform a niche finish.
Speecually looks like a niche decorated with materials having different textures. Natural or artificial stone is well harmonized with glass, and on the background of smooth walls, a niche with rough brick masonry looks stylishly.

ATTENTION: For a niche device, a special permission will be required in the bearing wall.
If a niche is properly equipped and make it nice, then it will decorate the bathroom, and in addition, will make your stay in it comfortable.


