Alternative to the traditional sector, metal profile, ceramic tile can serve roofing materials based on flexible bitumen coatings. If the roof of the flexible tile is mounted in accordance with the rules developed by manufacturers, the aesthetic attractiveness and reliability of the coating are ensured. About how to perform work with your own hands, will be discussed in this article.
Content
The main differences of flexible tiles
Flexible tile is a material similar to the structure and composition with the rubberoid. At the heart - impregnated with bitumen fiberglass canvas. Tile shape - Plates (trunks) with curly petals around the edge. On the back side - a sticky layer for gluing to a solid crate, and a small mineral crumb is applied on the front side. There is an additional fitting with nails. After laying, the coating becomes monolithic as a result of sintering of individual elements under the sunny beams.
As a result of improving the last flexible tile, the following qualities acquired:
- flexibility: The coating elements may be bent, which is important for the roofs of complex shape;
- ease: the roof of the flexible tile practically does not create loads on the building structure;
- water-repellent properties guarantee reliable protection against precipitation;
- long service life;
- attractive appearance: color and shape of the tile after mounting the coating resembles the scaly;
- ease of installation: Technology laying flexible tile do it yourself is available to a installer without special experience;
- wear resistance: the outer layer contains marble or granite abrasion resistant granules.

The flexibility of the bituminous tile allows you to create roofing coatings of a complex shape
It should be borne in mind that the soft coating of bitumen tiles is suitable not only for laying on the roof. You can also arrange a fondant flexible tile, insteading the attic from the inside.
General recommendations for laying flexible tiles
The manual of the manufacturer (with which you want to read after purchasing the coating) contains basic information on how to install flexible tile.
- To work, you should choose the warm season at temperatures from +5 ° C. Otherwise, the slabs do not glue with the crate and each other. Under the low temperature conditions, the bitumen tile becomes fragile.
- If the installation must be made in winter (for partial coating replacement), the plates are kept in a warm room for at least a day. After laying, the tile is heated by a construction hairdryer, and the joints are sealed using bitumen mastic.
- Installation of flexible tile with your own hands (video on the topic - at the end of the article) is performed for roofing systems with an angle of a slope of at least 11.3 °. Otherwise, the approaching snow slows down and inevitable leaks. In such conditions, the service life is reduced.
Phased Description of the Installation of Bituminous Tiles
Regardless of the manufacturer, the method of laying bitumen tiles is the same for any coating and consists of the following steps.
Preparatory stage for mounting flexible tile

Endament design with lining waterproofing
- Preparation of the foundation. It is necessary to create a solid crate of edged board, FSF plywood foxes or OSB plates. It is important to achieve an absolutely flat and solid surface. Platular materials (moisture resistant plywood, OSB) are stacked with a row shift to avoid cross-shaped connections. Between the plates leave the compensation gap of about 3 mm.
- Ventilation device. It is necessary to provide for the existence of references - the gaps between the counterclaim and the crate. Between bituminous tiles and insulation, covered with vapor insulation material, there must be space for air circulation. Designs or skate aerators in the upper zone of the roof should ensure the outflow of water vapor.
- Laying an additional waterproofing lining coating. It is recommended to choose the material of the same manufacturer as a bitumen tile. Installation starts at the bottom of each sink and move to the skate. At the same time, the upper strip must be laid with the allen on the lower no less than 10 cm. Tightness is provided by bitumen mastic, which is applied to the place of the joint. In the field of pipes, waterproofing should be on a vertical surface at least 20 cm. Enders are covered with a solid insulation strip. If you need to dock two bands, the joint is arranged at the top of the allen in 20 cm.
- Protection of Svezov and Frontton. The edges of the roof must be closed with metal straps. They are fixed over waterproofing. Neighboring elements must be mounted with an overlap at 50 mm. Fasteners in the joints should be more frequent - every 2-3 cm. The front plan should block the cornese in the docking grounds.
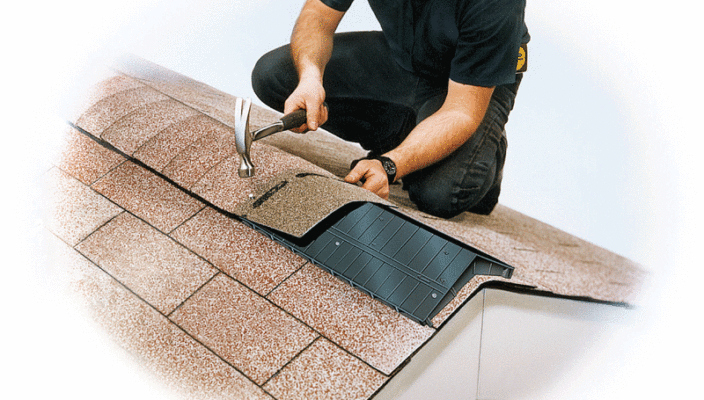
- The device of the aisle for antennas, ventilation pipes. To do this, use special cornese penetrations and aprons, cut the parts from the end carpet, cut out protection from galvanized sheet iron. Docking places are treated with bitumen mastic and silicone sealant.

Decoration of roof edges
IMPORTANT: A solid lattice of plywood sheets and OSB plates is fastened at the edges of the roof with an interval of 10 cm, in the places of the plates (on the rafters) - 15 cm and on the intermediate rafting legs - 30 cm.
Laying flexible tile
In order for the coating to be not corrected after installation, the laying of flexible tiles is first prepared. This will allow plates rows smoothly. The markup is performed using a cord: horizontal lines are applied in increments of 0.8 m and vertical - 1.0 m. It should be borne in mind that the lines should not specify the clear order of laying the shots, they are necessary to adjust the direction of the series.
Laying bitumen tiles is performed in compliance with the following rules.
- Packaging with tiles are chosen in random order: it will help to avoid contrast of the shades of adjacent elements.
- Having retreated 20 mm from the edge of the cornice bar, the cornice tiles are stacked. As start-up elements, ordinary tiles with pre-cropped petals can be used. The sticker is performed after removing the safety ribbon from the sticky layer and the processing of the rest of the mastics.
- Farmers are fixed with roofing nails (fastening step corresponds to a lobe width) in four places. For roofing systems with a large slope angle, additional fasteners are required: two more nails are driven along the edge of each sheet.
- Laying the next row is performed with the displacement of petals so that they overlap the excavations and docking sites of the previous (lower) row.
Important: Plastic elements are stacked on top of the skate bar, providing ventilating underground space.
Finishing flexible tiles of complex areas
Complex areas of roof, except passes for antennas, cables and chimneys, the following may be considered:
- zones near end slats;
- endow;
- skates.
Methods for sealing the roof in the specified zones.
- Bituminous tile is glued along the end plank, cutting off an excess on the line of the roof edge. At the same time, bituminous mastic (10 cm wide) is pre-injected on the edge of the roof.
- For the execution of endands of Bitumki sheets can be placed on the side of both skates. At the same time, it is necessary to carefully warm the sheets by a construction hairdryer, and their locations to handle their mastic.
- To make a hat from the flexible tile with your own hands, you should trim the cornese tile so that rectangular sheets come out. After that, Bitumka bends at an angle corresponding to the corner of the rod of the rods, is sampled and nailed, ranging from one of the edges. Each next sheet overlaps the previous one by 50 mm, closing nails.

Finishing the skate "Bitumka"
Useful Tips for Installation Flexible Tile
Before beginner assemblers may have questions about how to make Lases on flexible tile. Lases are needed not only for installation, but also for repairing roofing. There are several solutions to the problem.

Rams for the roof
- Special inserts of factory production. They are attached to the crate, for which it is necessary to bend the edge of the bitumen sheet. On top of the inserts are stacked by the boards for which the tiles stacked will be moved.
- Inserts from wooden bars drank at an angle. In fact, this method is similar to the previous one? With the difference that self-made details are used for the device of Lases.
- Using roofing ladder or gear system. The design is made of boards and bars (see photo).
- Using foam rubber. On the bituminous roof with the mineral top layer, the foam rubber will be stable and can serve as the basis for the work of the roofer. It is important to use the main insurance - the belt with the cable attached to it.

Foam rubber can be used as a support on the roof of bituminous tiles
At the end of the article - video tutorial with detailed explanations of the specialist on how to properly lay flexible tile.


https://ckl.com.ua/g84717900-smesiteli-gappo.