If your dwelling needs an additional heating in winter, then you need to install a heating system in it. With such a task, the water warm floor will perfectly cope with this, the installation of which can be carried out independently. If you do everything yourself, you can save a considerable amount. But note that this process requires some knowledge in the field of installation of engineering systems, as well as a certain skill. Collecting a water heating system "Warm floor" in a private house with your own hands, you will face a number of nuances and features, without which high-quality installation is impossible.
Content
Selection of material for creating a water warm floor with their own hands
The modern market of building materials is elapsed by a wide variety of pipes, fittings and other components intended for assembling a water warm floor. We want to immediately warn that it is better to choose all the components of one manufacturer. Thus, they will be perfectly shy, and you will not have to constantly pick up fittings to each other. But it is worth paying attention to some features when choosing a material. For each of the components there are own criteria that will help choose the material both for a small bathroom in a high-rise building and for living living room in a private house.

Water warm floor do it yourself. Basic criteria for the choice of pipes for the heating system of floors
Pipe plays one of the most important roles in floor insulation. It is on it that will circulate hot water, heating the surface to the desired temperature. To do this, use a special metal-plastic pipe that contains inside an aluminum layer. It allows heat for a long time to hold inside the system. Since the heating process is quite complicated, then for each kind of premises there is its own temperature range.
The temperature of the warm water floor, necessary for heating various rooms, is presented in the following ranges:
- Residential premises, apartment, manor - 21 ° C-27 ° C.
- Work premises, office, warehouse - about 29 ° C.
- Lobby, hallway, corridor - 30 ° С.
- Swimming pool, bathroom, toilet - 31-33 ° C.
Camping this or another water warm floor, be sure to consider this value. Then you can fully feel comfort and comfort, which is so necessary in the cold season. So that the room has reached such a temperature, the pipes need to warm up almost 60 ° C. The heat passing through the screed layer loses almost a third of the energy.

Modern pipes are represented in three versions, each of which differs in diameter. In addition, for the pipe of each diameter there is an own limit that limits the laying of the contour along the length.
For each diameter, the following parameters exist:
- 16 mm (contour length 70-90 m);
- 17 mm (90-100 m);
- 20 mm (maximum length 120 m).
Specialist Council: In case you need to pave the contour, the length of which goes beyond the allowable value is not to equip the system with a more powerful pump. It is better to divide the room into several contours, then the system will work with maximum efficiency.
In addition to the above parameters, it is also worth considering that the temperature difference in the feed pipe and the "return" should not exceed 10 ° C. This is a prerequisite that plays an important role in falling the temperature of the heating circuit.

The specifics of the structure of a metal-plastic pipe for a water warm floor does not allow it to be very encouraged. Planning the layout step, consider that if it is 100 mm, the pipe can simply burst in the bend place. This indicator is necessary to take into account so that the contour deformation does not spoil the entire system.

Determining in the step of laying the pipe, pay attention to the following indicators inherent in different kind of premises:
- For rooms that contain outer walls, a step of 150 mm is sufficient, while the rows should be at least 5.
- In the central part of the room, a step can be increased to 200-300 mm.
- For flooring floor baths and bathrooms, the pipe is mounted in 150-200 mm increments.
In any case, the width of the step directly depends on the thermal load intended to water. It may also depend on the length of the contour, and vary depending on the features and destination of the room.
Selection of insulation for warm water floor
To pick up for your system the right insulation, it is necessary to take into account some features of the installation of this material. As a heater, extruded polystyrene foam plates are used, which are usually represented in two sizes: 500x1000 mm and 600x1200 mm. They have a sufficiently dense durable structure, since they are calculated on the layer of the screed. In the stoves often you can find special grooves, thanks to which they are cloudy even more denser. Also, the insulation is produced with a thickness of 20, 30, 50, 80 and 100 mm.

To correctly choose the thickness of the insulation, we advise you to pay attention to the following features:
- if the room under water warm floor is heated, then 30 mm insulation is sufficient;
- for the arrangement of premises located above the ground floor, the plates of a thickness of at least 50 mm are used;
- to improve heating in close proximity to the soil, acquire a plate with a thickness of 100mm. Also, for such a surface, the option is suitable in which a 50 mm thick insulation is placed in two layers, while the layers should be located "grid".

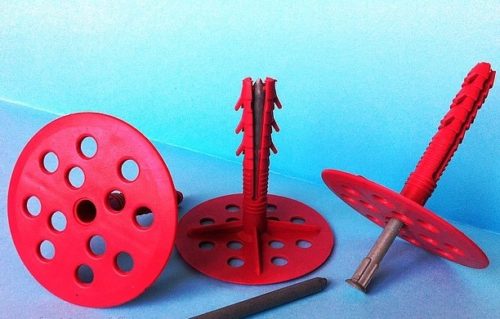
With an independent selection of insulation, we advise you to purchase a 30 mm option. It will be enough to arrange an apartment. The size of the slab is better to choose based on the parameters of the room. Deciding with the method of laying, you can choose the insulation of the desired size, then you can reduce material overrun. In addition, the polystyrene insulation is sold individually, so it is definitely not difficult to calculate the material. For fastening sheets to the floor, special "umbrellas" use.
Collector selection for water warm floor
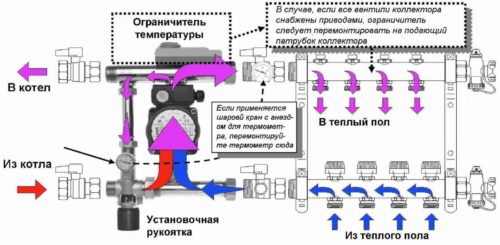
The collector, or how to say correctly, the collector-mixing node is the most important element of the system. Water comes from the highway, after which it distributes it for each of the contours. The collector must maintain the balance in the system, adjusting the temperature, pressure and water flow. We want to immediately warn that it is quite difficult to choose such a device. It is better to provide a scheme drawing a water warm floor by a specialist, so that he can choose the necessary manifold, and calculate the entire load.

The collector-mixing unit consists of the following elements:
- The collector - can be made both in a metal version and in plastic (designed directly for the soldering). For the heating of small rooms, you can use a second option that will be cheaper. The metal collector must be equipped with balancing valves, as well as overlapping valves. It all depends on the firm and configuration of the device.
- The air vent - resets the excess air from the system, balancing the pressure inside.
- Drainage cranes - drain water from the collector with full filling system.
- Fittings are the main binding collector systems, as well as brackets for its fastening.
- The mixing unit - must be mounted in case the heating system does not have its own riser. Consists of: thermostatic valve, pump, bypass and pressure gauge.
- Cabinet - "Box" for a collector-mixing node. The size of the cabinet is directly dependent on the collector and all components of the system. Produced in standard sizes, with an internal and external accommodation option.

Before starting the assembly and installation of warm floors, decide on the place where the closet will be located, as well as with the method of its placement. Note that it should be located near the main pipes. At the same time, the contours must approach the collector almost at one point to carry out the connection as compact and reliably.
Selection of insulation materials
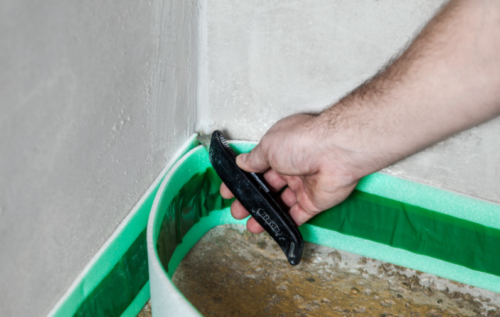
Since the system assembly must restrain heat without losing its effectiveness, it is necessary to isolate everything carefully. To date, this is used by damper tape and folgize. The damper tape is stacked around the perimeter of the room along the floor joint with the wall, and it usually happens red, green, white or blue. After the screed is flooded, it will protect potentially dangerous places from the flow, while maintaining useful heat inside the system.

Foloisol is a roll-type isolation with spraying. It is manufactured in two versions: with a substrate and without. In addition, it is often produced with a predetermined markup, designed to simplify the process of laying pipes. But it is worth considering that the markup, as well as the substrate, increase the value of the material. We would advise you to choose a medium version of foloisol without a substrate with markup.

Water warm floor do it yourself. Step-by-step instruction
Starting installation works related to the arrangement of an apartment or a house of heating system "Warm floor", we advise you to first prepare. Such work will require you exposure and perfection. We advise you to carefully examine the device of the collector-mixing unit, as well as all its components. If you acquire a set in a specialized store, then with the most likely you will only calculate their own. Thus, you will only be wiring the contours, and connect the collector to the system. But even these, at first glance, simple processes require special skills and knowledge, without which the installation of a water warm floor is impossible.
Calculation of water floor
How to find out how much to buy pipes? To calculate the amount of the necessary pipe for a water warm floor with your own hands, you can use the online calculator, which today you can find a huge set. You can also use average data that make up 100 m. Pipes on 20 m² of rooms. These data are averaged, and may vary depending on the thickness of the pipe, the laying method, as well as the contour step.

There is also a practice when you can buy in a sanitary shop a whole bay with a length of 200 m. After you perform all the work, you can return the rest by agreement with the seller by receiving your money for not spent material. In this case, the residue is fairly easy to calculate on the tops on the pipe. In addition, special fastening elements are needed for the pipe - harpoon brackets. They are installed with a middle step of 0.4 m. Thus, for the bay of 200 m, we will need about 500 harpoon-brackets.
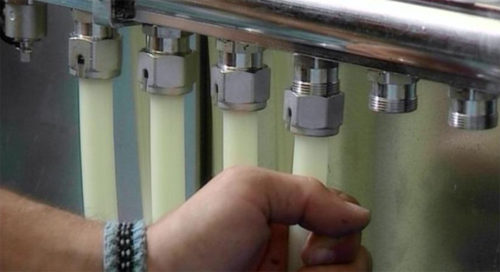
Tool and consumables
To properly collect warm floors in the house under the tile, we advise you to get everything necessary. The assembly process requires constant control of the collector system, besides, without construction work, it's simply not to do.

Olympus Digital Camera.
The tool required for the assembly and installation of water warm floor:
- concrete mixer or mixer, perforator, screwdriver, Bulgarian, crimping pump;
- hammer, screwdriver, metal scissors, construction knife;
- rule, level, roulette;
- set of wrenches, lantofum, packle;
- reinforcement grid, sand, cement, plasticizer for "warm floor", knitting wire, plastic ties;
- polystyrene insulation, damper tape, pholoisol, merilov;
- metal plastic tube, fittings, a mixing unit, a security group, a pressure gauge;
- pencils, borants, blades, umbrellas, harpoon brackets, tape;
- gloves, glasses, special equipment.
Preparation of the foundation
Starting an independent arrangement of an apartment with a heating system of type "Warm floor", keep in mind that it is better to start such work at the beginning of construction. First of all, the entire system is stacked, after which it is possible to continue the decoration of the walls and the rest.

Check the floors for convexities and depression. If the differences are essential, then the bumps are knocked down by a perforator with a nozzle "blade". Large recesses can be seen by cement-sandy solution. You can also use specialized ready-made mixtures of the "smooth floor". In principle, minor differences are allowed.
Assembly and installation of the heating system "Water warm floor"
We want to immediately note that before starting to collect the system, you need to concern in advance about the location of the cabinet with the collector-mixing unit. Make sure the highway is located near. Make sure the electricity point is connected to the system, which has its own circuit breaker in the electrical protection. Do not connect the system to the general network, it is better to take a separate machine for it.

We also recommend pre-draw the pipe layout scheme. The options for laying metal-plastic pipe There are several. The laying method depends on the features of your room, as well as from its area. There are several ways to laying, among which: snail, snake, as well as variable and combined methods. It is better to ask for a specialist who can choose the necessary method, based on the parameters of each room separately.
Mounted water warm floor, adhering to the next algorithm:
- On the perimeter of the room, including the doorway, glue the damper tape. You can use a self-adhesive version of the tape, or make styling with a tape.
- We start laying insulation. The polystyrene foam plates are placed in the grooves so that in each row there is no common seam. The necessary pieces are cut off with a construction knife.

- To fix the insulation at the base, through the plate a hole with a diameter of 10-12 mm, after which the plastic "umbrella" is inserted into them. The fastener is driven by a thermal industry, which will not give the plate to crack during expansion processes. On average, for one sheet is enough from 6-9 fasteners.
- The next thermal insulation layer is placed on top - foalisol. Make it parallel stripes, a little cleaner. The joints are sampled with transparent scotch. The easiest way to lay the material on which the markup is applied.
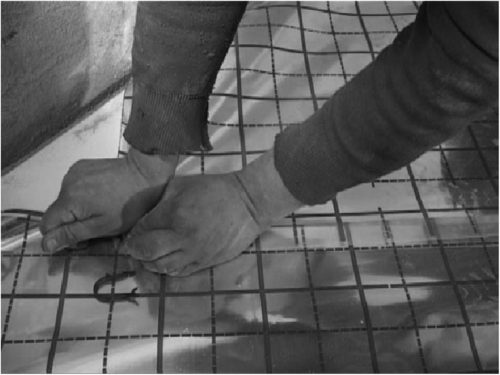
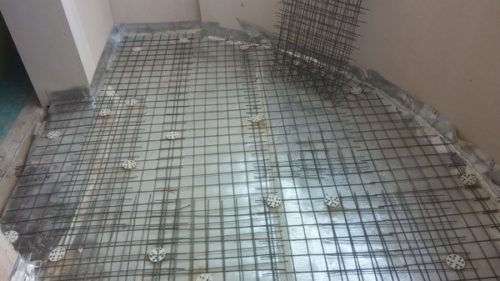
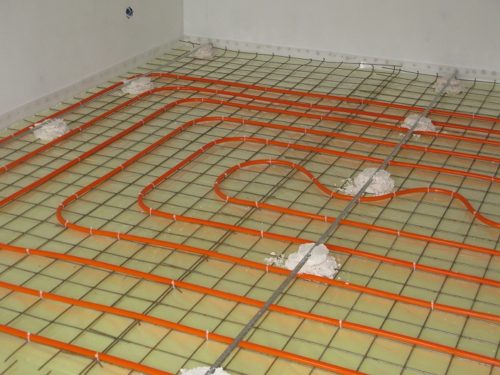
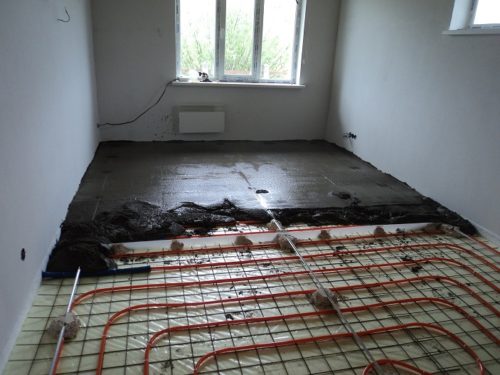
- The next layer is placed by the "Map" reinforcing grid. Typically, the size of 1000x2000 mm, a rod thickness 3 mm and a cell of 100x100 mm. Between themselves, the grid is connected by knitting wire or plastic screed. Where necessary, armopoyas is cut off with a grinder or scissors for metal.
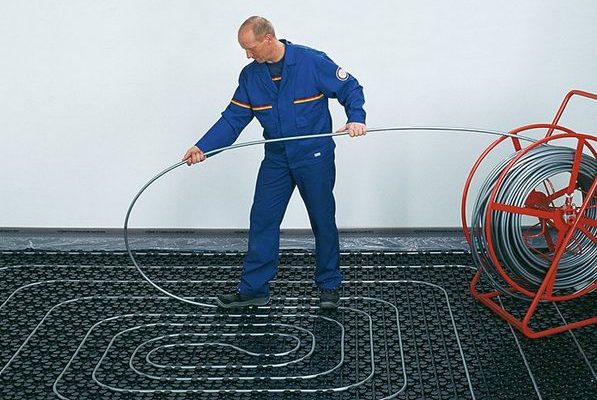
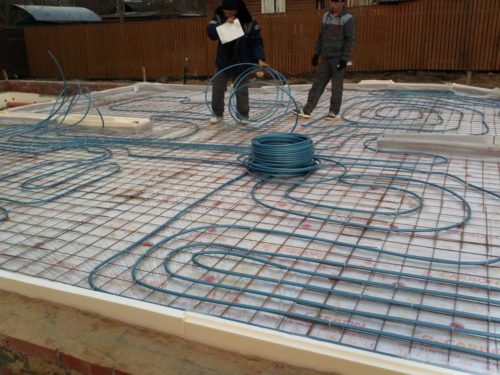
- Now you can lay the pipe. It is best to pull the pipe from the bay, rather than shoot rings. For this, the bay is placed on a special rotating mechanism, if any. Otherwise, take advantage of the help of a partner. Place each contour sequentially, in accordance with the system scheme.
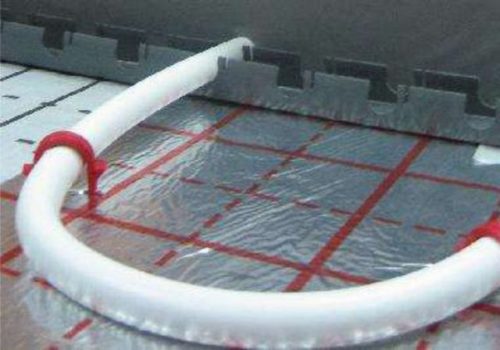
- To fix each contour of the pipe, you need to install a harpoon-bracket with a step of 300-400 mm. On turns, the step decreases to 100-150 mm.
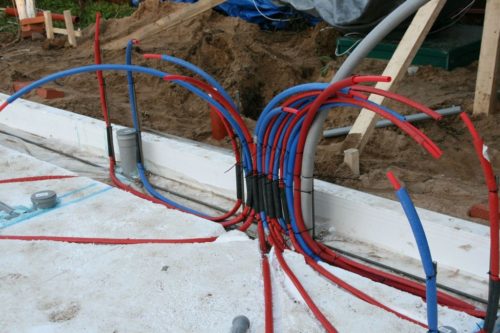
- Places where the pipe is suitable for a collector-mixing node, you need to isolate. To do this, the magnifier of the required diameter is worn onto the pipe. Wear insulation taking into account the thickness of the future screed.


The most important stage in the assembly of water warm floor is subject to the loop of the contour. It is better not to hurry, and perform everything consistently. Ask for the help of a partner in order not to be mistaken, and put the pipe in accordance with the scheme. Do not forget also about the maximum permissible step.
Connecting and inspection of system performance
Now that the system is prepared, you need to connect everything correctly, and then - test for functionality. Check - mandatory stage of work. If you do not do everything in a timely manner, then you can get an unpleasant "surprise" in the form of a flood near the neighbors below. All faults are easier to repair at this stage, rather than to sort out the entire system, removing the tile, and "undermining" the screed.

One of the final stages of the installation of water warm floor involves the following actions:
- In the marked place, install the cabinet for the collector-mixing unit. The collector is placed on a special element that must be sold complete.
- Connect the transparent hose to the collector's drainage nozzle, and then output into the sewer.
- Connect the "feed" to the collector through the pipe at the location of the shut-off crane. If the quality of the tap water "leaves much to be desired", then a mesh coarse filter is installed on the feed.
- From the reverse side at the output to the collector, the compressed pump is connected. The connection occurs through a special tee, after which they begin to fill the system.
- Now you need to overlap all the contours, except one. The air ventures should remain open in this case.
- To submit water to flush the system, unscrew the feed and drain faucet. You will see how water with plastic chip and lubrication residues will go to the drainage system.
- Similarly come with each of the contours. Do it until the system come out of the system and dirt. Filling faucet overlap.
- At the end of cleaning, the tee is removed, and the collector is connected to the feeding line.
- Now it remains to check the pressure in the system, having experienced it with the help of therapy pump. It is also worth noting that such work is better to invite a specialist.


If you did everything right, then you should have a fully working system, in which there is no air, and water is freely circulating in contours. If you are not confident in the correctness of the implementation of a stage, it is better to ask a more experienced person about help.
Fill screed and finishing
Now we need to close all the pipes so that we can continue to lay any favorite finishing material. We advise you to immediately take a concrete mixer for work to go fast. Additional assistance in the form of a subband will also not hurt.
To pour the final layer of water warm floor cake, come as follows:
- The beacons are mounted on the "nippers". All of them must be in the same level, so that the screed is smooth.
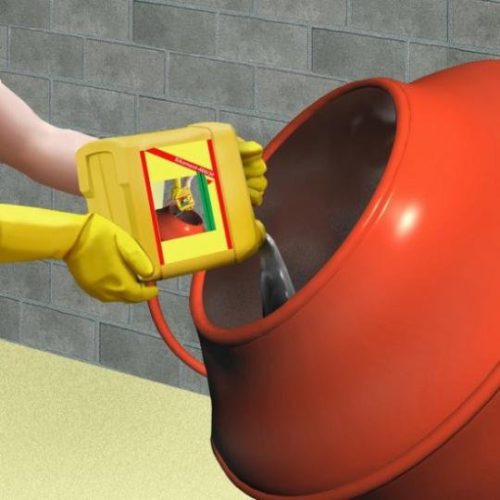
- Sand and cement fall in the concrete mixer, after which the plasticizer is added for the "warm floor". It is done with each knee, in accordance with the dosage indicated on the package. This will help avoid cracks in the screed during system operation.
- The mixture is poured consistently, usually from one corner to another. To level the solution, use the rule of the required length. At the same time moving around the beacons.
- During the pouring, you move so as not to step onto the metal-plastic pipe. Concrete mixer is better installed in the next room, or put on a special platform from the spent sheet material.
- After the screed finally turned, the system is started again to warm the floors to the required temperature. At this stage, you will have to experiment with temperature modes to identify the desired one.
- If you make a water warm floor under the tile itself, then you will consider that you need a specialized adhesive mixture. Normal tile glue for such works is simply not suitable.


As you can see, the process of assembling the heating system of the room "Water warm floor" is quite complicated, and has preliminary preparation. In addition, you will have to acquire expensive devices and tools. To save on this issue, we advise you to install the cabinet and collector yourself. You can also put all the layers of the "Warm Paul" Cake. Believe me, you will save a very round sum. For testing and connecting the system, we advise you to resort to the help of a specialized employee, then you don't have to worry about the quality of the final result.


