
Perfectly smooth walls are quite rare for any unprofiled room, and even for buildings, the operation of which is carried out for a long time. Therefore, when decorating walls with wallpaper, it will certainly require preliminary preparation of surfaces.
Content
Alignment is carried out using various building materials, the choice of which depends on the level of error, the financial capabilities of the owner of the house and the deadlines allocated to the project. Before making a decision in favor of one way, consider below the outlined wall processing technologies under the sticking of wallpaper, the most popular solutions in this direction.
Why level the walls under the wallpaper?

Evaluate the level of alignment until all works on decorating the premises are rather difficult. At the same time, in the absence of such a procedure, it is not easy to correct the resulting poor result, but sometimes it does not seem possible without a certain period of operation. 
We give the most significant advantages of alignment of the walls under the wallpaper:
- Attractive appearance of the decorated coating.
- Lack of defects in the form of dents, bugro, grain.
- Uniform wallpaper structure.
- The absence of sprawling seams.
- Improving the adhesion of the base with decorative coating.
- Increase the duration of operation.

Permissible rate of deviations

Note the fact that the requirements for the levels are determined not only by the selected type of wallpaper, but also the intended follow-up room furnishings. For example, if it is planned to complete the space along one wall by a wardrobe or anybody, then the disorder of the geometry of the room will be noticeably quite clearly. Therefore, the standard deviation rate does not exceed 2 mm / m2 surface area of \u200b\u200bthe wall.

How to check the fatty walls?
You can check the smooth walls on your own, not attracting specialists. To perform this work, it is enough just to have a construction level, convenient and easy to use. To check all the settings of the room, check the following indicators:
- vertical of each wall;
- horizontal of all surfaces intended to stick wallpaper;
- equalization of diagonals.

Important! In the case when the difference in diagonals does not exceed 10 mm, the entire volume of work will be insignificant. With a more substantial deviation, prepare walls under wallpaper will have to be thoroughly and sequentially in several stages.
How to level the walls under the wallpaper?

Most often, the following types of building materials are used to carry out such works:
- plasterboard;
- putty;
- plaster.
Important! Choose the appropriate option, considering not only your preferences, the degree of irregularities of the walls and financial capabilities. Be sure to relate the technologies of preparation and applying solutions with their professional skills.
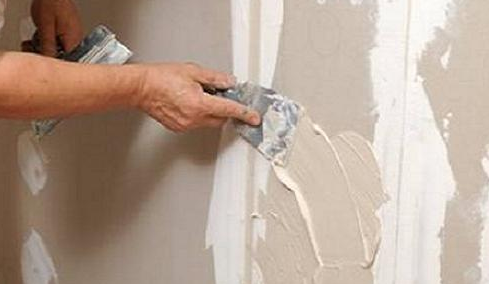

How to equate walls with putty?
This material is great for fixing minor defects.

What to choose a putty?
The range of such products is presented on the construction market a fairly wide line. The following varieties of appointment are distinguished:
- starting mixtures;
- materials for finishing finish.

Another principle of classification is the type of material. Depending on your own professional skills, select a putty more suitable view of two categories:
- dry mix;
- ready to apply mass.
Important! If you prefer the first option, immediately before aligning the walls under the wallpaper, prepare the solution accurately following the manufacturer's recipe instructions. Note that the use of such a mixture is strictly limited, so you only diverge the number that we will be able to apply at the specified time. The consumption of the material in this case will be 1 kg / 1 m2 of the wall area.


What tools to prepare?
To prepare the wall under the wallpaper putty, the following tools will be needed:
- bucket of square shape;
- a small spatula of up to 10 cm wide for the fence of a solution, applying to the main spatula and its cleaning;
- big spatula - from 40 cm wide.

Important! The square shape of the capacity allows the maximum to use the entire prepared mixture with a small overrun. Suitable parameters of a large spatula are selected taking into account the area of \u200b\u200bthe wall - than it is more, the wider there should be a tool.
Technology leveling
To prepare the wall under the wallpaper putty, while performing the work, follow the following rules:
- Carefully, but carefully, clean the base.
- Treat the surface with an antibacterial preparation.
- Sproute the wall.

- Apply the first layer of starting putty, taking a solution from a bucket with a small spatula and apply it to a large one.

Important! Consider the angle of inclination of the spatula to the wall determines the thickness of the formable layer - than it is more, the thinner the coating.
- In the process of applying, we regularly clean the spatula from the filling mass, rinse the tool in the water.
- Place the painting grid on top of the first layer - by this you will protect yourself from the appearance of cracks in the future.

- Apply the second layer of putty in the direction perpendicular to the first.
- After the material is frozen, create 2 very thin layers of the finish putty.
- Wake up their primer after grabbing.
- Compare all roughness with a special brush, performing circular movements over the entire surface.


Video
Review the video example of alignment of the walls with putty under the wallpaper to more clearly imagine the entire upcoming scope of work.
How to align the walls with plaster?
Until recently, plaster is most often used to solve problems of any complexity to eliminate the defects of walls and other parts of the building. In addition, the universality of the use of many species of this material during finishing works can significantly reduce the cost of purchasing consumables. The only drawback of such technology is laboriousness and for a long time to create a high-quality leveling coating.

What to choose plaster?
In today's market, several types of such material are presented:
- lime-clay;
- cement-sand;
- lime-cement;
- gypsum-lime;
- glino-plaster with the addition of lime.
Important! Most often, plastering in the form of dry-mixtures based on portland cement is used to align the walls under the wallpaper with the addition of polymers. Such formulations provide a fairly fast and reliable setting with the base. 
Suitable type of plaster mix Select based on the type of material used in the construction of walls:
- for brick base, cement-sand plaster is perfect;
- wooden walls are better to align with glyboyps, clay-cement or gypsum-lime solid;
- concrete surfaces are well handled with gypsum compositions with mineral additives;
- gypsum mixes are also used for walls of foam concrete.


Sequence of performance
To carry out the alignment of the walls of the plaster correctly, follow below the instructions in the instructions:
- Clean the surface from previous decorative materials, dirt, dust carefully.
- Scroll the base.

- Secure the plaster grid with cells with a diameter of 5 * 5 cm to eliminate the subsequent cracking of the coating.
- At the edges, install two lighthouse, exposing them in terms of level.
Important! For this work, use special perforated construction lights or wooden rails. - Fastener of beacons Perform quick-conchive gypsum glue.
- Set intermediate beacons in a step of 20 cm, determining their position on the cord.

- Prepare a plaster solution.
- Moisten the surface.
- Apply a liquid mixture with a solid layer of 3-5 mm.
Important! To create a first layer - spray, prepare the solution based on the standard water proportion of at least 60%. - Wait for the plaster drying.
- Apply the main layer with a thickness of 5-7 mm.
- When forming a plaster leveling layer, be sure to focus on the thickness of the mounted beacons.

Important! For this work, make the solution more thick, with the percentage of water no more than 35%. - Wait for the capture of this coating with the surface of the wall, but do not allow complete drying to carry out the further proceeding procedure.
- Create a finishing layer with a thickness of 2-4 mm.
- After the formation of each layer, check the quality of the work performed.

- After drying, carefully lock the plaster using a metal grater or a special smooth iron to ensure not only the evenness of the walls, but also their smoothness.


Video
Review the visual example of alignment of brick walls with plaster.
How to use plasterboard for wall leveling?
The use of drywall as an alignment material today is quite popular.

Its use gives many advantages, of which the most significant are as follows:
- environmental purity;
- the ability to solve the complex task of training very uneven walls;
- minimum time spent.
Important! Additionally, we note the fact that plasterboard sheets are convenient in the installation and at the same time increase heat-saving and noise insulating characteristics. Thus, you are easy, quickly, and most importantly - cheap, you can solve several tasks to arrange the internal space of your own home.


Mounting Gypsum Mounting Technology
Despite the fact that this procedure is very simple and is quite accessible to fulfill the full work of its hands, first read some nuances to carry out the alignment of the walls under the wallpaper is really correct:
- Choose a suitable fastening technology, given the level of curvature of the base:
- if the indicator does not exceed 7 cm, give preference to the method of gluing sheets;
- in the case when irregularities are much more, create a pre-frame of construction profiles for installing sheets. In this case, on the perimeter, put the details of the UD type, vertically secure the CD panel, withsting a step of 60 cm.
- Determine the location of sockets, switches and household electrical appliances in advance.
- Follow the sheets of leveling material on the walls.

- If necessary, cut the drywall with any sharp tool to give individual elements the required dimensions.
- Secure sheets according to the selected technology:
- when mounting on a metal or wood frame, we climb the screw slightly into the thickness of the drywall. The distance between the fasteners in this case is determined at least 30 cm, the length of the screws is 2.5 cm;
- when sticking sheets, apply a solution with small parts in several places, also at a distance of 30 cm.
- Be sure to adjust the position of the sheet by level.
- Slip the entire surface of the wall.

Video
Familiarize yourself with the visual instructions for mounting drywall on the frame of metal profiles.
Conclusion
After you have familiarized yourself with all the features of the most practical ways to align the walls under the wallpaper, carefully glue all the "for" and "against" in favor of each of them, given the characteristics of your own premises and their capabilities. When performing the work, they certainly follow all the recommendations to eliminate the re-detection of deviations in the flatness of the wall surface after the process is completed.


