If building buildings are erected more than one, then there is a need to build inter-storey staircase marches. This design should be not only elegant, beautiful and fit into the interior of the entire room, but also to be strong enough to endure heavy loads. Especially important is the trouble-free design of the ladder for families, in the house of which young children and people of old age live. The construction of the stairs is a rather complicated process and requires clear planning and neat work. About how to build a staircase to the second floor with your own hands, let's tell later.
Content
Types of stairs to the second floor

For the construction of private houses, marching stairs are used, since in comparison with other models only they are suitable for uniform and safe lifting to the next floor. There are march stairs in design and manufacturing material.
By material manufacturing staircase marches are:
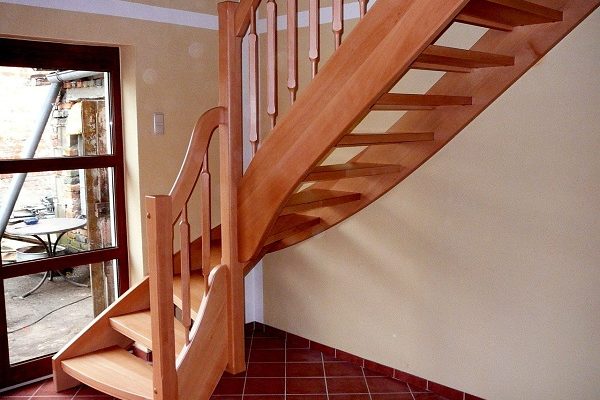
- Wooden. The most simple in the installation and light designs. The tree always fit into any interior design, besides, it has natural heat and environmental purity. Moreover, these designs have a small weight, which makes it possible to do without structure for them a separate foundation. The flaws of the tree are somewhat-demanding in constant care and relatively low strength. Therefore, raising large and heavy loads to the second floor and heavy loads.

- Steel. These are the most common types of stairs. They have a relatively low weight, which together with excellent strength makes them the most optimal option for a private house. Often metal stairs make combined, lining steel frame or stone. The only disadvantage of steel structures is the need to apply welding connections. If there is no experience in welding, you will have to hire contractors. However, this is also its own plus - you can make a light "air" design, and the installation time is significantly reduced.

- Monolithic concrete. It is quite rare, as they require too much materials, complex in the manufacture, and have a very large weight. This design is acceptable only in the case of buying a finished march. However, its installation should be made to roof flooring with the help of a lifting crane due to the high weight.

By its design, the stairs are:
- Single-one. This design is applied in places where there are no restrictions on the area and can be placed without increasing the angle of lifting. There is a simple structure and ease of manufacture.
- Two-day. If the area does not allow to place a single-room staircase in the room, they make a two-hours. It is characterized by the presence of an additional transition site between marchs.
- Screw stairs on the second floor. The most acceptable option with a lack of space. They occupy quite a little space, however, differ in the complexity of the design, manufacture and installation.
Next, consider the method of mounting various options for stairs to the second floor.
Making a simple wooden staircase on the second floor
Drawings and calculations of wooden stairs on the second floor

This design is most popular, as it is easy to manufacture and does not require any special tools and materials. Also, it can be free to make it yourself. It consists of a wooden marching staircase from several structural elements:
- Kosouras. The most important part of the stairs. These are wooden beams that carry all the load as the design itself and people moving along it. For this reason, made of massive dense wood.
- Stages. Consist of two parts: a sticking (horizontal part) and a riser (vertical part). Often stairs are manufactured without the last element. However, if there are small children or elderly in the house, then the presence of them is mandatory.
- Railing. They are not binding, but to ensure safety when moving on a march, their presence is desirable.

Before the start of manufacture, you need to calculate the parameters and make the drawings of the stairs to the second floor:
- The ladder parameters are mainly dependent on the height of the step and the height between the floor 1 and 2 floors. The normal height of the steps for a healthy person is 200 mm. However, if there is a disabled person or an elderly person, it is better to reduce the height of up to 150 mm.
- The width of the sticking should be such that the leg is completely at it. You can do more, just need to be aware that the more this indicator will be, the more the place will occupy the entire design.

Suppose, the height between the surfaces of the floors is 3000 mm, and the height of the steps is 150 mm. In this case, it will be necessary to 20 steps. If the width of the sticky is equal to 300 cm, then the length of the march base to the perpendicular between the floors will be 6000 mm. For the manufacture of cosoms such a design, 2 beams will be needed:
- √ 30002 + 60002 \u003d 6708 mm.
For steps you need a board with a thickness of at least 36 mm for coming and at least 20 mm for risers.
Section of a bar for the manufacture of Kosomers of the Mossy Stairs on the second floor
There must be at least 340 x 200 mm to ensure normal strength. If the width of the stage is more than 1,400 mm, then an additional must be installed between the two extreme cososters. For fastening the cosomes to the ceiling beam and the floor, a stubborn timber and metal fasteners are installed, which are attached with the help of anchor bolts.
Wooden staircase on the second floor - installation work

All wood must be carefully polished and prepare for processing.
For fastening the steps on a koser, drank. Ultimately, the beam of the Kourow resembles a tree hacksaw. For proper markup, the pattern is made, which takes into account the height of the step and the width of the sticky. At the ends of the beams of the cosomov, it is necessary to cut the grooves that will enter the mount of the entire design to the overlap. The next step is made by the markup of the Kosomrov. As a result, the design of two beams should be identical.
Next, you can begin the manufacture of details of the future staircase. To do this, you will need a joiner:
- Electrolovka.
- Grifmashinka.
- Hammer.
- Electric drill.
Consumables, except wood:
- Screen bolts or hairpins. They are designed to stroll two cowra. Thanks to them, the staircase does not drive around. For a staircase 6 meters long, 3 studs are enough.

Order order:
- In the crouches on the applied markup make drank under the installation of steps. Cutting the tree is very careful, so that there is no distortion. Otherwise, the steps will be uneven. After all the parts are cut out, the places of the cut must be carefully polished. After the billets are ready, they are installed in place, attaching to the bottom stop and upper codes using bolts. In three places, the boosters are tightened with tie studs.
- Now you can make and secure the steps. The width of the sticking should be 10-20 mm to be greater than the calculated one. This is done in order for the step as it would hover over the opponse. With such a design, the rise is greatly facilitated.
- Boards are cut by the prepared pattern. After cutting, polished and installed in place. Montage of steps of a wooden marching staircase is quite simple. The adoptions and risers are attached to the seating on the jetty glue and pressed with the help of self-tapping screws. The use of glue is necessary in order to eliminate the slightest movement of wood, during which it can creak.
- Next, if necessary, the railing of the stairs is mounted. Consist the railing of two main parts: Balyasin and handrails. They can be purchased ready for them, but if there is an opportunity and desire, you can pull out yourself.
- After assembling the entire design, the tree is opened with a verse and varnish several times. Wooden staircase requires a certain care. Once every 5 years, the varnish coating must be updated.
Installing the stairs to the second floor of steel

With a metal staircase, things are a little more difficult. A steel channel is used as a cosomer for it. Naturally, no one will cut into it in it for mounting steps. Instead, the so-called "Filkings" welded on the schwell. They are made of two corners cooked with each other.
The order of work in this case is as follows:
- The first thing is welded with a chawller boosters to mortgages on the beams of overlapping and on the floor of the first floor. When welding, the cosos should be followed by their parallelism.
- After that, their corners are equipped with Falkets. To start the workpiece for them are made from the corner. The last step is mounted by sticking and risers. They can be made of wood or sheet metal. In the first case, the mount is carried out using self-tapping screws, in the second - with welding.
- Metal after the assembly work is necessarily ground and paint in several layers of paint. As a railing, the use of welded metal structures with elements of artistic forging will be an excellent option.
- When assembling a metal staircase, it is necessary to pay special attention to the quality of welded seams. Weak seam not only will not give a guarantee of a long exploitation of the stairs, but also will make a rise in it unsafe.
Installation of monolithic concrete staircase on the second floor

The manufacture of such a design in a private house is justified only if it is used only as a pedestal from which the main staircase will be left. To fill the concrete, you will need to install formwork, as well as the use of reinforcement for reinforcing concrete.
After installing the formwork, the concrete needs to be poured quickly and completely. Otherwise, the monolith of the layers will be broken. Put a concrete staircase with a ceramic tile.


