The foundation is not in vain call the most important element in the building structure. The fate of the whole house depends on his proper design, laying and care. If the problems with the roof or walls can be solved, then the flaws in the design of the foundation or its operation will be very difficult to correct. That is why attention to the base must be given in a timely manner in full.
Content
The main factor that can affect the resistance of the base of the house is water. From constant blotting concrete begins to gradually collapse, its carrying ability is reduced, under the weight of the walls and roof it can crack and collapse. In addition, moisture, falling inside the reinforced concrete foundation, leads to corrosion of reinforcing materials that are made of steel. This also does not add the caption of the unnecessary years of life. The most vulnerable place of the foundation is its upper surface. The protrusion due to brick masonry forms a cornice. Water accumulates on its surface, which can then be leaked inside the concrete and at the occurrence of frosts just to destroy it. It is possible to solve this problem by setting water-trailing on the foundation. About how to make fits for the base with their own hands, let's tell further.
Types of sings for foundation

In addition to the protective function, the tide on the foundation carries in itself and decorative meaning. They decorate the place of conjugation of the base and the first row of brickwork. Pipes from the following materials are manufactured:
- Brick (clinker) and concrete. This is a "classic". The brick is put on a spoon, thereby forming an inclined plane. Concrete stacked in the same way. The latter is often used in the construction of administrative buildings. This type of popular is perfect for mounting on brick or block walls. It has excellent durability, long service life. Installation of clinker elements is performed on the solution, which complicates the process.
- Cink Steel. Dobly elements from galvanized steel are distinguished by relative durability, rapid installation and low cost. Steel as painted with special paint and not painted are used to install the sumps. It all depends on the preferences of the owner and the design of the house.

- Plastic and vinyl cells. Have a fairly low price, however, they do not serve not for a very long time. Vinyl is influenced by the effects of temperature drops and ultraviolet radiation. This can be said about plastic. In addition, very cheap materials when heated can make not a very pleasant smell, and with large frosts - just crack. However, it is very simple to carry out the installation of the basement, with their own hands without attracting specialized assistance.
- Copper foals. Copper is very beautiful, durable, but very expensive material. It is not too difficult to work with copper sheets, as copper is soft metal, which greatly simplifies the installation process. However, the value of the material makes it inaccessible to most consumers.
How are those mounted for foundation from clinkers

This process is quite complex and resembles a brick laying. After all the main construction works are finished, start laying a fill on the foundation. Clinker brick has a special manufacturing technology. Thanks to the use of special clay for its production, as well as a special temperature firing mode, it becomes very durable and waterproof. This material is ideal for installing a foundation.
There are elements that are specifically made for installing low tide. They have the shape of a trapezium with a beveled face. Rear angle - straight, which allows such an element to fit tightly as a wall and to the foundation, and this saves a solution. The latter is a conventional sand and cement mixture in the ratio of 1: 1. Sand for this is better to use not river, but a career. It is greater than clay content, which is better for brickwork.
Procedure for work:
- At the first stage, as in conventional brickwork, the angular sectors are laid out. You need to be very attentive. If there are no ready-made angular elements. They will have to cut from ordinary.
- Then the signal thread is tensioned between the laid out angles, which will be installed all other bricks.
Production of direct stations of steel low

The standard tide from galvanized steel is made from a wide band. It consists of three planes:
- The upper plane serves to mount the mounted on the wall.
- The middle plane (it is the widest) is the very tumper by which the water should be drained.
- The bottom plane is parallel to the top. Often it makes the rib rider, which enhances the entire design. Over the edge of the rigidity of the tide can be attached to the side surface of the foundation through the brackets.

Although, now in any tin workshop, you can order a repayment of any configuration, if you wish it, it is quite bye forces to do yourself:
- First of all, it is necessary to cut the metal on the strip. Usually galvanized sold in sheets of 2m x 1m. Accordingly, for a smaller cut, with a string, it is necessary to determine as accurately as possible with the width of each strip.
- The width of the upper and lower shelves (planes) is at least 20 mm. Otherwise, the upper shelf will be uncomfortable to mount against the wall. If the bottom shelf is enhanced by the rigid rib, then another 10-12 mm should be added to the hoist width.
- The width of the average shelf is determined by the width of the cornice. Calculating the bandwidth, you can start the marking of the sheet. If it is possible, you should ask for metal vendors to cut sheets on the strips of a certain width. They, as a rule, have special guillotines on which it is very simple and fast. For self-sinking metal, you can use scissors for metal or a grinder with a thin cutting disc.
- Cutting a galvanized sheet on the bands of the desired width, you can begin to bend. It is done very simple. The band is laid on a solid angular surface (steel corner will suit the most) and light tapping hammer strifting in the right direction. In the manufacture of ties, it is necessary to ensure that the shelves of each of them are the same in width and corner of the bend. Otherwise, to dock them and secure will be very difficult.
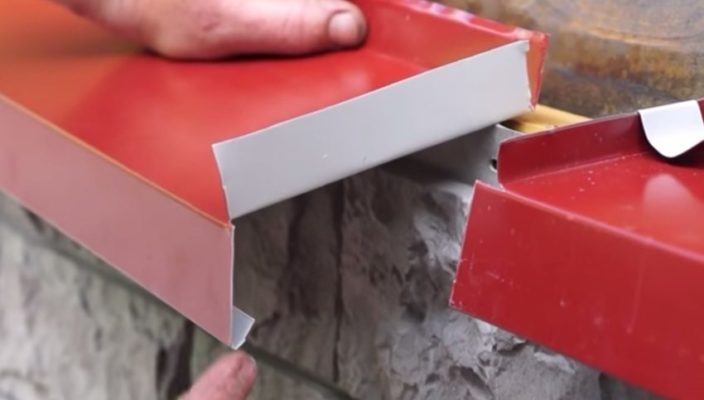
How to install fountains

The manufacture and fastening of the angular elements is different: exterior and internal.
External angle can be made in several ways:
- Of the two straight ties. To do this, take two straight lines. The end of the first of them is cut at an angle of 45 °. The second tide is similarly cut under the same angle, only with a switch of 10-20 mm. When sending elements, the allowance remains inside the compound. Thanks to him, two elements are attached to each other with rivets.
- From one straight line. This is a simpler way. One straight cast is taken. In its middle there is an angle of 90 °. In this case, the top of the angle should be on the lower shelf, and on one of the sides there must be a battery of up to 20 mm. After that, the tump is cut along the markup lines. The lower shelf does not cut. Next, the part is bended so that there is a straight angle between its parts, and the allowance turned out to be the bottom of the junction. Two parts are connected by rivets or soldering.
- With a decorative plank. The angle is made by two above methods, only a decorative strap is installed above the joint, which covers it. It is attached to those with samphs or rivets.
Internal angles are made in the same ways as external. The only difference is that the top of the corner is located on the upper shelf, which remains the whole, and the lower and the average will be cut.
Installation of metal tips on the base with their own hands

When all elements are ready, you can begin to install it. For this, you will need the following tools and materials:
- Perforator.
- Screwdriver.
- Dowels with stainless steel nails for fastening molding to the wall.
- Mounting foam.
- Sealant for external work. The material for internal works will not suit, as it will not be able to withstand the effect of temperature and high humidity. In winter, the surface of the steel can heat up to the positive temperature in the sun, and then sharply cooled. Because of such oscillations, the sealant just cracks and crumbling.

Procedure for work:
- The first thing is to install the corners of the tips of the base. Corner elements are attached in the corners of the building with the help of self-tapping screws. In the upper shelf, openings with a diameter of 5-6 mm. Through them, with the help of a perforator in the wall, the same hole is drilled. A dowel is installed in it, which screws up the self-sufficiency. Mounting is made in increasing no more than 400 mm for direct elements and no more than 150 mm for angular.
- If there is emptiness between the foundation and the bottom of the lowland, it must be filled. Otherwise, the moisture should be accumulated under it. You can do this in two ways:
- styling of discovery from cement mortar;
- filling out the emptiness by mounting foam.

The second way is much simpler, however, it should be remembered that after attaching the molding on it it is necessary to install the cargo every 500 mm. The fact is that, cooling, foam begins to expand and can spoil steel parts by leaving them.
After the installation of the angular elements is completed, you might think about how to consolidate direct fonts for the foundation. They are installed with a mustache with a tolerance of 10-20 mm. The joint of two elements is necessarily processed by a sealant.
If the walls of the house are planned to be fermented with a ventilated facade, then setting is necessary before the installation of the facade. They are attached directly to the guide profiles, and then the location of the connection is closed with facing material.


If you already demolish at home in the country area, it is better to make it the hands of professionals - to remove responsibility for possible damage to neighbors, dust and export and utilization of garbage. Contact cottage comfort plus
https: //xn--80ahqp0afz7a3a.xn--p1ai/demontazh-i-snos/snos-domov-na-uchastkax-moskovskoj-oblasti/