During each repair of the apartment, one of the main tasks is the restoration or installation of the ceiling. The most accurate look can be given with the help of suspended structures. Such ceilings will help to hide even the coolest surface defects, carefully "hide" wires. Suspended structures can be easily dismantled and rebuilt on your taste. They perfectly fit into the design of any room. Next, we consider it more, how to make suspended ceilings.
Content
Where to start making a suspended ceiling

Before making a suspended ceiling, it should be determined to determine its design features, as well as with what material it will decor.
Depending on the material used for the lining of the suspended structure, the ceilings are divided into:
- Plasterboard.
- Stretch canvas.
- Rack.
- Panel.
Whatever material is used for the finishing decor, the technology of mounting the suspended structures is one, and consists of the following steps:
- Design work. At this stage are determined with the design of the future ceiling. Here it is necessary to take into account the features of the room in which the repair is carried out. For example, if it is a kitchen or bathroom, then the facing material must have waterproof. If the room has a small area, then the carcass of the suspended ceiling cannot be done too massive, and, on the contrary, in large rooms you can mount a two-level volumetric ceiling.
- Drawing up estimates of repair and purchase of basic materials. Based on the features of the future suspension design, the purchase of materials and components of the ceiling is carried out. If not light panels or rails are selected, and bulky drywall sheets are chosen, then they should also take care of how the delivery of the material will be carried out.
- Direct mounting suspension design. About this stage, we will tell you more on further in the article on the example of the installation of plasterboard ceilings.
Advantages and disadvantages of suspended ceilings
Most often, when installing suspended structures, it is preferred by plasterboard ceilings. They have a number of benefits:
- Like any other suspended structures, plasterboard ceilings allow you to hide any irregularities and defects of the base surface. In the carcass niche, you can "hide" wires and pipes.
- In the suspended ceiling, you can equip any type of lighting. Wiring in the suspended ceiling with your own hands is mounted very simple.
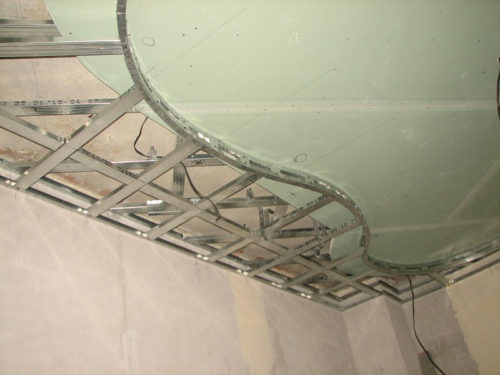
- Suspended structures can be mounted both in one and two levels. They are easy to give a beautiful design and unusual shape.
- Suspended structures have good heat and sound insulation properties.
Disadvantages of suspended ceilings:
- Such structures are quite cumbersome, so they can not be mounted in small rooms.
- For mounting suspended ceilings, you will need to have certain knowledge and skills. Perform these work on your own will be quite difficult.
- In order for the installation to go through all the rules, specialized tools should be purchased - perforator, screwdriver, laser level, etc.
How do suspended ceilings
Consider how the installation of suspended structures is carried out on the example of gypsum ceilings. It should be said that it is possible to mount the suspended ceiling with your own hands along the same technique.
Tools and Materials for Suspended Ceiling
For mounting the ceiling, some tools and materials will be required:
- Ceiling and guide profiles.
- Fasteners (suspensions and "crabs").
- Scissors, roulette, hammer.
- Self-stick tape (seal).
- Wedges, dowel-nails, selflessness.
- Building level.
- Plasterboard.
- Perforator.
- Screwdriver.
- Primer mixture.
- Putty.
Ceiling markup to install the frame
The mounting of the suspended ceiling begins with the marking of the walls and the surface of the draft ceiling under the installation of profiles. It is necessary to do it very carefully, as the quality of the entire design depends on the level of installation of the frame. Fix errors later will be very difficult and expensive.
Procedure for work:
- The ceiling markup begins from the lowest corner of the room. It can be determined very simple. Roulette is measured height from the ceiling for the floor in each of the corners, and the lowest site is selected.
- After that, it is necessary to determine the height of the lowering of the ceiling. It depends on what equipment will be hidden under it. These can be point lamps, ventilation aircraft and other communications. As a rule, it ranges from 50 to 80 mm. At a given distance from the draft ceiling, a label is applied at the lowest corner using a marker. From it, with the help of the level, the same marks on the walls around the perimeter of the room are set.
- The next stage of the label is connected by lines using a painting cord. This line will be a guideline for installing a water profile.
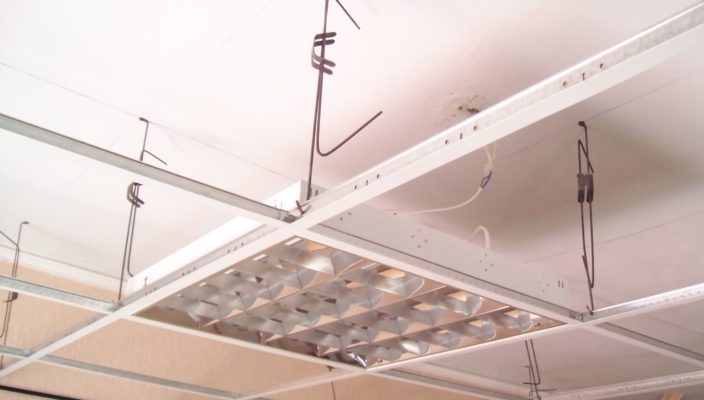
- On the draft ceiling it is necessary to place the lines for which ceiling suspensions will be installed. Lines must coincide with the places of the transverse profile. The suspensions are mounted in a step of no more than 0.5 meters. If the profiles are shrinkable, the suspension is mandatory installed in the place of docking.
- Installing the docking profiles is necessary if the width of the room is more than 2500 mm. The fact is that the standard sheet of ceiling plasterboard has just such a length. If the room is wider, you will have to install 2 sheets. The bog of plasterboard should not "hang in the air." That is why the installation of the docking profiles is mandatory. They are also attached to the draft ceiling, it should be taken into account when laying the suspensions. Each of them is attached with two anchors. Note the drilling points by attaching the ceiling.
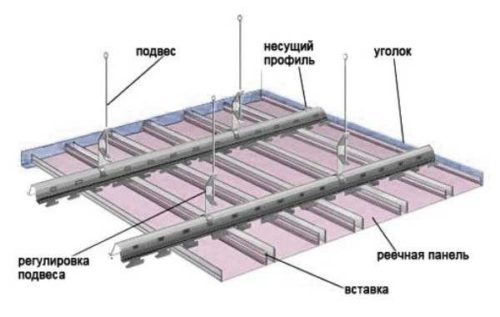
Installing a frame for suspended ceiling
At this stage, installation work is carried out in the following sequence:
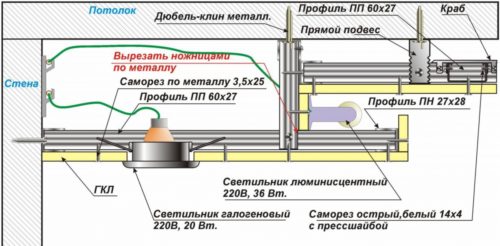
- Start the mounting frame of the suspended ceiling from the installation of the bypass profile. This uses UD profile. It is installed around the perimeter of the room on the wall. It was for this that the line was drawn. The profile is fastened with fast-mounting dowels with a size of 6x40 mm. It consists of two parts: dowel and nail.
- The profile is applied to the wall along the line, with a drill or perforator, the hole of the corresponding diameter is drilled, into which the dowel is inserted. Then the nail is clogged inward or screwed. Installing the waterproof profile is necessary very carefully, as it will determine the fatality of the entire ceiling. These profiles have a length of 3 and 4 meters. They are joined among themselves. The junction place is attached to an additional dowel.
- After that the suspensions are attached to the ceiling. Here you have to work hard. If the length of the room is 5 meters, then it will be necessary to set 9 profiles, for each of them - at least 5 suspensions, for fastening which it is necessary to drill in the ceiling 2 holes. Total: 50 holes in the ceiling. It is worth saying that this stage should be done on your own - e is too simple.
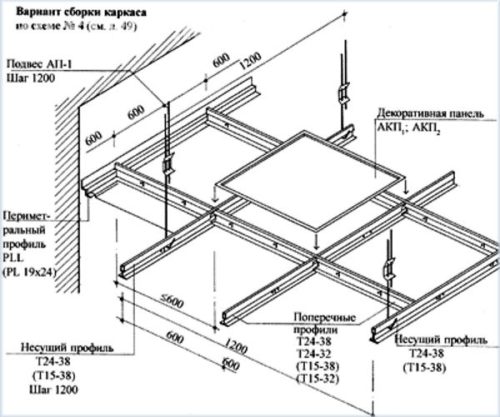
- When the bypass profile is installed around the perimeter, and the suspensions are placed on the ceiling, you can begin to mount the transverse profiles on which all plasterboard will be kept. With their ends, they will be inserted into the waterproof and attached by special self-drawing. The step of the transverse profile set is 600 mm. The fact is that the width of the standard sheet of ceiling plasterboard is 1200 mm. In this case, each sheet 3 will lie on the profiles. Tags for the installation of profiles can be applied with a marker.
- Next, the transverse profiles (lags) are mounted. Fasten them to the bypass profile with the help of small screws (they are also called seeds) by 2-3 for each point of attachment. The field of this profile is attached to the suspension. Here it is necessary to check its flatness in terms of level. This work is better to perform together. One person holds the profile with the help of a level, and the second fastens it to the suspension.
- The docking of profiles is carried out with the help of special "crabs". This frame design is suitable for a single-level ceiling. In the multi-level ceilings, the installation of the frame is made much more complicated.
Installation of plasterboard sheets ceiling
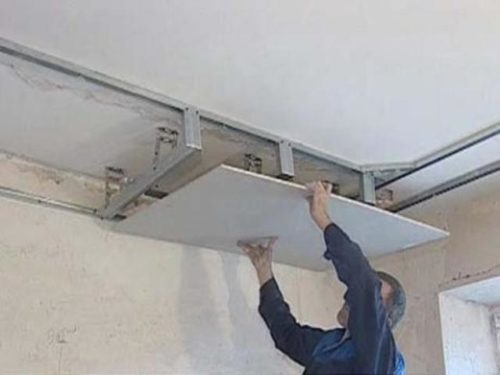
To install the suspended ceiling, ceiling plasterboard is used. In comparison with the wall sheets, it has a smaller thickness, and, accordingly, the weight. Before installation, the material should be searched indoors at least two days. Storage sheets of material only in a horizontal position. Otherwise, it can lose the shape or burst.
The sheet is fastened to profiles with special self-draws with a step of no more than 200 mm. Hats fasteners should be recessed inside the sheet. If it is difficult to check this visually, you can make a touch. However, it is impossible to screw the screws too deep. Plasterboard can simply crack in this place.
Before installing sheets, you need to take chamders from the top and bottom ends. From the side of the sides, they already have. They are needed for putting the putty deeper into the junction. The sheets should not be allowed to be shy, between them should be a gap of about 2-3 mm. Mixed plasterboard is attached not only to transverse profiles, but also to the wound guide.
It should be remembered that the sheet is attached not only around the perimeter, but also in the central axis. For convenience on many plasterboard models in the middle of the sheet, tags are applied to install self-tapping screws.
FINISH FINISH OF THE SUPPORT
After the sheets are installed, the ceiling already has a practically final look. Now it needs to be progressing, sprinkle and paint. The painting ribbon is pasted on all joints. Then the entire surface is well ground and put off. If everything is done correctly and the ceiling turned out to be smooth, then only one layer of finishing putty is applied, if there are big flaws, they are corrected using a starting solution. As soon as the putty is over, the ceiling is rubbed, removing small irregularities, they are ground and painted with water-emulsion paint.


