The kitchen and the bathroom is a high humidity zone. When water evaporates, it rises to the ceiling and settles on it in the form of small droplets (condensate). The main burden in such rooms with high humidity falls on the ceilings. Excellent solution - installation of a rack ceiling in the bathroom. The material is not afraid of moisture, care for him is very simple, and the installation, if desired, can master each.
Content
Before proceeding directly to the installation of the cutting ceiling in the bathroom, let's learn its strengths and weaknesses. And to begin with, we find out that such materials for finishing the premises with high humidity first appeared in the Russian market in the 90s, just when most people began to do in their housing "Eurorepair".
Materials for mounting the ceilings were supplied to Russian markets from Germany, therefore, like any novelty, they were not available for many Russians. Anyway, the high cost of building material did not interfere with people to install similar designs in the bathroom and the kitchen, since high cost and beautiful appearance justified these costs.
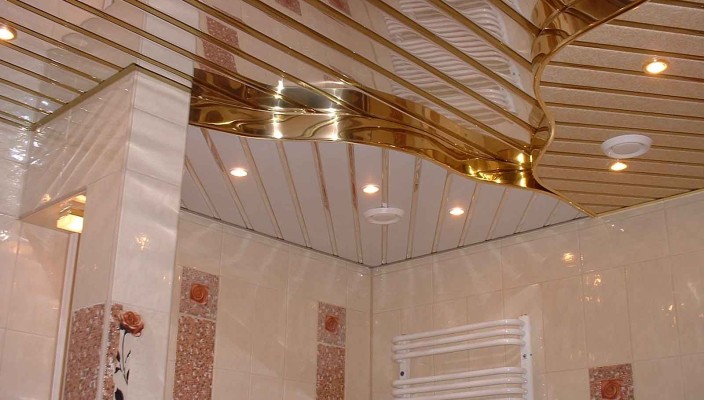
Currently, in building supermarkets, you can meet several types of plates: these are traditional white rails, as well as matte and mirror designs. With the help of beautiful ceilings, even the most courageous design ideas can be realized in reality.

The main advantages of the cutting ceiling:
- if you choose an aluminum cutting ceiling to install in the bathroom, then it will serve for a long time. Such a material is not afraid of moisture, makes temperature fluctuations and moisture drops. Install the ceiling is allowed in the toilet, bathroom and in the kitchen;
- the ceiling is a suspension design, with its help you can make the ceilings perfectly smooth without significant labor costs;
- protection of rooms from high humidity, spread of mold and fungus;
- the simplicity of the cutting ceiling allows you to choose this finishing material even to those people who have never engaged in mounting suspended structures;
- pre-prepare the surface is not necessary;
- easy to care - the ceiling easily wipes slightly damp cloth;
- a large selection of color colors;
- repels dust and dirt;
- the service life is 20 years;
- suspended aluminum design is harmless material. Such ceilings can be installed in residential rooms;
- rush ceilings look presented, and if you choose the tone of the finishing material with a shade of walls and furniture, then the room will look more advantageous.
From the minuses of the ceilings, only two can be distinguished - this is the cost of materials and the fact that the installation of the cutting ceiling in the bathroom will require a certain skill and the presence of additional devices (for example, the retractable staircase).
What is this finishing material
The ceiling can be made of steel and aluminum. This is a profile with teeth, located at the same distance for which the rails for the ceiling are fixed. For each rail (its kind) there is its traverse. So that when installing the ceiling, the gaps, traverses and rails are preferably purchased in one place and one company.
After you have determined with the type of ceiling and its tint, you need to know how much finishing material needs to be bought.
Thip quantity by such a technique:
- Construction tape measure Measure the room. We learn the length of the profile (P-shaped). It is fixed on the wall and will allow you to perform the most accurately as possible.
- Case length (general) carrier comb or stringer. To do this, we need to mark the markup on the ceiling perpendicular to the location (so far only intuitively) future panels.
- Thip the area of \u200b\u200bthe room and we obtain an approximate number of materials for the ceiling coating.
It remains to go to the building supermarket to purchase everything you need, and also do not forget to prepare tools.
When installing a roll ceiling in the bathroom with your own hands we will need such materials and tools:
- set of a rush ceiling with profiles, panels, stringers;
- suspension elements;
- perforator;
- electric drill;
- screwdriver or screwdriver;
- flomaster;
- roulette;
- level;
- metal scissors;
- ordinary scissors;
- pliers;
- dowel;
- self-tapping screw;
- folding staircase for construction work.
Depending on the fastening method, the ceilings can be different types. Consider the embodiments of the structures:
- Closed mount. During the rails, the rails are attached closely, therefore there is no space between them. As a result, it turns out perfectly even and beautiful ceiling, resembling PVC panels or lining.
- An open method - between the panels there is a small gap, which is closed by a plinth (width of no more than 1.5 cm). This embodiment is not suitable for small rooms, since the gaps are very noticeable.
- There is another interesting option to fasten the rivers in the open way - to close the space between the stripes can be aluminum stripes, then the ceiling will look beautiful. This option allows combining various materials and unusually arrange a room. Inserts from other material will help to visually lengthen the room in the right direction.

The rails themselves differ in size, width and thickness:
- Size is 3 or 4 meters. If this option does not suit you, it is necessary to order a service on cutting ceiling on a special machine (you can cut a rake on your own with a grinder).
- The width of the finishing material varies from 9 to 20 cm. Most often, buyers choose the rails with a width of 10 cm.
- In the thickness of ceiling rails, you can choose different, but only if the design will be collected from very thin rails, then where is the warranty that the ceiling will be reliable? The optimal option is width - 0.5 mm.
If there is a need, you can change the tint of the ceiling, only to paint it is allowed only 1 time. To achieve the effect of the mirror, you must purchase a chrome ceiling.
And more important advice, pay attention to the factory packaging, each ceiling rail must be protected by a film.
Rack ceiling in the bathroom do it yourself
Installation of the ceiling in the bathroom, in the kitchen or in the toilet begins only after all other finishing works in this room are completed. The ceiling installation is the so-called final chord in the room decoration.
A responsible moment from which the result of your work depends on 90% is the markup. On the ceiling, you need to make a markup correctly to fix the profile.

How to perform markup on the ceiling for mounting the rails:
- we plan a marker with the help level of the perimeter of the room. If you have a horizontal ceiling, then you need to decide on the installation height. For multi-level ceilings, complex markings are needed and additional calculations;
- from the distance (the top edge of the wall) will depend on the filling of the space between the ceiling and the suspended ceiling design. If nothing will be placed in this niche, then you can lift the ceiling at the maximum. It is enough to leave a small gap within 5 cm. If you plan to install lighting or ventilation, then you need to highlight more space. Just keep in mind that in standard apartment buildings, the height of the ceilings is the same everywhere - 2.5 m and a lot of "pick up" for the installation of the rush ceiling is not necessary, since the room will seem small, and the ceiling "put pressure";
- now you need to mark the markup for the fastening of the stringers. The lines between the side walls and markup should be strictly parallel and perpendicular to the direction to the end wall and panels.
How to install a cutting ceiling in the bathroom
The first step in installing the design is the installation of the guides. All over the perimeter of the room, you must install the guide bands. To do this, on a predetermined markup "omit" our future ceiling by 15, a maximum of 20 cm (it depends on the communication space-based space). To fulfill everything correctly, it is desirable to use a laser construction level in the work. We need to spend a flat horizontal line to attach a guide profile.
Standard profile length - 3 m, if necessary, it can be shortened if you use metal scissors.

Now you need to attach a profile to the wall (so that it is more convenient to work, become on a stool or use the folding staircase). It is necessary to drill with the help of an electrician hole and insert a screw along with a dowel. Thus, you need to attach a profile throughout the perimeter of the bathroom. Step between fasteners - 5 cm.
In the corners, the profile is connected so that the edge of one fastener enter the hole of the other. After completing the installation of the guides, it is necessary to make sure that it all coincides and there is no distortion. After that, you can install the suspensions, but first perform measurements for their attachment with the observance of the distance (sufficient step 1 m). We plan on the ceiling place of fastening and fix the stringers straight to the ceiling.
The hardest part of the work is already behind, now we need to learn how to make a cutting ceiling in the bathroom.
Next, our actions are as follows:
- take the first rake and insert it into the profile that is already fixed on the wall until it clicks, it means that she got up to her place;
- we snatch the rail with the help of guides;
- by the same principle, we mount all other rails.

Do not forget before installing each strip on the ceiling, remove the protective film.
Thus, gradually "recruit" the ceiling to the last panel. If you want it to look beautiful, then you need to insert the mirror planks. Then, when installing the plates, it is necessary to alternate the panel - first 1 main rail is mounted, then a narrow mirror (standard width 2 m) and so on.
If you plan to install lamps in the bathroom, then at the first stage - markup, it is necessary to determine the location of the lighting equipment and drill in advance with the help of a grinder in the rail of the holes of the desired diameter. During the installation of the ceiling, start working from one edge of the wall, as soon as you come to the installation of the rail with a hole for a luminaire, you can start the installation of the rails from the opposite side. And at the end of the installation of lamps and secure the strips on the ceiling.
Marking the design is easier together for one person to support the rail, and the other sent and inserted it into the grooves. More collaboration will help to perform work faster and better, since the rails are easy to scratch when installed.

Useful advice
To make the result of the work pleased you, you need to follow these recommendations:
- Call the direction of lines that are formed at the panel's junction. They are located from the window (when mounting the ceiling in the kitchen) or from the entrance to the opposite wall.
- If they are crosslinked, then you can visually change the proportions of the narrow room.
- If your bathroom square sizes, then they will look good on the ceiling of the band diagonally.
- If your room is spacious, then the panel will need to be connected (splitting with each other). Then, when buying a necessary set of components, do not forget to purchase intermediate liners so that the place of the junction was almost inconspicuous.
- When installing the design, you can immediately install point lamps, for this, drill in advance in the rail of the holes of the desired diameter.
- If you need to crop panels, it is better to operate an angular grinder, and you can cut a hole for a point lamp using a cutter.
- Display the wires to connect the lighting equipment at once as soon as you install the strip. Leave the wires with a reserve so that there are no problems when connected. Connect the luminaires after installation.
- If you want to perform the installation of the ceiling diagonally, then the suspended structures should be diagonally.
Your room will be transformed if you personally carry out the installation of a rush ceiling. Such structures are easy to install, they do not absorb moisture, easily wash and serve you for many years.
How to install a cutting ceiling in the bathroom, watch the video:


