Many daches who are enthusiastic with the improvement of their own territory seek to in every way to improve the plot near the house, make it beautiful and original. For this, there is a whole separate segment of the "dacha market" with a wide range of decorative figures, figurines, fountains and other products. But one of the most spectacular always remains a decorative mill. It is capable of instantly transforming any plot, and make such a design with their own hands, if desired, will not be much difficult. In this article we will talk about how to make a decorative mill.
Content
Why do you need a decorative mill?
The desire to improve the countryside sometimes pushes their owners to completely unusual ideas. Those times have long passed when the territory around the house was occupied by smooth rows of beds, an empty lawn or planting of fruit trees. Today, more and more people use the cottage as a place to relax with the whole family, friendly sites with friends or as a creative workshop.
A wooden decorative mill can serve as a good addition to the uncomplicated landscape design in a rustic style. As a "support" you can also arrange a well or a well under ancient, put the funny figures of the gnomes or animals. Only a few elements, and the site will find its own "mood." But first of all it is necessary to create the center of the composition - a decorative mill.

Its initially, it is the decoration of the nuclear area, but in some cases the mill can be a functional structure. For example, in the form of a decorative mill, you can arrange a toilet on the street, a small barn or entrance to the cellar. If there are small children in the family, you can make a house for games from the mill. Many in the territory of the cottage constantly live guard dogs, and only imagine how they will unusually look at their booths in the form of small neat mills ...
In addition, with the help of this simple design, it is possible to disguise outside engineering communications or other unsightly elements, for example, a hatch from the septica, a tap for watering the garden or a ventilation pipe from the cellar.
The manufacture of a decorative mill does not require large financial investments, and maybe they can do at all for free if you have wood from construction, a little fasteners, varnish and paints.
Continuing the topic of the practicality of the "fake" mills, you can make them more ambitious and arrange inside a gazebo, summer kitchen or dining room. But such a decision is suitable for large sites, otherwise the mill will look like too cumbersome.

As for small structures, they are able to benefit, albeit not so tangible. For example, if you equip the mill with drawers, then there can be flower beds with different varieties of plants. And if there is its own reservoir on the site, the mill will become the perfect addition to it and the place for storing fishing rods, seaches for cleaning water and other tools.

Making a decorative mill
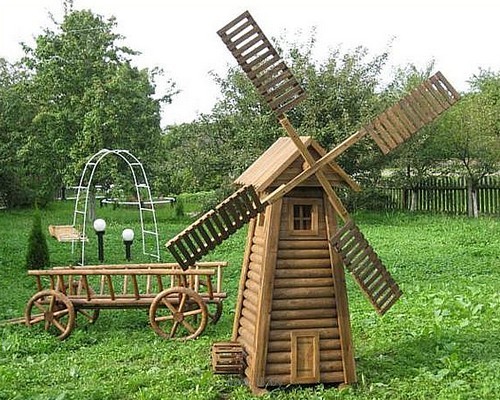
If you look at the mill, then you can see three main parts: the support platform, the housing (trunk) and the wings (blades). Each of them must be collected separately and only then connects into a single design.
Support platform
You need to start from the bottom - platform. It should be very durable and stable to be able to withstand the load of the whole design. The size of the platform is directly dependent on the height of the future mill - the higher it is, the wider the base.
For the manufacture of the platform, the board is suitable for a minimum width of 15 cm and a thickness from 2 cm. Ideally use facing lining. For massive structures, such as arbors or sheds in the form of a mill, it will be necessary to pour a full lightweight foundation (monolithic, columnar or ribbonally small-breed).
We offer to consider the phased construction of a decorative mill on an example of a small wooden design for the garden decorating a height of no more than 2 m. For it, there is enough square platform with a side of 60 cm.

During the installation, make sure that the platform does not shift. To do this, use the boards of identical length and constantly check the sizes with a roulette.
Very important stage of construction - waterproofing. If we put a wooden platform on the grass or blue earth, it will very quickly start rotting and collapsed. Here you can go in two ways: make a stationary construction installed on an improvised foundation, or portable with four low legs. In the second case, the mill can be found in the house during the rain and in the winter, thereby maintaining its original appearance longer.
If you still decided to make a stationary mill, make a markup in the selected place in accordance with the size of the platform, remove the fertile layer of the soil (from 15 to 30 cm), pour on the bottom of the 5 cm of the sand layer, 5 cm layer of rubbank, see the resulting drainage pillow. On top of it, the bed of rolled waterproofing (the cheapest regteroid is suitable or the usual polyethylene film with a thickness of 200 microns). Now you can safely put the mill.
In any case, the wooden platform must be treated with antiseptics to prevent the material from rotting, as well as to cover the weatherproof varnish or paint.
The legs for the base can be made of PVC pipes that are commonly used to lay the water supply. You need to take three pipes of the same length (about 20 cm), 4 bars with such a section so that you can log in to the pipes. Insert the bars in the pipe and secure them with self-draws there.

Use self-tapping screws or nails to fasten the platform boards. As a result, after connecting the pipe-legs, you should have something like stools.
Useful advice: Drill several holes in the platform in the platform so that the water does not delay the surface during the rain, and flowed down.
Mill housing
For the manufacture of a decorative mill body, take 4 wooden bars with a square cross section of 40 mm and 4 bars for the upper part with a smaller cross section, for example, 25 mm. Collect first bars thoroughly in the form of a pyramid, cover with self-drawing, and then do the same with thin elements. As a result, the "body" of the mill should be turned out. Watch it to be strictly vertical. You can check it with the help level.

In the housing of the mill you can make improvised windows, a door or even a small balcony, in which the flowers can then be placed.
Attach the pyramid to the support platform using bolts with nuts. So if necessary, you can quickly disassemble the design for storing in the winter.

To give the case completed, it needs to make a roof. It will look like a cap of two wooden parts in the form of an equally chained triangles of 30x30x35 cm. At the top of them will be combined with wooden bars with a length of 60 cm, and in the base area - three broad boards.

To increase the stability of the design, attach the vertical axis to the roof and frame, pressed in two bearings. Thus, the roof will be able to rotate freely under the influence of wind.
To make the axis, you will need a metal rod. To do this, you can use a stud 14 mm in diameter and 1.5 m long.
How to attach the axis:
- Put the metal rod so that it entered the central part of the roof base and left the bottom of the frame.
- Secure the axis from both ends with nuts with washers.
- Take a second stilette with a length of 40 cm and attach a little higher than the middle of the vertical rod using a bolt with a nut.
- Swipe this axis through the boards with bearings and screw the nuts. Bearings mount in the center of the boards with the help of tie bolts. They will pass through the board and pull the opening for the bearing.
- Boards attach to the roof of the roof with a rib and spire in its form.
As a result, the axis will pour the roof through, passing in parallel to its skate.
Wings mill
It remains to make the last part of the decorative mill - the steering wheel and wings that will rotate under the influence of the wind. For the manufacture of sail, you will need 4 boards in the form of trapezoids that will be connected by small bars. In the center you should install the mounting axis.
Trapezoid boards can be painted with acrylic or enamel, open lacquer or climb galvanized sheet metal, attaching it from the back of the propeller.

To create blades, take the 50x20 mm boards, 1.5 m long. It should not be longer to do that the wings do not get too heavy. Fold them in the shape of the cross, cut out at the point of intersection of the groove and torn the bolts. Thus, each blade will be almost 75 cm long.
To each blade, bring wooden boards so that they resemble a trapezoid. Attach the horizontal axis to the propeller on the instructions described above and cut the excess part of the stud after installation. Otherwise, it will be too long and blade can disrupt the balance of the design.

How to make a decorative mill with your own hands (alternative):
Finish mill
The sheathing of the decorative mill is the most exciting and creative part of the work. In our case, it uses wooden lining for this. After fixing the boards in a vertical position, you can cut out miniature windows and doors.
As for the roof, it can also be lifted with clapboard, but it is better to do it with galvanized hardware so that the rain could not harm the design.
For decorative milling mills, you can use paints, transparent or tinted varnishes, mosaic or any other materials that will tell you a fantasy. If you want to keep the natural wood texture, cover the surface with a transparent varnish.
Useful advice: Choose an atmospheric-resistant varnish on an alkyd basis. The PF-170 or yacht varnish is best suited.
With the help of the veil, it is possible to make wood tone with darker, implacing noble breeds. So, from ordinary pine or beech can make a cherry, oak, nut or ash. With each stratified layer, the surface will become darker.

Another interesting and easy way to decorate the mill - to attach carved platbands. They can be ordered in a carpentry workshop, buy in a construction store or make it yourself if you are interested in carving. The functions of the platbands can be taken over ordinary moldings, and if you paint them into contrasting colors, the decor will look even more effectively. For example, a dark brown hull with yellow moldings.
Finally, the most win-win version of the decorative design of the garden mill is to install the backlight. Place inside LED lanterns so that in the evening they created additional lighting. If there are small windows in the case, let down the lanterns right behind them. If there are no windows, swipe the LED ribbon around the perimeter of the roof or convey it the tower itself. In any case, the backlight will look very beautiful.
To favorably designate the mill on the plot, break the flower garden around it. Just do not put too high varieties so that the design "is not lost" in the thickets. The ideal option will be sharpening soil crops.

Finally, several useful tips to help you make an ideal decorative garden mill:
- Of all the breeds for making a design, pine is best suited - it is easy to process, it is inexpensive and it has a beautiful texture.
- To be confident in the successful outcome of the case, make the drawings of the decorative mill and each element separately. This will help streamline work and verify the result obtained with a drawing on paper.
- In mandatory, all wooden structural elements are processed by antiseptic composition and cover moisture-resistant varnish. Otherwise, very soon the mill will start rotting from the water, or unexpected residents will appear in it - wood beetles.
Decorative mills: photo
We have prepared a small photographic formation of interesting ideas for decorative mills. We hope that they will push you on creating their own original design.


