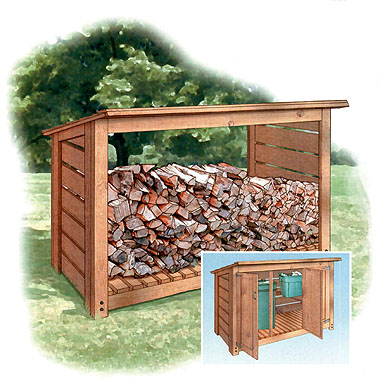
For each owner of the country house or cottage, it is very important that you can get a fire in the grill at any time, to flood the oven or fireplace. This is possible only with the presence of dry wood. And for this you need a canopy under firewood: walls and roofs will protect against rain and snow. In this article we will try to explain how to build a canopy for firewood with their own hands.
Content
Choose a place for the woodwood and building material
In many respects, this structure resembles a gazebo and may, under certain conditions, perform its functions. Consequently, the place for the woven, as well as the material for its construction, must be chosen according to the following rules.
- Preference should be given a hill: rain and thawed water will not accumulate there.
- It is better to choose the sunny side of the plot, in the open space. The sun and wind are the necessary conditions for the firewood always dry. Preferably a storm sewage device.
- Wood bars, logs, metal pipes, profiles, etc. Possible combination of these materials. Slate, metal tile, galvanized iron, various types of flexible reversible roof, cellular polycarbonate are used to cover the place of storage of firewoods from rain.
- In the case of placing a woven in a lowline, a ditch should be dug to drive the rainwater.
Preference when choosing materials for construction should be given metal (with processing tools): It serves longer than wood. Decor canopy if it also serves as a gazebo, you can use forged elements. Canopy for firewood (photo as an example is presented in the article) may look very attractive.

Phased description of the construction process
First you need to perform a project according to which the design will be collected. It should contain all major dimensions and important details, as well as methods for connecting components. It should be borne in mind that the design should be free to blow by the wind: this is necessary so that the wood can dry in a natural way.

Before talking about how to build a canopy for wood, you should list the tool and materials necessary for work.
Tools and materials
- The simplest design is made of wood. We will be required with a cross section of at least 50 × 50 mm with a design height of up to 2 m, if the height is greater - the section should also be greater.
- We need boards with a thickness of 30-40 mm.
- For fastening parts you need to stock up nails, self-draws, corners (for docking beams).
- To work with wood, you will need a hand-saw or an electrolovka, a drill with a set of drills, screwdrivers or a screwdriver, a hammer, a brush for staining.
- For wood processing, it will take an antiseptic agent.
- Shovels are needed for the construction of the base and device of drainage drangies.
Preparation of the site, creating a foundation
- On the ground is required to place the contour of the future wan. For this you need pegs and a caproic rope. Then it is necessary to free the construction site from the stumps, bushes, remove the turf.
- The foundation for the structure of this type should not be capital: the supports of the canopy can be simply lured into the ground. But in order for the wood to not suffer from mold, did not rotate and served several years, it must be treated with an antiseptic or burn in the fire to the state of the coagulation of the surface.
- With the help of a manual drill or bayonet shovel, it is necessary to prepare the wells with a depth of 0.7 - 0.8 m and pour on its bottom of the sand with a layer of 0.1.
- In the wells are installed bars that will play racks. After checking their position using a level or plumb (bars should be vertical), the wells fall asleep soil, which is compacted.
- The front racks must be higher than the rear: it is necessary to create a single-table roof.
Mounting carcass
After installing the racks, it is necessary to rigidly "connect" it so that the design is stable. This requires to install perpendicular and diagonal struts between the racks from three sides. One side must be open to middle access. The procedure for the following.
- We measure the distance between the racks in the direction of the installation of a diagonal strut and using a manual saw (electrol bison) we produce them from the bar of the same section that the racks. The length of the strut must be calculated in such a way that they can be attached to the "mortise" method.
- In the planned places, the racks make a pressure for installation of spacers. Fix the details with nails or self-drawing. For a better connection of all parts, waterproof glue can be used. Excess glue, awaiting after dense pressed parts connected, it is necessary to remove.
- In the lower and top of the design, we set the horizontal struts. They can be embedded in the rack or attached to them with the help of the corners. The distance to the Earth should be about 100 mm: the ventilation gap must be observed. The upper horizontal struts can serve as the base for the roof crate and fall on the supports from above.
- The side and rear walls can be covered with a hydrobarier or sew metal, boards. You can also use the reinforcing grid. This is necessary for the firewood to be conveniently stored and the lunite has stopped.

Assembling pallet
Firewood should not be stored on Earth, otherwise they will dance that lead to the spread of mold and fungi. It is necessary to create a firewood pad. To do this, in the lower horizontal struts, we make diagonal width 30 - 32 mm wide (2 mm - allowance). Distance between entered is 50-60 mm. In this guilt, insert the boards with a thickness of 30 mm (they must be parallel) after applying waterproof glue. At the edges of the board fixed with nails, scoring them at an angle. Such a design is able to withstand a large weight of the lunite.

When using boards, a thickness of 40 mm can be laid their plastics, but the gaps of about 20-30 mm wide should be provided. All wooden canopy parts must be covered with paint for outdoor work.
Roof device
The roof in this case is a simple, usually one-piece design. To do this, first mount the crate: on top of the bars of the upper strapping, the bars of smaller cross section (50 × 50 or 50 × 40 mm) at a distance of 0.5 m from each other. Now it is possible to lay roofing material. To do this, you can use: metal tile, slate, steel galvanized sheets, etc. Under the caps of nails and self-tapping screws that lock the roofing material, it is necessary to install gaskets from rubber or several layers of rubberoid.

In order to flow from the roof, the rainwater did not fall on the firewood, waterproof should be provided. They are fixed with the help of brackets from the bottom side of the roof and have at an angle of at least 5 degrees.
To your attention a video about how to make a canopy for firewood. Such a wrapping can be transported from place to place.
We collect a canopy for firewood
To build a woodwood from a metal, you can use pipes, chawllers, corners, rods. The design may be a similar canopy for firewood, built of wood, but the connection of parts is performed using welding.
To work, you will need such a tool:
- welding machine (electrical or gas);
- bulgarian;
- hoven for metal;
- hammer;
- electr service with a set of drills (for fastening the crate).
Vertical supports must be concreted: so they will preserve better in the soil. The metal wrapper will serve longer than wooden, but it must be protected from moisture using paint.


