
Among all building materials, modern plasterboard is favorably featured by the universality of use. With it, it is easy and quickly distinguished by the inner space of the room. It is often used by the hikington and as the main leveling material in the preparation of walls and overlap to finish with any decorative material. Often, use it as the main finishing coating. Immediately after the manufacture, the sheets of this type correspond to sufficiently high technical characteristics. In order to reduce these indicators during the installation and further operation, it is required to select the correct fastening technology and accurately follow all its items.
Content
What to choose the method of attaching plasterboard?

Today, several methods of attachment of plasterboard are developed:
- gluing;
- installation on the frame.
Important! To accurately determine exactly what option is more acceptable for your project, read carefully with the features of the job, existing options for mounting parts for drywall and a list of tools for each process.

Installation of plasterboard for glue
This solution will be the best option if you wish to quickly complete the finish process, especially when attaching drywall on the walls with minor deviations - up to 20-30 mm.

pros
- Necessary minimal professional skills.
- The maximum dense contact of the plasterboard sheets with the base.
- A small list of tools.
- As an additional result, good sound insulation from structural noise.
- Long operation period with the right choice of high-quality glue.

Minuses
- Preferably strong and reliable surface base.
- The lack of ability to create an additional soundproofing layer under plasterboard, the exception is a rather time-consuming procedure for mounting foam sheets.

Tools and materials
To perform all the work on fastening the plasterboard to the ceiling or walls, prepare the tools and consumables, focusing on the proposed list below:
- plasterboard sheets of suitable thickness;
- mounting glue, preferably on a plaster basis;
- perforator;
- capacity for the preparation of glue;
- self-tapping screw;
- screwdriver;
- spatulas of different widths;
- dowels;
- brush;
- plumb;
- level;
- construction cord.

Technology gluing
In order to ensure a reliable grip of drywall with the surface of the base, the ideal evenness of the decorated coating, and accordingly, continuous operation, perform sequentially in several steps.

Proceedings:
- Carefully clean the wall from the garbage, the previous decorative coating and fasteners, other types of dirt using for this a suitable spatula and brush.

- Wash the base to ensure complete removal of the dust.
- Wait for complete surface drying.

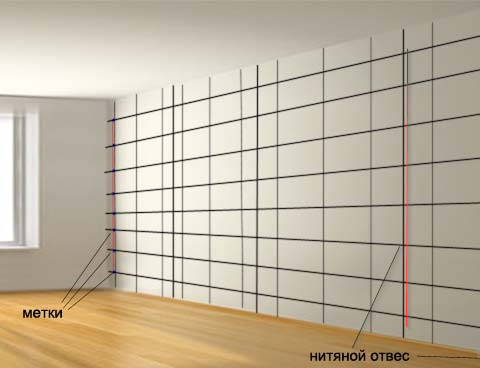
- Place the markup over the entire surface area with a plumb and level as follows:
- Determine the vertical, the distance between which corresponds to the width of the sheets.
- In the middle between two adjacent lines, as well as at a distance of 4-5 cm from them, and then drag additional circuits - they will be decisive for the location of the marks.
- Determine the horizontal lines, focusing on the necessary distance between the marks at 0.4-0.5 meters.

- In the corners of the base, drill holes for dowels and install them.
- Screw the screws so that they are 1 cm out from the wall.

- Check the vertical of between fasteners.
- Pull the cord.
- Screw along a vertical line at each corner screws.
- Pull the cord angles between the top and bottom screws.
- Create a series of screws on the horizontal lines.

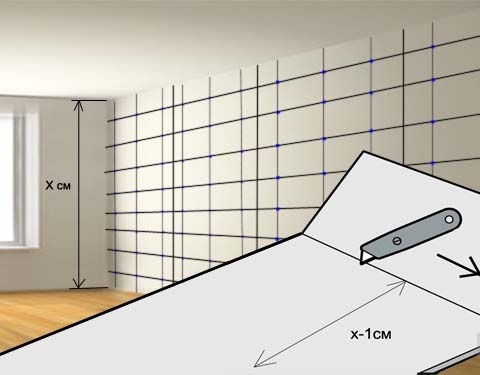
- Cut each sheet of drywall in length by 1 cm.
Important! Such a procedure will help to freely adjust the position of the material and facilitate the docking of the sheets.
- Prepare glue, precisely maintaining the proportions specified by the manufacturer.
- Apply the solution on small portions of sheets in places where they should contact the brand.
- Set gypsum board to the surface so as to mark and adhesive particles in contact.


Features drywall mounting frame
This method is also popular, though, and take a little more time and require large expenditures. Note that attachment of drywall to the profile - the only true solution when aligned walls with a large number of defects and deviations in respect of flatness.

What are the profiles set?
To create a frame for gypsum board is most often used are 2 types of profiles:
- wooden slats;
- metal finished products.

The advantages of using metal profiles
- operation durability;
- good rigidity which eliminates the deformation thereafter;
- excellent resistance to moisture when using galvanized steel profiles, or treated polymers;
- it allowed the use of walls and ceilings with a very large curvature without additional pre-correcting them;
- the ability to use any type of insulation material.

Disadvantages of the application of metal frame
- required large number of construction tools;
- relative laboriousness;
- a big degree of contamination when performing work;
- without the use of additional insulation materials as a layer between plasterboard and base, with mechanical exposure, it is quite deaf, but a loud sound.

Pluses of using wooden rails
- environmental purity of material of natural origin;
- excellent sound insulation indicators, without applying additional consumables.

Cons of the use of wooden frame
- the material requires careful pretreatment - planing to achieve the perfect evenness of all parts;
- a preliminary impregnation of wood with antibacterial drugs to protect against moisture to prevent the deformation is necessary.

Tools for mounting drywall on frame
To perform work on fastening profiles and drywall, prepare the following tools and consumables:
- level - wheels, laser or water;
- plumb;
- roulette;
- cord;
- pencil;
- metal profiles of suitable cross section and shapes;
- metal scissors;
- perforator;
- self-tapping screws; dowels;
- hammer;
- bulgarian;
- pliers;
- acute knife;
- plane;
- hacksaw;
- spatulas - big and small;
- grater or sandpaper with graininess in 100-150;
- capacities for the preparation of building mixtures.

Montaja technology
Before proceeding with work, keep in mind that most of the time when finishing the surfaces of the surfaces of drywall, preparatory processes are torn.

Sequencing:
- Determine the most protruding point on the surface with a cord and a plumb.
- Squeeze it down the plumb.
- Fix the point on the floor.
- Place the guide profile by checking the line accuracy using the level.
- Make the marking of vertical lines at a distance of 0.6-1 meters.
- Follow the horizontal lines, withsting the gaps in 1m.
- Install vertical angular racks.
- Mount the intermediate rack, checking the smooth location relative to the angular racks each using the level.
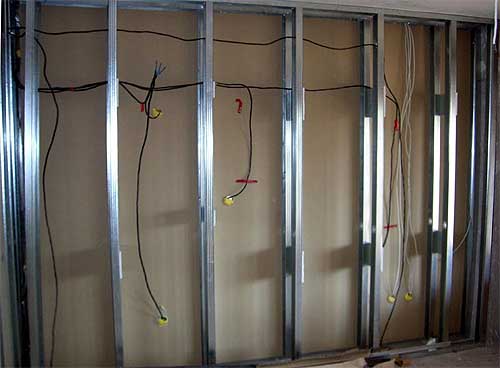
- Install the top guide.
- Determine the order of laying sheets.
- In those that will be in places location of sockets, drill holes in advance.
- Mount the plasterboard sheets successively, under each forming a lining of 0.8-1 cm.
- All sheets put tight to each other.
- Crepe with self-pressing in a step of 20-25 cm, making an indent from the edge of 10 cm.

- Slightly head the hats into the thickness of the plasterboard, approximately 1-2 mm.
- After fixing all sheets, remove the lining.
- Fill out this space sealant.
- Prepare a putty or primer deep penetration.
- Create a protective coating on top of the plasterboard.
- Before further operation, rain full drying of the solution.
Important! View a visual video example of mounting plasterboard on profiles.


Conclusion
No matter what kind of method has become more acceptable to you, be sure to stick to all features of the surface finishes by plasterboard. Only in this case, you really get the result in the form of high-quality coverage with a long service life.


